
You are using an out of date browser. It may not display this or other websites correctly.
You should upgrade or use an alternative browser.
You should upgrade or use an alternative browser.
Yaks airfix scorpion light tank in 1/76
- Thread starter yak face
- Start date
- Status
- Not open for further replies.
G
Guest
Guest
Scimitar and Scorpion pretty much differ only in the gun and mantlet, externally anyway. The later ones are usually seen with large stowage boxes on the sides of the turret, but there are photos of non-trials vehicles without them. I’m looking through Tanks Illustrated No. 22: Scorpion — The CVR(T) Range by Simon Dunstan (London: Arms & Armour Press, 1986; ISBN 0-85368-747-1) and in 13 pages of Scimitar pictures, none has the turret-side stowage boxes. In fact, the only photo in the whole book that shows them is on the front cover (funnily enough, a book titled Scorpion has a Scimitar on the frontYou are supposed to be able to build a scimitar too ( by changing the mantlet and gun barrel only ) but i think the one depicted is a prototype and bears little resemblance to any production machine ive seen
") ).
).
G
Guest
Guest
Nice work Tony!!
Excellent work mucker!
Ahl se thee....
Ahl se thee....
- Joined
- Apr 27, 2018
- Messages
- 15,039
1/3
Scimitar and Scorpion pretty much differ only in the gun and mantlet, externally anyway. The later ones are usually seen with large stowage boxes on the sides of the turret, but there are photos of non-trials vehicles without them. I’m looking through Tanks Illustrated No. 22: Scorpion — The CVR(T) Range by Simon Dunstan (London: Arms & Armour Press, 1986; ISBN 0-85368-747-1) and in 13 pages of Scimitar pictures, none has the turret-side stowage boxes. In fact, the only photo in the whole book that shows them is on the front cover (funnily enough, a book titled Scorpion has a Scimitar on the front :smiling3
Chieftan side bins were often fitted to scimitars and scorpions for extra storage.
G
Guest
Guest
The long Chieftain hull bins? Those went along the hull sides of CVR(T)s as well, not usually on the turret, to the best of my knowledge
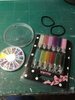
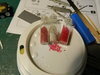
After consultation with my personal scorpion guru (papa695) ive decided to do the headlights underneath the front apron (?) i also want to depict the sidelights and indicators and to this end ill be using my trusty poundshop nail art stuff ! The little caviar balls will do perfectly for the side/ tail lights and indicators and the jewels will make nice sparkly headlights! Im also going to use sone holographic confetti on the viewing ports to give a nice glass effect . View attachment 326746
Attachments
Jeez mucker, just what is Helen going to do without her nail stuff - presuming it is hers.......  !
!
!No its all mine darling!:blow-kiss::blow-kiss:Jeez mucker, just what is Helen going to do without her nail stuff - presuming it is hers.......
G
Guest
Guest
It’s the bottom plate of the floatation screen. The lights were originally underneath it because the folded-up screen rested on top of it; once it had been done away with, the lamps could move up on top of it.the front apron (?)
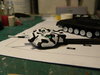
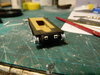
Bit more progress , ive given the white another coat and it looks tons better , thanks Ian for the info. Ive also been adding the viewing ports from my trusty stock of holographic confetti and made a start on making the indicators/sidelights , where i will be using the caviar balls. The headlight mounts have been made from drilled plastic card and fixed under the apron , theyre not exactly standard but then again looking at lots of pics of actual machines i must have seen at least half a dozen different types so im not worried! cheers tonyView attachment 327904View attachment 327905View attachment 327906View attachment 327907View attachment 327908View attachment 327909View attachment 327910View attachment 327911
Attachments
Steve you wouldnt believe the amount of eye shadow / eye liner / nail stuff ive got and regularly use , on the models of course cheers tonyCamos looking a lot better now Tony. Nice work on the coloured glass. Did you put some on your own nails while you were at it?:smiling5::smiling3:
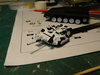
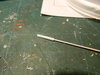
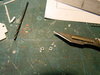
Ironic isnt it ? The recent cold weather had been preventing me from applying the rest of my arctic camo ! Anyway it warmed up enough yesterday to get in the shed. I finished applying the viewing ports and touched them up around the edges. The turret just needs aerials and the spotlight adding . The spotlight was a solid piece in the kit so i drilled it out and painted it with chrome paint
Well im calling this done . After a serious loss of mojo coupled with a lack of spare time has meant that ive not touched this for about four weeks. Ive added the sidelights and indicators and the finishing touches to the turret (aerials , spotlight and machine gun on the mantlet ), added the exhaust and painted the tools . Heres a couple of pics to finish this thread off and I'll try and get some proper ones done on a 'completed' thread tomorrow. Thanks to anyone whos been watching , cheers tony

- Status
- Not open for further replies.
Legal Notice
scalemodelling.co.uk is a privately operated online discussion forum. All content posted by members reflects their own views and opinions and does not necessarily represent those of the forum owners or administrators. While reasonable efforts are made to moderate content, no responsibility is accepted for user-generated material. By using this site, you agree to comply with UK law and the forum rules.