Theme editor

Scale Model Shop

Yaks MiG 21 Eduard 1/48 slovakian air force

Status
Not open for further replies.
Decals always make a model look more complete IMHO. Yours is looking really good Tony & I'm glad I've finally discovered what those green panels are!
 
Well im quite pleased with the result after taking off all the white tack and masking tape. Theres just a few tiny areas where the black has crept through gaps in the tape but they should be easily sorted. After that the next step is clear coat ,decals and weathering, then its onto the final stages such as undercarriage , jet exhaust and dielectric panels . Heres some pics and one of the pattern as shown on the instructions, cheers tony.

Well the shape is very familiar, but the camo' , that's totally different for me. Love it
 
Nice to see the decals on and make this look more like a Mig-21. The finish line is in sight Tony.
 
Looking good, I really need to make some time to get back to mine.
 
Thread owner
Panel line wash is on and its had a coat of matt varnish. Next isthe undercarriage and other fiddly bits then its almost there. Ive still got to assemble the five part turned brass pitot I got for it , thats going to be interesting!heres a picView attachment 272195
 

Attachments

  • DSCN2196 [Desktop Resolution].JPG
    DSCN2196 [Desktop Resolution].JPG
    2.4 KB · Views: 0
Thread owner
Almost there now, Ive got the undercarriage and doors on , added some tiny knocky off bits and got the stores attached. Ive also removed the temporary canopy (fitted to save masking the cockpit , handily theres two in the kit) and fitted the resin seat. Whie looking at pictures of the actual aircraft , and also the excellent box top art , I noticed the canopy glass has a orange/brown seal at the edges so once i had removed the masking decided to attempt this . I used a fine line brush that i got in a set from Poundland ,originally intended for nail art i think, and it worked great (I needed the magnifier and i held my breath till i went blue trying to keep my hand steady!) This being the weekend kit its missing some fairly prominent parts ( i already covered the U/C door linkages) and the Angle of Attack Vane on the nose and the 'Odd Rods' IFF aerials under the nose and on top of the fin are not included in the kit. I made these from plastic card and brass rod respectively. I also had to add the static dump wicks on the rear edge of the wings, fin and elevators , using toothbrush bristles (29p soft kiddies brush -the bristles are thinner)I used one of these for the canopy stay too as the kit one was a bit overscale .
I also managed with a lot of sweating to assemble the turned brass pitot complete with four TINY brass fins , this will be the last thing to be fitted then its ready for photographing and its done , only three days late . heres a few pics , cheers tonyView attachment 272523 View attachment 272524 View attachment 272525 View attachment 272526 View attachment 272527 View attachment 272528 View attachment 272529 View attachment 272530 View attachment 272531 View attachment 272532
 

Attachments

  • DSCN2205 [Desktop Resolution].JPG
    DSCN2205 [Desktop Resolution].JPG
    1.7 KB · Views: 0
  • DSCN2203 [Desktop Resolution].JPG
    DSCN2203 [Desktop Resolution].JPG
    1.3 KB · Views: 0
  • DSCN2208 [Desktop Resolution].JPG
    DSCN2208 [Desktop Resolution].JPG
    2.4 KB · Views: 0
  • DSCN2207 [Desktop Resolution].JPG
    DSCN2207 [Desktop Resolution].JPG
    2.2 KB · Views: 0
  • DSCN2206 [Desktop Resolution].JPG
    DSCN2206 [Desktop Resolution].JPG
    1.7 KB · Views: 0
  • DSCN2204 [Desktop Resolution].JPG
    DSCN2204 [Desktop Resolution].JPG
    2.5 KB · Views: 0
  • DSCN2202 [Desktop Resolution].JPG
    DSCN2202 [Desktop Resolution].JPG
    1.9 KB · Views: 0
  • DSCN2201 [Desktop Resolution].JPG
    DSCN2201 [Desktop Resolution].JPG
    1.8 KB · Views: 0
  • DSCN2200 [Desktop Resolution].JPG
    DSCN2200 [Desktop Resolution].JPG
    2 KB · Views: 0
  • DSCN2199 [Desktop Resolution].JPG
    DSCN2199 [Desktop Resolution].JPG
    2 KB · Views: 0
Thread owner
DISASTER! In my haste to start taking photos of the completed model Ive had an ' incident'! The brass pitot was assembled ,painted and fitted , the joint having a tiny touch up of black paint .This was still glossy while wet and wanting to get on with taking the completed shots I held it in front of the halogen heater to dry it ---OH ! Flaming Heck ! (well the initial letters are the same) I melted the top of the nose and the nose ring. What a Silly Billy (again ,initial letters are the same) , If i could kick myself in the arse I would take a great big swing. I prised off the slightly deformed nose ring and VERY carefully sanded the top of the nose, which I have now filled. Whether I can sand and touch up this and rescue the build remains to be seen, more info later , yours sheepishly tony
 
Thread owner
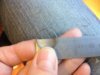
View attachment 272648 Heres the damage half way through repair, if we just keep this to ourselves i dont think anyone will notice;);)
 

Attachments

  • IMG_0966.JPG
    IMG_0966.JPG
    1.8 KB · Views: 0
Drat & blast! I'm sure you'll fix it Tony, better than I'll fix mine after the cat knocked it off the table... and then I stepped on it, not knowing it was there :(
 
Thread owner
Drat & blast! I'm sure you'll fix it Tony, better than I'll fix mine after the cat knocked it off the table... and then I stepped on it, not knowing it was there :(
The mig or the cat!?
 
Thread owner
At least you had someone else to blame , mine was my own doing!!:mad::mad:o_O
 
Keep off the wine gums Tony.
Sorry to hear about the disaster, but at least you kept a COOL head, and you can see the LIGHT at the end of the tunnel.
 
Thread owner
Well ive been having a think about the melted nose ring . I was going to put it back on but it would have niggled me. So i had a look in the spares box and look what i found. Its an empty cotton bobbin , the sort of thing my missus says' what are you saving that for?' Anyway it just so happens the end of this bobbin is EXACTLY the same diameter as the nose ring so off i went . Ive cut off the end portion and sanded it to the right depth, it just needs a slight chamfer sanding and its ready for painting. I think itll look 100% better than trying to re-use the deformed original . And just like an episode of He-Man theres a moral at the end of this tale , and that is dont throw anything away if you think it might someday be useful!
cheers , Prince Adam of Eternia
 

Attachments

  • IMG_0973.JPG
    IMG_0973.JPG
    2.4 KB · Views: 0
  • IMG_0972.JPG
    IMG_0972.JPG
    2.6 KB · Views: 0
  • IMG_0970.JPG
    IMG_0970.JPG
    2.5 KB · Views: 0
  • IMG_0967.JPG
    IMG_0967.JPG
    2.9 KB · Views: 0
  • IMG_0968.JPG
    IMG_0968.JPG
    2.2 KB · Views: 0
  • IMG_0969.JPG
    IMG_0969.JPG
    2.5 KB · Views: 0
  • IMG_0971.JPG
    IMG_0971.JPG
    1.1 KB · Views: 0
Status
Not open for further replies.
Back
Top