
You are using an out of date browser. It may not display this or other websites correctly.
You should upgrade or use an alternative browser.
You should upgrade or use an alternative browser.
Zoukei Mura Hs129B-2/ RIII, 1/32 scale.
- Thread starter BarryW
- Start date
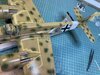
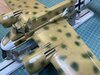
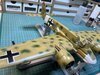
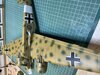
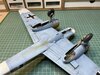
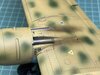
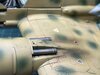
Having corrected the underwing black cross, it was easy enough. I have got on with the rest of the markings. The most notable element of this is in respect of the minor marking like walk lines. 1 Man Army are the only company, as far as I know, who produce all the stencilling.
Walk line decals can be a real problem to lay down specially on large scale kits and when they are a complex shape. Even if you get them in position, after lots of fiddling, you often get silvering at least in some places and often need to do multiple coats of solution to settle them.
I found these masks really easy to lay down in position, much easier than decals as they hold together. Much quicker too.
View attachment 440124
Here they are in position.
View attachment 440127
View attachment 440126
View attachment 440125
I have a couple of areas to touch up but, they look great.
Attachments
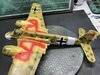
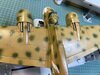
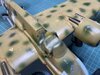
I have finished the markings. I did use a few decals, for the dials on the inner engine covers, the triangles, the insignia on the nose. Right now I have applied some decal solution which will dry off overnight. Tomorrow I will start the weathering process.
View attachment 440208
View attachment 440209
View attachment 440208
View attachment 440209
Attachments
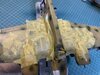
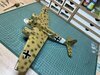
I have done an overall coat of gloss varnish. With lacquer varnishes, over lacquer paints, you need to apply it in very light mist coats over several passes. Whatever you do it is important not to lay down a heavy wet coat or you are asking for trouble.
As the next process is quite aggressive I will leave the varnish to cure for several hours. Normally you are set to go within 30 minutes with lacquers. Next I will be applying enamel washes, it is the removal of surplus with white spirit that is aggressive.
View attachment 440282
As the next process is quite aggressive I will leave the varnish to cure for several hours. Normally you are set to go within 30 minutes with lacquers. Next I will be applying enamel washes, it is the removal of surplus with white spirit that is aggressive.
View attachment 440282
Attachments
I am not sure. I have tried odourless thinners but I did not find a difference. It is not a problem though. Just a few hours of curing…Hi Barry
Looking superb. Really like the camo. Is there nothing less aggressive than white spirit for manipulating the enamel wash?
Jim
1/3
Ive never had that issue with Sansodor low odour thinners Barry. Which type are you using?
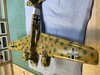
I have done the enamel pin washes and I am leaving the model overnight before applying the first Matt coat.
View attachment 440444View attachment 440445
View attachment 440444View attachment 440445
Attachments
The state of your work space! Sort it out Barry. There needs to be spills, used paper towels and tools everywhere.
Your Henschel is coming along very nicely, great attention to detail. Looking forward to seeing the weathering.
Your Henschel is coming along very nicely, great attention to detail. Looking forward to seeing the weathering.
My first matt coat now done. I actually used the MRP Semi-Matt as I find it gives the perfect surface for the next weathering processes. The final Matt coat will be a full matt and will done after streaking and applying exhaust smoke.
View attachment 440485
View attachment 440485
Attachments
I have done some pigment weathering, streaking with weathering pencils and sprayed exhaust soot. That was followed by a final matt coat.
View attachment 440549
View attachment 440550
Now into the final steps starting with the application of metal powders, oil and kerosene leaks and then until final fittings. I might even get it finished tomorrow, definitely by Friday.
View attachment 440549
View attachment 440550
Now into the final steps starting with the application of metal powders, oil and kerosene leaks and then until final fittings. I might even get it finished tomorrow, definitely by Friday.
Attachments

I have done some work on the exhausts using Tamiya pigments. Still a bit of blending to do…..
View attachment 440611View attachment 440612
I will get on with more weathering and expect to finish by the weekend.
View attachment 440611View attachment 440612
I will get on with more weathering and expect to finish by the weekend.
Attachments
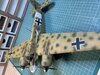
A quick peek at the completed model. I will do a separate completed thread tomorrow using my new photo booth…
View attachment 440625
This model is not the easiest but it is certainly not a hard build. This one really want to come together and is a real pleasure start to finish.
View attachment 440625
This model is not the easiest but it is certainly not a hard build. This one really want to come together and is a real pleasure start to finish.
Attachments
Legal Notice
scalemodelling.co.uk is a privately operated online discussion forum. All content posted by members reflects their own views and opinions and does not necessarily represent those of the forum owners or administrators. While reasonable efforts are made to moderate content, no responsibility is accepted for user-generated material. By using this site, you agree to comply with UK law and the forum rules.