Theme editor

Scale Model Shop

Zvezda SU - 100 1/35 SCALE & BM truck

  • Thread starter Thread starter Guest
  • Start date Start date
Those Masterclub tracks look pants compared to their usual quality

I have previously used their resin ones which have been great - have a couple of the new metal sets but not opened them yet so I just hope they don't turn out as bad
 
Thread owner
Hi John this is taking shape very nice indeed keep up the good work.
Pete.
Thanks Pete, still untidy compared to most on here though.

Quite the update John, it's looking great. Loving all of the extras.
Yes Andy it was , more to come today
Those Masterclub tracks look pants compared to their usual quality

I have previously used their resin ones which have been great - have a couple of the new metal sets but not opened them yet so I just hope they don't turn out as bad

Hi Simon, Steve "Rivet " and I were discussing them in a pm, they arrived with the sleeve completely flat and the links were wrapped in a plastic bag. think we both are of the opinion that they might be counterfeit, not something I would buy knowingly. I had always liked them before, but this time Historex Agents didn't have any. To be fair the bends might be down to bad packaging, but not the debris on the links.
 
Thread owner
To day I managed to get all the decals on, always think the model starts to come to life now. On the SU I did some mini ropes around those wooden cases on the back, and put the tow cables in place.
BM had a pickax and axe put on the wooden back board. All clear lamps were put on.

2020_4_2c.jpg2020_5.jpg2020_6_2n.jpg
After the decal setting has been done I need to check all is painted, ready for the varnish.
Not going to be a lot of mud on the tracks as there will be snow , so will have to see how it pans out. Any tips more than grateful .
That thread does give a quite realistic rope, its by COATS.

BM.

2020_3_2b.jpg

2020_2a.jpg

Thanks for following and the comments.
John.
 

Attachments

  • 2020.jpg
    2020.jpg
    3.1 KB · Views: 0
Looking very good John, nice progress and some lovely details :thumb2:
Steven
 
Evening John,
all looking very smart indeed :nerd: recovery cables and stowage look great
 
All looking good John, one would think you've done this sort of thing before.
Great attention to detail, am watching your build as always.

Jim
 
Thread owner
Evening John,
all looking very smart indeed :nerd: recovery cables and stowage look great
Thanks Si.
John,
All looking very nice indeed.
Cheers Paul.
All looking good John, one would think you've done this sort of thing before.
Great attention to detail, am watching your build as always.

Jim
Hi Jim, nice of you to drop in, suppose your knee deep in snow up there in the wilds.:surprised:.
Fantastic work John.
Thanks Peter.

Hopefully to day I will get some parts on the SU painted , like those extra tracks and wooden boxes.
Been thinking about Pine Trees, I've seen some on a build by Paul and " Shovelhead" Ray kindly gave me an address for Panzer Models who stock the branches.
I can see this year I'll be growing both sea grass and asparagus ferns :nerd:
Thanks for the comments.
John .
 
Hi John
That is looking better and better. The little extras like the ropes are worth the effort.
Jim
 
Thread owner
Hi John
That is looking better and better. The little extras like the ropes are worth the effort.
Jim
Cheers Jim. Not as hard to do as I expected, just fiddly. Agree they are certainly worth the effort.
 
Very nice JR. Some of your best work yet. Lovin the bent fenders. Expect to see those on all your AFVs from now on :smiling5:
 
Thread owner
Very nice JR. Some of your best work yet. Lovin the bent fenders. Expect to see those on all your AFVs from now on :smiling5:
Very kind of you to say Steve. Think the overall green is a bit heavy on the SU, I'd had a mix up of tips.
There will be some PE fenders plus other goodies on another KV-2 Build !
 
Thread owner
Evening, don't know where you are but the winds got up again.Lovely sunny day after a wet morning.
Right moving on, started on the dowel, to make things quicker I inverted my 100mm belt sander and thinned down the dowel.
Then rinsed in water, to lift the grain and dragged the saw down the length, gives a reasonable bark texture.
2020_3.jpg2020_2.jpg
These will be de -nibbed once dry with a light sanding.

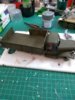
As the ammo cases arrived yesterday i'd made a start on the boxes. Nice clean moulding, the decals are so small , so will have some fun, but iv'e used them before with success.

2020_6.jpg

2020_5.jpg
Bit of over glue, think I need to use a much smaller brush for this sort of kit, may be an old No 7 .

Several weeks ago I glued up a section of insulating foam to a ply base, left it with weights on. Today started the shaping. I wanted to have some high at the back, so to increase this I removed about 30mm from some of the base.

2020.jpg
Marked out and numerous cut made into the foam at the depth of a Stanley knife blade.

2020_7.jpg


2020_9.jpg

Then cut another section to give the total high, with a smaller piece on the left.2020_10.jpg

That last piece will be glued later, but first the main part.

2020_11.jpg

UHU for foam applied each side, then rubbed joined to remove any air and to spread the glue out weights and pins were applied.

2020_12.jpg

Just to give an idea of where the truck and SU will be.


2020_14.jpg

Thanks for looking in, comments welcome.
 
Evening John, just been having a catch up

Any reason why the mantlet cover is stood up?

There are a couple of ejector pin marks on the inside of it

Base is off to a good start - what’s the foam?

Tree trunks look good
 
Back
Top