
You are using an out of date browser. It may not display this or other websites correctly.
You should upgrade or use an alternative browser.
You should upgrade or use an alternative browser.
Geoff’s 1/48 Eduard Spitfire Story - Spitfire Mk.I build.
- Thread starter Geoffers
- Start date
1/3
Thats turned out well Geoff. Colors are spot on.
Another step of the build completed
…...
I’m happy with how it’s looking so it will be a gloss coat next before I tackle the dreaded Eduard transfers
I switched from 1/72 to 1/48 as I thought the larger scale would be easier…..this is the PE rear view mirror, scalpel blade for scale
….
Thanks for looking
Geoff.

Yeah, I think all they do is add more even tinier parts than 1/72

Good work so far, looking forward to seeing the transfers wrestled into submission
- Joined
- Jan 26, 2017
- Messages
- 2,545
1/3
Cheers StevenNice paintwork so far Geoff - all looking good, cheers
Thanks Steve, I’m pleased with how it’s turned out so farThats turned out well Geoff. Colors are spot on.

Thank you JoeVery nice work Geoff.
Thanks Neil, yep there’s no getting away from themYeah, I think all they do is add more even tinier parts than 1/72
Good work so far, looking forward to seeing the transfers wrestled into submission

Geoff.
- Joined
- Jan 26, 2017
- Messages
- 2,545
1/3
Update time 
I’m pleased to say the transfers are now all on
I have been avoiding trying any of the newer Eduard kits for a while as I’ve heard some pretty harsh reports of how the new style of transfers perform.
However there was no alternative for the scheme I wanted to build so it was time to bite the bullet and give them a try.
The newer transfers as you may be aware can be used in either the traditional way or by peeling off the top layer to leave an almost painted on appearance.

Traditional way.

With the top layer removed.
If you can get it right they are as near to painting the markings as you can get.

After a few trial runs using some spare transfers and my paint mule I was confident enough to give it a go.
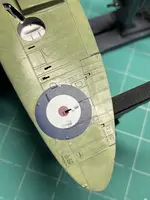
I put the stencils on first which may have been the wrong way around as a couple of them are covered by the markings.
The best way I discovered was to put the decals down using Mr Setter decal solution on the model. Press them down in the usual way then leave them overnight.
The next day I carefully scrapped at the edge of the decal with a sharp blade. This loosens the top coating of the decal and this can then be removed completely.
I did have a few hiccups though as when lifting the top coating it did fetch away part of the decal.

This I solved by cutting an appropriate sized piece of a spare decal and apply it to the damaged part using the same process as before.
Here’s the repaired decal.

I’m pleased with how it’s turned out


So it’s a clear coat next and a bit of light weathering.
Thanks for looking
Geoff.
I’m pleased to say the transfers are now all on
I have been avoiding trying any of the newer Eduard kits for a while as I’ve heard some pretty harsh reports of how the new style of transfers perform.
However there was no alternative for the scheme I wanted to build so it was time to bite the bullet and give them a try.
The newer transfers as you may be aware can be used in either the traditional way or by peeling off the top layer to leave an almost painted on appearance.
Traditional way.
With the top layer removed.
If you can get it right they are as near to painting the markings as you can get.
After a few trial runs using some spare transfers and my paint mule I was confident enough to give it a go.
I put the stencils on first which may have been the wrong way around as a couple of them are covered by the markings.
The best way I discovered was to put the decals down using Mr Setter decal solution on the model. Press them down in the usual way then leave them overnight.
The next day I carefully scrapped at the edge of the decal with a sharp blade. This loosens the top coating of the decal and this can then be removed completely.
I did have a few hiccups though as when lifting the top coating it did fetch away part of the decal.
This I solved by cutting an appropriate sized piece of a spare decal and apply it to the damaged part using the same process as before.
Here’s the repaired decal.
I’m pleased with how it’s turned out
So it’s a clear coat next and a bit of light weathering.
Thanks for looking
Geoff.
Attachments
Last edited:
- Joined
- Jan 26, 2017
- Messages
- 2,545
1/3
I just used Mr Setter applied directly to the model where the transfer was to be placed then applied the transfer onto it. Once I was happy with its position I pressed it down with a damp cotton bud and then left it alone overnight.Nice work on the decals Geoffdid you use 'mr softer' as well or only 'mr setter'? Cheers
Geoff.
1/3
Glad it all turned out well Geoff. Looks very nice indeed
- Joined
- Jan 26, 2017
- Messages
- 2,545
1/3
Hopefully NeilThey really do look painted on. Looking forward to the clear coat now which should make them really pop.

Cheers Joe, I’m pleased with how that have turned outDecals look superb Geoff, looking very nice
Thanks SteveGlad it all turned out well Geoff. Looks very nice indeed
Geoff.
- Joined
- Jan 26, 2017
- Messages
- 2,545
1/3
Cheers ColinLooking good Geoff. I still haven't tried these decals out yet. I'm not sure I'm brave enough !
They aren’t too bad after a bit of practice, they are worth the effort in my opinion.
Geoff.
- Joined
- Jan 26, 2017
- Messages
- 2,545
1/3
All done now I’m pleased to say .
After the last post I gave it a Matt clear coat ready for some dirt.
I went a bit old school with the weathering and used a Flory clay wash. The benefit of using a Matt coat is it sticks a bit more which gives it more of a dirty look than just panel lining.
I also used some oils to recreate the gun staining a bit of extra grime near the wing root.
The exhausts were painted with AK extreme burnt metal and pale burnt metal then given a wash with Mig brown enamel wash.
After this the little bits and bobs were been added and it was given a final satin coat to seal everything in.
This is were I had a near disaster
I was using AK real colors satin varnish for the first time and got the mix completely wrong.
Following some advice from the net I thinned it 8/2 which resulted in a lovely spider webbing effect all over the model
After a bit of a panic (no pics as I was a bit stressed at the time ) I managed to clear it off and redo with a more suitable mix. I think I went 2/8 or something close which did the trick albeit a bit heavier than I would have liked
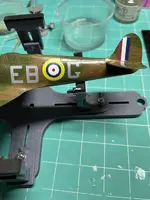
Anyway here is the finished result, in honour of Flt Lt Eric “Sawn Off” Lock DSO, DFC and bar.


I’ll post some better/more pics up in the finished aircraft thread.
Thanks for looking
Geoff.
.After the last post I gave it a Matt clear coat ready for some dirt
.I went a bit old school with the weathering and used a Flory clay wash. The benefit of using a Matt coat is it sticks a bit more which gives it more of a dirty look than just panel lining.
I also used some oils to recreate the gun staining a bit of extra grime near the wing root.
The exhausts were painted with AK extreme burnt metal and pale burnt metal then given a wash with Mig brown enamel wash.
After this the little bits and bobs were been added and it was given a final satin coat to seal everything in.
This is were I had a near disaster
I was using AK real colors satin varnish for the first time and got the mix completely wrong.
Following some advice from the net I thinned it 8/2 which resulted in a lovely spider webbing effect all over the model
After a bit of a panic (no pics as I was a bit stressed at the time
) I managed to clear it off and redo with a more suitable mix. I think I went 2/8 or something close which did the trick albeit a bit heavier than I would have liked Anyway here is the finished result, in honour of Flt Lt Eric “Sawn Off” Lock DSO, DFC and bar.
I’ll post some better/more pics up in the finished aircraft thread.
Thanks for looking
Geoff.
Last edited:
 looking good
 1/3
Nothing worse than things going south at the end of the build. Glad you recovered it Geoff. A very nice hard looking work horse of a Spitfire for the gallery.
Legal Notice
scalemodelling.co.uk is a privately operated online discussion forum. All content posted by members reflects their own views and opinions and does not necessarily represent those of the forum owners or administrators. While reasonable efforts are made to moderate content, no responsibility is accepted for user-generated material. By using this site, you agree to comply with UK law and the forum rules.
Currently on our website
Threads
37,403
Messages
707,843
Members
2,652
Latest member
Waffenträger Auf E-100