Theme editor

Scale Model Shop

Special Hobby 1/32 Tempest V

Status
Not open for further replies.

stona

New member
Joined
Jul 22, 2008
Messages
9,889
Reaction score
9
Points
0
1/3
Thread owner
I'm on a run of specialist limited run kits (resin Seafang from Iconicair, then Fly's Hurricane II) so I thought I might as well have a go at another. Also, I've just stocked up on British colours for my Hurricane and I might as well use them.


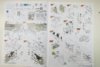
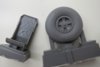
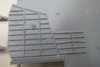
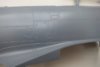
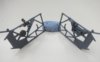
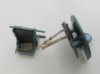
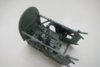
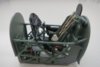
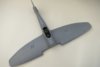
I've attached an image of the box. Inside you get the typical multi media kit you'd expect, complete with resin and photo etch parts. The plastic is in another league from that in the Fly kit. It looks beautifully molded with lovely detail, both inside and out. How it all goes together I don't know, but we're about to find out :)  


I hope to get started sometime next week.


Cheers


Steve

View attachment 258417
 

Attachments

  • IMG_1696.JPG
    IMG_1696.JPG
    2 KB · Views: 0
Excellent stuff Steve, this is another kit that draws PCM kit comparisons!


Looking forward to the build.


Paul
 
Thread owner
Excellent stuff Steve, this is another kit that draws PCM kit comparisons!


Looking forward to the build.


Paul

It does Paul. From memory  the PCM Tempest was a decent kit. I think it fitted quite well, with the normal provisos about getting everything in the right place and lined up in the absence of any locating aids. I don't remember any really bad fits, like on their Hurricane.


I have to say that the Special Hobby plastic looks really good, right up there with any of the best mainstream manufacturers. If it fits as good as it looks this should be a good one!


Cheers


Steve
 
I have to say that the Special Hobby plastic looks really good, right up there with any of the best mainstream manufacturers. If it fits as good as it looks this should be a good one!

I remember there being rumour of this kit when the PCM launched their's. From memory I think the Special Hobby shades it. But I guess you'll find that out,


Again, I have the PCM kit!


Looking forward to this


Cheers


P
 
Thread owner
For overall detail the Special Hobby kit looks to be ahead of the PCM kit, but having said that a lot of it will not be seen and I still rate the PCM kit highly. It makes a very nice Tempest.


Whatever I do with the Special Hobby kit, it WON'T have invasion stripes !!!


Cheers


Steve
 
Thread owner
Here's a look at the plastic. The exterior detail is very good, as seen here on the wings and fuselage, also the interior as, as here what will be the top of a wheel well.


The resin is substantial and looks very nice.


The instructions look confused to me and may need some interpretation. I'm also fairly sure that some of the colour calls are wrong.


I haven't attached a picture but also in the box is one of the nice HGW harnesses, appropriate for the Tempest.


Cheers


Steve

View attachment 258520

View attachment 258521

View attachment 258522

View attachment 258523

View attachment 258524
 

Attachments

  • IMG_1701.JPG
    IMG_1701.JPG
    2.1 KB · Views: 0
  • IMG_1700.JPG
    IMG_1700.JPG
    1.8 KB · Views: 0
  • IMG_1699.JPG
    IMG_1699.JPG
    1.6 KB · Views: 0
  • IMG_1698.JPG
    IMG_1698.JPG
    1.4 KB · Views: 0
  • IMG_1697.JPG
    IMG_1697.JPG
    1.3 KB · Views: 0
That looks to be a very nice kit.


I'm sure you'll make something very special out of it.


Paul
 
Thread owner
I've spent a few hours on the fuselage side walls and the cockpit framing which will go inside them. There is no point in making a comparison between this kit's cockpit and the PCM one, this is light years ahead.


I have used the resin options wherever possible, but many of these smaller parts are also in plastic on the sprues for the less adventurous. To be honest, the cockpit opening on the Tempest is so small that most of this detail will not be seen once the fuselage halves are joined in any case.


Cheers


Steve

View attachment 258574
 

Attachments

  • IMG_1702.JPG
    IMG_1702.JPG
    1.8 KB · Views: 0
the pit looks very nice mate, you certainly are on a run with these limited run kits! The surface detail truly is brilliant, very, very nice rivets!


John
 
Thread owner
There is one issue with building the cockpit interior. It is impossible tofind a sequence that won't involve some huffing and puffing at some stage. There are just so many pieces that have to fit together simultaneously, many on previous sub assemblies which will only line up if you test fitted them when you built them (I did) that it is going to be fun. This is just an aspect of the way the kit is engineered so will just have to be dealt with.


I've attached a couple of pictures of the instructions to illustrate the point, and show the method that is suggested in them. I might well do something else, after all, instructions are just someone else's opinion on how the thing should be put together and to do the steps shown in the pictures together is obviously impossible :)


There are also a couple of parts that miraculously appear in some 'Steps' or sub assemblies without any instruction to fit them. It keeps you on your toes. There is an option for a gyro gun sight, but no clue as to how it fits. Good job wartime Tempests didn't have them fitted!


Apart from this everything is going swimmingly.


View attachment 258584


View attachment 258585


Hopefully I'll have something looking like Step 15 in a few days time!


Cheers


Steve


Edit: I've also had a look at the HGW harness. Nowhere in the instructions does it mention removing the backing ! I've made a couple before, so it's obvious to me, but might not be to everyone.
 

Attachments

  • IMG_1704.JPG
    IMG_1704.JPG
    2.4 KB · Views: 0
  • IMG_1703.JPG
    IMG_1703.JPG
    1.9 KB · Views: 0
Thread owner
I've now built the front part of the cockpit. It was just as much of a jostle as it looks, but the fit was generally good. I drilled a few locating holes out, and through the bulkhead in some cases, to make things easier. It is quite a complicated sub assembly, and it will be almost invisible in the completed model!


View attachment 258661


View attachment 258662


I've also made the HGW harness (more eye strain!) and fitted the various parts to the seat and rear bulkhead. Once attached to the rest of the cockpit I just have the instrument panel to finish and I'll be looking at joining the fuselage halves.


Cheers


Steve
 

Attachments

  • IMG_1710.JPG
    IMG_1710.JPG
    1.6 KB · Views: 0
  • IMG_1707.JPG
    IMG_1707.JPG
    1.7 KB · Views: 0
Thread owner
Got an extra hour or so in and have managed to complete that 'Step 15'.


This is a kit in itself, and a nice one at that.


View attachment 258663


Cheers


Steve
 

Attachments

  • IMG_1712.JPG
    IMG_1712.JPG
    2.2 KB · Views: 0
Top work steve , beautifully painted . The harness looks superb , are the hgw belts a fiddle ? Ive never used them. Cheers tony
 
Thread owner
That cockpit is exceptional...

And it's all out of the box !!!! I think that Special Hobby have raised their game significantly with this kit. The cockpit is quite a complicated structure. but it all went together quite easily, though not quite as per the instructions.


The HGW harness is very nice too. It was a fiddle Tony, but then so are all the others that require assembly. I generally use the RB Production harnesses, but I was very impressed with the way this one took a very dilute oil wash to pick out the detail and grubby it up a bit. To the naked eye it looks a lot like webbing.


Cheers


Steve
 
Thread owner
It's hardly modelling weather here in Birmingham today, but I've just got in and thought I'd test fit the wings of the Tempest, which I built yesterday, to the fuselage.


The fit of these non main stream kits can be problematic and is understandably a concern to many.


Here you see the fuselage dry fitted to the wings, I haven't applied any glues yet. As you can see the fit is excellent, in fact it's about the best I've seen in any kit which I've built in the last fifteen years or so. 'Chapeau' to Special Hobby for this one.


View attachment 258869


Cheers


Steve
 

Attachments

  • IMG_1713.JPG
    IMG_1713.JPG
    1.4 KB · Views: 0
Status
Not open for further replies.
Back
Top