Theme editor

Scale Model Shop

HK Models 1/32 scale D. H. Mosquito

Status
Not open for further replies.
Thread owner
Hi Vaughan,


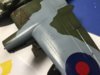
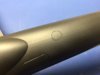
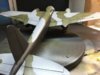
Well if it is it has been very carefully molded!!!


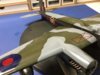
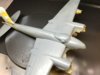
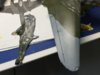
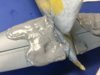
It is actually some of the exceptionally fine surface detail on the kit.  There was actually a very fine mold seam running down the centre of it and removing the seam had to be done with considerable care to ensure that I also did not remove this detail.  I believe it is representing something that they ran down a join where two plywood sheets butted against each other.  This detail appears in other places.


here is a close up photo that shows the detail:


View attachment 261953


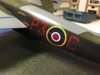
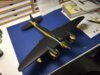
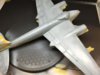
The surface engraving on this kit is unrivalled, simply exquisite, as good or even better than Tamiya have achieved.


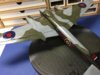
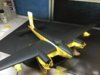
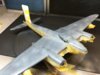
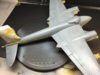
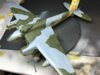
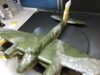
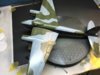
Anyway - I did not manage to finish the masking last night and will need to finish it tonight but I did manage to get the trickier masking done with various widths of Tammy tape including some of their curved tape.  I also used some shaped Maskatar masking for the curved section at the rear to get clean curves it does not show on the photo below because it is a transparent grey and all you can really see is the Tammy tape around it.


View attachment 261952
 

Attachments

  • IMG_1437.jpg
    IMG_1437.jpg
    3.1 KB · Views: 0
  • IMG_1438.jpg
    IMG_1438.jpg
    1.9 KB · Views: 0
Ah...... that throws a different light on it. I can see that it's ment to be there in your close up photo. Looking forward to the final stages. 
 
Thread owner
Here she is, all dressed up for a base coat of RAF Ocean Grey. 


View attachment 262008


i am using AKI Air Series for the main base coats supplemented by Vallejo Model Air.  I find they spray beautifully, even better than Vallejo MA. 


I spray in a series of light coats at about 20psi neat unthinned with a .4 needle. 


Here she is after the first pass with the airbrush 


View attachment 262009


then after the second pass


View attachment 262010


then the third pass


View attachment 262011


but it's still not finished. I have decided not preshade as you can see and just rely on post shading.  So I mixed the base colour with 25% white and thinned it about 25%. I then sprayed into the middle  of panels and along areas that would catch the sun. I spayed at about 10 psi  


This is how it then looked


View attachment 262012


As you can see the colour is now well modulated but it needs one more touch to get the effect I want.  After cleaning the airbrush I mix the base colour about 25% to 75% thinner and then do a mist coat at about 30 psi to knock back the contrast and get the more subtle modulated effect I want. 


As you can see below the mist coat helps blend the base colour while improving the overall effect  


View attachment 262013


the process is very controllable and foolproof   


Tomorrow after leaving it 24 hours to cure I will give it a very light sanding and wipe it down with a damp cloth before masking up for RAF Dark Green   I will mask it with this below  


View attachment 262014


this is the part of the build I really enjoy  
 

Attachments

  • image.jpeg
    image.jpeg
    2.7 KB · Views: 0
  • image.jpeg
    image.jpeg
    2.9 KB · Views: 0
  • image.jpeg
    image.jpeg
    2.8 KB · Views: 0
  • image.jpeg
    image.jpeg
    2.5 KB · Views: 0
  • image.jpeg
    image.jpeg
    2.7 KB · Views: 0
  • image.jpeg
    image.jpeg
    2.8 KB · Views: 0
  • image.jpeg
    image.jpeg
    2.5 KB · Views: 0
Thread owner
Looking at the pics on the big screen in the office the Ocean Grey look washed out and far too light - it really is Ocean Grey and is a darker in real life.
 
Looking Good.  I will have to try your approach to the black.
 
Coming along nicely there Barry mate. Interested to see the clever putty being used to do the camo. 
 
Thread owner
RAF Green done..


the masking material is excellent it sinks into the detail and stops any bleed. Very easy to manipulate as well


View attachment 262125


here is the aircraft just before the mist coat. 


View attachment 262126


the masking material does not stickView attachment 262127


 and just lifts away. 


I spent just seconds removing the mask after painting 


View attachment 262128


View attachment 262129


there is no bleed and it looks spot on, any imperfections you see in the photo is on the mask protecting the black sides   


I will give the paint 24 hours to cure before removing most of the remaining masking material  
 

Attachments

  • image.jpeg
    image.jpeg
    2.9 KB · Views: 0
  • image.jpeg
    image.jpeg
    2.9 KB · Views: 0
  • image.jpeg
    image.jpeg
    2.4 KB · Views: 0
  • image.jpeg
    image.jpeg
    2.5 KB · Views: 0
  • image.jpeg
    image.jpeg
    2.7 KB · Views: 0
Thread owner
First some pics with the masking removed except for the u/c and transparencies 


View attachment 262197


View attachment 262198


View attachment 262199


i have just finished two gloss costs with Alvlad Aqua Gloss to prepare for decalling 


View attachment 262200


View attachment 262201


i I will leave it to cure and start decalling tomorrow. 


Below are my best friends for decals. A cup warmer and decal solutions.  Keeping the water warm helps speed up the process for which the cup warmer was a real breakthrough  


View attachment 262202
 

Attachments

  • image.jpeg
    image.jpeg
    2.6 KB · Views: 0
  • image.jpeg
    image.jpeg
    2.6 KB · Views: 0
  • image.jpeg
    image.jpeg
    2.9 KB · Views: 0
  • image.jpeg
    image.jpeg
    2.9 KB · Views: 0
  • image.jpeg
    image.jpeg
    2.7 KB · Views: 0
  • image.jpeg
    image.jpeg
    2.5 KB · Views: 0
Barry where do you get the Clever Putty from, how much does it cost and can you re-use it? 
 
Thread owner
Hi Vaughan.  I just Googled for it and I cannot remember where I got it from.  I got two tins in all and yes it is reusable.  This is the second time I have used it.
 
Barry where do you get the Clever Putty from, how much does it cost and can you re-use it? 

Seen it in e-bay. Price from 4,95 right up to 7,50 per tin! Plus post!  It is also sold as a recovery aid so I am sure it can be found cheaper...


I remember when we had silly putty. I guess it got the smarts...
 
Looking very nice Barry.
You are going to need a bigger turn table when you start the Lancaster..... :)
 
Thread owner
It's not only the turntable that would need to be bigger Ian!!


anyway. I have got decals on and I have done three coats of decal softener. The decals went down well but did take a lot of solution to soften them. 


Tomorrow we will see how they look and whether they need more treatment. 


View attachment 262247


View attachment 262248


View attachment 262249


I will hopefully be able to apply a sealing gloss coat tomorrow. 
 

Attachments

  • image.jpeg
    image.jpeg
    2.9 KB · Views: 0
  • image.jpeg
    image.jpeg
    3 KB · Views: 0
  • image.jpeg
    image.jpeg
    2.6 KB · Views: 0
Looking great so far Barry, waiting the end with anticipation.
 
Thread owner
Thanks Dave


Progress will be frustratingly slow this week as I have some evening meetings.  Soooo close to the end.  Four, maybe five more sessions should do it.
 
The paint looks great mate. Nice work. Really coming together well. Sure is big though. 
 
Thread owner
As mentioned I have not had a lot of time to progress the Mossie this week but I have grabbed half an hour here and there to apply a pin wash and then, going over the model in small sections, remove the surplus with cotton buds dipped in white spirit.  It is important to wipe in the direction of the air flow to finish off.  I want to go over it once more but here is how it looks now. 


View attachment 263224


View attachment 263225


I used the AKI panel line washes, the ones specially for black on the sides and undersides and the one for green/grey camo on top. 


Tonight once I have checked it over I will do a single thin coat of matt varnish to prepare the surface for the next stage of weathering that is best with a matt or slightly matt surface.  Tomorrow I will be able to get on with some wear and chipping.  I have established what parts of the airframe are wood and what is metal to make sure I can get the appropriate treatment.
 

Attachments

  • image.jpeg
    image.jpeg
    2.6 KB · Views: 0
  • image.jpeg
    image.jpeg
    2.7 KB · Views: 0
Status
Not open for further replies.
Back
Top