Theme editor

Scale Model Shop

Dave W's 1/48 Greek F4E

Status
Not open for further replies.

Dave W

New member
Joined
Jan 8, 2011
Messages
4,713
Reaction score
0
Points
0
1/3
Thread owner
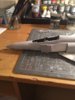
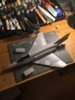
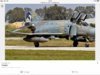
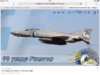
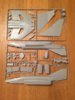
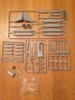
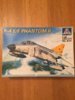
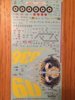
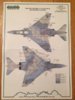
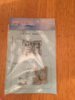
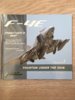
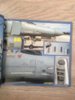
I will be using the old Italeri 1/48 F4E that I've already got in my stash for this build. The kits not bad,but it does have raised panel lines. I might do a bit of rescribing if in in the mood for it. I've also got a pair of Aires resin ejection seats that I intended to use for the other phantom in my stash,the Hasegawa Royal Navy Phantom kit.Hopefully they will fit this kit. And To finish the model I got a decal sheet from Hannants. In 2014 the Helenic Airforce celebrated 40 years  of the Phantom in its service. One aircraft was painted in this scheme. I've spent an hour this evening researching the camouflage colours on the Internet. All Greek F4E's are in the Aegean greys scheme,which aren't the same as American aircraft. I've settled on Tamiya XF55 for FS36307, Humbrol 145 for FS36237 and Tamiya XF20 for FS36251.These are the colours I will be using, unless anyone knows different?. I don't think we have any Greek modellers on the forum who can help me out?.

View attachment 263190

View attachment 263191

View attachment 263192

View attachment 263193

View attachment 263194

View attachment 263195

View attachment 263196

View attachment 263197

View attachment 263198

View attachment 263199
 

Attachments

  • image.jpeg
    image.jpeg
    1.8 KB · Views: 0
  • image.jpeg
    image.jpeg
    2.9 KB · Views: 0
  • image.jpeg
    image.jpeg
    2.4 KB · Views: 0
  • image.jpeg
    image.jpeg
    2.6 KB · Views: 0
  • image.jpeg
    image.jpeg
    2.5 KB · Views: 0
  • image.jpeg
    image.jpeg
    2.4 KB · Views: 0
  • image.jpeg
    image.jpeg
    2.8 KB · Views: 0
  • image.jpeg
    image.jpeg
    2.8 KB · Views: 0
  • image.jpeg
    image.jpeg
    2.7 KB · Views: 0
  • image.jpeg
    image.jpeg
    2.1 KB · Views: 0
Thread owner

Thanks for the link Ian. The blue grey in that set is quoted as FS35237. On the decal sheet it's FS36237. A bit of confusion there although my conversion chart matches Humbrol 145 to both FS numbers!. I will put this set down on my Christmas list though.
 
Thread owner
I've glued the very basic cockpit together.This is then glued to a lower fuselage insert.A dry fit shows big gaps inside between the cockpit and the sidewalls.So I will be having the canopies closed.The kit dates from 1980 and has the original manufacturers logo (Testors) moulded on the inside.

View attachment 272684 View attachment 272685 View attachment 272686
 

Attachments

  • image.jpeg
    image.jpeg
    2 KB · Views: 0
  • image.jpeg
    image.jpeg
    2.3 KB · Views: 0
  • image.jpeg
    image.jpeg
    2.4 KB · Views: 0
Mmm...this book looks excellent as a reference, Dave!
Nise start ;)
 
I thought I had the oldest at 1987, but you might have beaten me here. However, it's a Phantom, it will look great.
 
Thread owner
Detail is very basic. Ive picked out some on the sidewalls that probably wont be seen.Decals are supplied for the main instrument panels.But there is raised detail on the side consoles which i have painted. I will add a bit of colour tonight. The Aires resin seats will make a big difference. They are nicely detailed. And ive glued the fuselage halves together. More work this evening.

View attachment 273740 View attachment 273741 View attachment 273742 View attachment 273743 View attachment 273744 View attachment 273745
 

Attachments

  • IMG_3263.JPG
    IMG_3263.JPG
    2 KB · Views: 0
  • IMG_3265.JPG
    IMG_3265.JPG
    1.9 KB · Views: 0
  • IMG_3266.JPG
    IMG_3266.JPG
    2 KB · Views: 0
  • IMG_3267.JPG
    IMG_3267.JPG
    1.6 KB · Views: 0
  • IMG_3268.JPG
    IMG_3268.JPG
    2.3 KB · Views: 0
  • IMG_3262.JPG
    IMG_3262.JPG
    1.8 KB · Views: 0
Thread owner
View attachment 273819 View attachment 273820 View attachment 273821 View attachment 273822 View attachment 273823 Ive glued the cockpit/ lower fuselage insert and nose section on. The fit isnt great and i need to do some filling and sanding. Theres also a part missing . A panel that covers a hole in the rear fuselage. I only paid £2 for the kit a few years ago and all the parts were loose in the box. So im not surprised somethings missing. Everything else seems to be there though.So ive filled the hole with plastic card. It needs a bit of filler as well. I dont think Phantom kits are tail sitters. But i will add some weight before the radome goes on just in case.
 

Attachments

  • IMG_3279.JPG
    IMG_3279.JPG
    2.5 KB · Views: 0
  • IMG_3282.JPG
    IMG_3282.JPG
    2.3 KB · Views: 0
  • IMG_3283.JPG
    IMG_3283.JPG
    2.4 KB · Views: 0
  • IMG_3273.JPG
    IMG_3273.JPG
    1.9 KB · Views: 0
  • IMG_3280.JPG
    IMG_3280.JPG
    2.1 KB · Views: 0
Nice work so far Dave but OMG what a gap, but I'm sure you'll beat it.
I must start mine soon.
 
Thread owner
I havent got any lead with me in my Glasgow digs. So ive 'borrowed' some screw driver bits from work and glued them inside the nose. I dont think it needs the weight. Its just in case.Then ive glued the radome on and sanded some joins.Theres a step where the radome joins the fuselage. So that needs sorting out.Then ive glued the wings together. A dry fit shows a gap at the wing root either side.So i will glue some sprue between the fuselage halves to push them out a bit and close the gap. Im off home for a few days now. So will carry on with this on sunday.

View attachment 273920 View attachment 273921 View attachment 273922 View attachment 273923
 

Attachments

  • IMG_3289.JPG
    IMG_3289.JPG
    2.7 KB · Views: 0
  • IMG_3291.JPG
    IMG_3291.JPG
    3 KB · Views: 0
  • IMG_3292.JPG
    IMG_3292.JPG
    2.8 KB · Views: 0
  • IMG_3293.JPG
    IMG_3293.JPG
    2.9 KB · Views: 0
Status
Not open for further replies.
Back
Top