Theme editor

Scale Model Shop

Special Hobby 1/32 Yak 3

Status
Not open for further replies.

BarryW

Active member
SMF Supporters
Joined
Jul 23, 2011
Messages
6,147
Reaction score
462
Points
83
Age
70
1/3
Thread owner
After the abortive Revell 190 I am getting on with this short run kit. I have had both good and bad experiences with short run with Special Hobby, but in 1/32 scale some subjects are just not available unless you turn to these niche short run manufacturers.

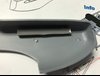
These kits have their ‘quirks’ such as very basic engineering and no location tabs. But they can build up into excellent models.
View attachment 292851

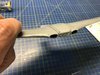
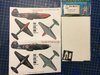
I have some masks and will depict the aircraft with a red nose.
View attachment 292852

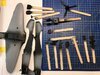
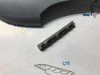
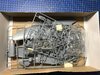
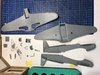
Not a lot of parts, not compared to most 32 scale aircraft.
View attachment 292853

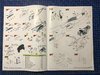
Instructions look a bit crowded but taking a closer look they seem rather good and well laid out.
View attachment 292854

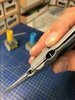
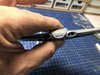
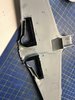
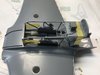
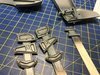
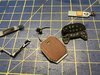
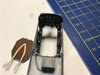
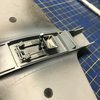
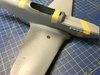
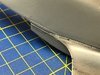
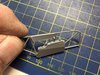
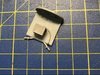
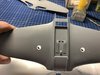
I have been building up sub-assemblies and adding a little extra detail.
View attachment 292856

View attachment 292858

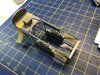
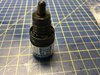
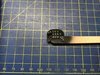
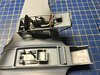
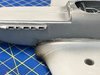
Some very nice resin exhausts. I wondered at first how to cut off the block without breaking or damaging the parts but then I realised I did not have to!!
View attachment 292859

View attachment 292860

View attachment 292861

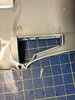
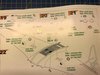
I really could not understand this page of the instructions at all. I can see there are alternative decals but why complicate it so much? I just cemented the transparencies into the holes, the applied the decals from underneath, made sure they had the right orientation, job done. Simple.

View attachment 292862

View attachment 292863

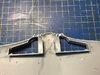
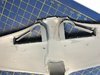
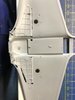
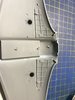
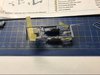
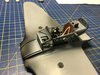
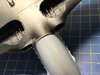
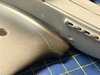
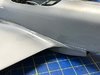
Here is how far I have got so far.
View attachment 292864

I have to say that I am enjoying this build. The plastic is nice and crisply molded. There is a little flash but it’s nowhere near as bad as Revell. The fit is not bad a all so far and I like the engineering. I am sure this kit will throw up a real challenge or two ahead but so far so good.
 

Attachments

  • C1CAB152-D060-472E-B1A1-B2927D36619F.jpeg
    C1CAB152-D060-472E-B1A1-B2927D36619F.jpeg
    3.1 KB · Views: 0
  • FABD9232-6E0C-4A4E-A37F-516C6BECFCC6.jpeg
    FABD9232-6E0C-4A4E-A37F-516C6BECFCC6.jpeg
    2.9 KB · Views: 0
  • D0934A11-DAEA-4E7E-908B-0DC2D68F0703.jpeg
    D0934A11-DAEA-4E7E-908B-0DC2D68F0703.jpeg
    2.4 KB · Views: 0
  • 9940C0F6-2547-4A26-96D0-09BE82199A95.jpeg
    9940C0F6-2547-4A26-96D0-09BE82199A95.jpeg
    4 KB · Views: 0
  • 1A962C64-D87A-4AF0-90CA-5D0CD5CDD98C.jpeg
    1A962C64-D87A-4AF0-90CA-5D0CD5CDD98C.jpeg
    3.7 KB · Views: 0
  • ED76BC89-4188-43D3-BD9A-3E7B93971CF1.jpeg
    ED76BC89-4188-43D3-BD9A-3E7B93971CF1.jpeg
    3.8 KB · Views: 0
  • ACB96FF0-37A7-4B95-9F21-51A51973F97D.jpeg
    ACB96FF0-37A7-4B95-9F21-51A51973F97D.jpeg
    4 KB · Views: 0
  • D7C2C13E-ABF5-42BC-B8FD-76D329804DF5.jpeg
    D7C2C13E-ABF5-42BC-B8FD-76D329804DF5.jpeg
    3.9 KB · Views: 0
  • BA1D2EA2-7D4A-4687-A681-3A015F27155D.jpeg
    BA1D2EA2-7D4A-4687-A681-3A015F27155D.jpeg
    3.1 KB · Views: 0
  • A014126E-4999-463D-9917-E650D6CA1D86.jpeg
    A014126E-4999-463D-9917-E650D6CA1D86.jpeg
    3.5 KB · Views: 0
  • 3B747F1A-5C61-4E66-ABD0-85E36FFA0FBE.jpeg
    3B747F1A-5C61-4E66-ABD0-85E36FFA0FBE.jpeg
    3.9 KB · Views: 0
  • D64C45E9-7C49-44B5-B5A7-29360191588A.jpeg
    D64C45E9-7C49-44B5-B5A7-29360191588A.jpeg
    3.5 KB · Views: 0
Soviet, limited run ? OK youve got my attention Barry ! Nice start , I'll be watching closely and taking notes as this is one that I will be getting sooner or later , cheers tony
 
Interested to see how the fit goes on this one. Goodluck Barry.
 
Thread owner
Well I am still pulling together sub assemblies ahead of painting and I have hit the first real fit issues.

The wheel well walls really do not fit at all.

I spent ages trying to dry fit and eventually tried to fit one end into place and bend the other end back into position. This is how it looked with one end in place.
View attachment 293017
It did not work....

I ended up easing them off to try again.
Eventually I ended up with this mish mash. It looks better in the photo than it actually is...
.View attachment 293018

I have a lot of filling and sanding to do including inserting plastic card to try to make it look something like a wheel well rather than a load of badly fitting plastic.

Then I have a piece to fit somewhere in there. The instructions give you a rough idea but that it something to deal with later.
View attachment 293019

Once I have filled the various gaps and smoothed and shaped the joins I will have this to deal with...
View attachment 293020
Lots more sanding and scraping away the wheel well plastic to get a wing join....

Such is the challenge of a Special Hobby kit so why get them and why put up with this? Simple, in 1/32 they are the only ones producing certain subjects, even significant aircraft types like this....

You just make excuses for them and when you buy, you know you are getting a crap kit. They are not cheap though.... unlike Revell who at least produce cheap crap kits that you can often throw away knowing someone makes a better version of the subject!!!

Such is life and here I am waiting for them to release their Whirlwind, yes I will probably buy it knowing its a crap kit......
 

Attachments

  • IMG_2943.jpg
    IMG_2943.jpg
    32.9 KB · Views: 0
  • IMG_2941.jpg
    IMG_2941.jpg
    2.8 KB · Views: 0
  • IMG_2940.jpg
    IMG_2940.jpg
    2.8 KB · Views: 0
  • IMG_2939.jpg
    IMG_2939.jpg
    3 KB · Views: 0
Thread owner
A further musing on the challenges of Special Hobby....

I read a couple of reviews neither identified the wheel well fit as an issue. One did identify a wing fit issue and suggested an easy correction.

One review said that this is probably Special Hobby's best kit - well I beg to differ, their Fiat G50bis was a better kit with far fewer build problems. Even their Aircobra had fewer issues, the killer simply being the practical difficulties with the front wheel's engineering on the tricycle u/c, one problem I never did solve.....

So what is it with reviewers? Why do they ignore problems?

Maybe we have a situation like the Emperor's new clothes.... you know the old fairy story. Perhaps we need an equivilent of the little boy to cut though the bull, stop making excuses (oh, but Revell are cheap, oh, but SH are short-run and you expect bad fit) and say it as it is, they make crap kits. Once people stop making excuses for them they will be exposed for what they really are, crap kit makers. Only then may they decide they need to improve. It is possible, look at the huge strides Airfix have made while still offering good value new tool kits (just not in my scale....). We modellers can be our worse enemy, too willing to accept poor quality.
 
Just about here I would say something like 'all looking great' but anyway, even though those wheel well parts look identical, did you try reversing them. I've had that on a kit (not this one) were the instructions mixed up left and right.
 
Thread owner
I did indeed Colin. I too read about issues with SP instructions. I spent nearly an hour trying and fiddling around and in the end the two parts got mixed up anyway and I just made sure I cemented them however they fit best. .
 
Thread owner
So far so good.

It was clear that the detail was creating a step so I had to trim back the internal ribbing a little
View attachment 293129

Then I painted raised areas black and pressed the parts together to reveal the key sections to sand. I did this a few times in the process.
View attachment 293130
View attachment 293131
After a while I managed to get the pieces to connect after a lot of scraping, cutting and sanding.
View attachment 293132
It’s better than it looks in the photo
Next I will need to fill and sand to close some gaps and improve the appearance. It won’t be perfect but I will make the best of it.
 

Attachments

  • 4A929FBE-5ECD-4091-965D-6901E40AF5E7.jpeg
    4A929FBE-5ECD-4091-965D-6901E40AF5E7.jpeg
    3.7 KB · Views: 0
  • 0C2DC674-AB71-40FA-9DCE-8EDD95ABD2CB.jpeg
    0C2DC674-AB71-40FA-9DCE-8EDD95ABD2CB.jpeg
    3.1 KB · Views: 0
  • 689A3C1D-53A8-4480-9797-E88D4EB21FB2.jpeg
    689A3C1D-53A8-4480-9797-E88D4EB21FB2.jpeg
    3.6 KB · Views: 0
  • DED79643-F3AC-48D0-A865-4DD404AF0797.jpeg
    DED79643-F3AC-48D0-A865-4DD404AF0797.jpeg
    3.1 KB · Views: 0
Your really having to put some work into this one Barry, but your doing a great job.
 
Thread owner
I have joined the wings and have had to use a large amount of Mr Surfacer 500 down the join. Once it has properly cured there is going to be a lot of sanding to do with, most likely further filler treatments.
View attachment 293266

This photo represents one of the other challenges of these short run kits. The need to join several parts without any positive location points while have to get the right angles and right position. Sometimes you need child sized fingers and four hands....
View attachment 293263
Managed it though, eventually... I really should have painted these parts first but in the end decided that I prefer to face the positioning and gluing first.
View attachment 293264
I dry fitted this into position and found that in this case it is a perfect fit!
View attachment 293265

It’s a fight but so far I am winning.
 

Attachments

  • D21DDECF-FCE9-4DDB-9EBF-9C4FCECAAC17.jpeg
    D21DDECF-FCE9-4DDB-9EBF-9C4FCECAAC17.jpeg
    3.4 KB · Views: 0
  • 492DD638-1DB8-4379-BA14-FC7779185B3E.jpeg
    492DD638-1DB8-4379-BA14-FC7779185B3E.jpeg
    3.2 KB · Views: 0
  • 72B04A7F-D0EE-4DAD-9DA7-B5A337E7F5D6.jpeg
    72B04A7F-D0EE-4DAD-9DA7-B5A337E7F5D6.jpeg
    4.5 KB · Views: 0
  • 5A48DF13-93EA-4FCF-B230-4FA423E7A1EE.jpeg
    5A48DF13-93EA-4FCF-B230-4FA423E7A1EE.jpeg
    3.1 KB · Views: 0
Thread owner
One thing about Special Hobby is how they have a large number of exceptionally small parts which are difficult to handle with or without tweezers, difficult to position because they lack any positive locations and are often difficult even to work out exactly where they go. They are also often quite precarious with a very small ‘glue area’. These can be plastic pe or resin. If you persevere and get them into place without the carpet monster swallowing them you then find later they some have been knocked off without you noticing... the carpet monster getting them anyway. Several small parts have disappeared like that. Most are so small no-one will notice on the finished model anyway. The only one that annoys me is a part I attached to an u/leg that is noticeable......
 
Thread owner
I have not posted updates for a few days as all I have been doing is filling and sanding... not very interesting..

But in the end it all came together, seals and joins smoothed and in one piece..

Last night I applied a MRP Black primer to the interior and some other parts to prepare for painting. The primer is particularly necessary because this kit is 'multi-media' with resin and p.e. plus because of the amount of scraping and sanding I wanted to improve the surface and remove any micro scratches wherever possible.
View attachment 293500

Tonight and tomorrow I will be getting on with a little more construction and the painting.
 

Attachments

  • IMG_2956.jpg
    IMG_2956.jpg
    3.6 KB · Views: 0
A satisfying point to be at. I'm sure it will just fall together now....................................
 
Great work Barry. I used to think crap fitting kits were the norm and thats just how models are. Then i built the Tamiya 1/32 Mosquito. Hundreds of parts that fitted together perfectly. And no filler needed anywhere.
 
I used to think crap fitting kits were the norm and thats just how models are.
Likewise, bit of a revelation to get a modern kit in your hands.

Great work so far Barry, good to see the old fashioned skills coming gout to do battle.
 
Thread owner
I am getting on with the interior pieces with dry brushing and washes.

The ip individual dial decals bed in well.
View attachment 293624
Next I use some stuff I managed to source to replicate the dial glass. I have no idea where I got it or how much it costs but is does replicate nice clear lenses and it applies easily with a cocktail stick.
View attachment 293625
Once applied it is cured with a light pen.
View attachment 293626
Here are some parts weathered ready to install.
View attachment 293627
View attachment 293628
Fitting parts into place.
View attachment 293629
View attachment 293630
 

Attachments

  • E88DAFA1-C86F-40EB-8187-FBB304E7B66C.jpeg
    E88DAFA1-C86F-40EB-8187-FBB304E7B66C.jpeg
    4.6 KB · Views: 0
  • 3C52FAA9-EA5D-4984-9E8C-1FFF464EA206.jpeg
    3C52FAA9-EA5D-4984-9E8C-1FFF464EA206.jpeg
    4.2 KB · Views: 0
  • 782DA7BE-1CB1-4745-9698-10675209A16C.jpeg
    782DA7BE-1CB1-4745-9698-10675209A16C.jpeg
    3 KB · Views: 0
  • DA5EAAD5-8144-4208-83A0-0BD354B3F601.jpeg
    DA5EAAD5-8144-4208-83A0-0BD354B3F601.jpeg
    4.2 KB · Views: 0
  • 61D7B52A-A55B-4120-9C20-875831973813.jpeg
    61D7B52A-A55B-4120-9C20-875831973813.jpeg
    3.5 KB · Views: 0
  • 7871FED0-194C-402A-BC3F-BCD6224FDB7B.jpeg
    7871FED0-194C-402A-BC3F-BCD6224FDB7B.jpeg
    3.6 KB · Views: 0
  • A78DC55B-7898-400F-994A-DBA5732A895C.jpeg
    A78DC55B-7898-400F-994A-DBA5732A895C.jpeg
    4.3 KB · Views: 0
Thread owner
A little more fitting done
I wonder if that will still fit no ow the seat is in place?
View attachment 293711
Surprise, surprise - it does....
View attachment 293713
Now what about this. First time joining the fuselage halves together and the first test fit to the wing before the pit was dropped into place.
View attachment 293712
Thanks to being forewarned and having trimmed a little inside it is not bad at all but there will be some filler and sanding to do underside.

Fuselage halves being cemented together. More sanding of the seams to do, not perfect but not bad.
View attachment 293714
I can see some issues connecting the wing to the fuse though, with the pit in place. We shall see.
 

Attachments

  • DCD38114-A388-4CF9-AD48-BEADF5214557.jpeg
    DCD38114-A388-4CF9-AD48-BEADF5214557.jpeg
    3.7 KB · Views: 0
  • DAED1CC2-2534-4BA4-9FD2-CBEDC84AE1BE.jpeg
    DAED1CC2-2534-4BA4-9FD2-CBEDC84AE1BE.jpeg
    3.8 KB · Views: 0
  • 5033BE78-C405-401C-ADA4-FDB10CF9305E.jpeg
    5033BE78-C405-401C-ADA4-FDB10CF9305E.jpeg
    3.7 KB · Views: 0
  • CF42E3B0-CB92-48C8-8705-EA7714505E7B.jpeg
    CF42E3B0-CB92-48C8-8705-EA7714505E7B.jpeg
    4.1 KB · Views: 0
Thread owner
Well once the fuselage was dry I gave in to temptation and before sanding the joins dry fitted it to the wing....the result...
View attachment 293787
View attachment 293788
View attachment 293789
View attachment 293790
All in all a pretty good fit and rather than push my luck I cemented it into place... Those joins above will very easily be sorted by a smear of Mr Dissolved Putty, a wipe with a sanding stick and a good rub with a cotton bud dipped in ipa.

Just one area will need some serious work...
View attachment 293791
There is quite a gap there and a fair bit of filling and sanding is needed.

In the same session I treated all the seams with Mr Surfacer 500 and tonight is a sanding session...
 

Attachments

  • IMG_2989.jpg
    IMG_2989.jpg
    2.8 KB · Views: 0
  • IMG_2988.jpg
    IMG_2988.jpg
    2.8 KB · Views: 0
  • IMG_2987.jpg
    IMG_2987.jpg
    3 KB · Views: 0
  • IMG_2986.jpg
    IMG_2986.jpg
    2.8 KB · Views: 0
  • IMG_2985.jpg
    IMG_2985.jpg
    2.5 KB · Views: 0
Status
Not open for further replies.
Back
Top