
You are using an out of date browser. It may not display this or other websites correctly.
You should upgrade or use an alternative browser.
You should upgrade or use an alternative browser.
Special Hobby 1/32 Yak 3
- Thread starter BarryW
- Start date
- Status
- Not open for further replies.
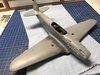
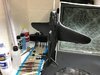
She is starting to look like a Yak. But at the moment there seems to be an endless cycle of filling and sanding, filling and sanding.....View attachment 293860View attachment 293861
Attachments
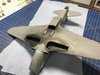
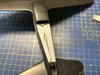
Lots more filling and sanding until eventually it was time to attach the poor fitting i.p. cover/gunsight parts to the pit. I was going to have an open canopy but one of the open canopy parts cracked when sanding off the sprue attachment point so I am fitting the closed canopy instead. This is also a very poor fit and I will have some more filling and sanding to do. A fun build this certainly is not...
View attachment 293897
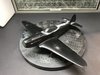
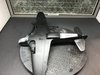
I am looking forward to finishing this one.
View attachment 293897
I am looking forward to finishing this one.
Attachments
You sound relieved, or is that surprised ?Now what about this.
A bit of each!!!You sound relieved, or is that surprised ?
This is the test of a real modeller Barry, and I know you're more than up to the task. Does seem to be quite a troublesome build though.
I've got a Special Hobby Tempest in the stash, hope it's a little bit easier than this!
Cheers
Paul
I've got a Special Hobby Tempest in the stash, hope it's a little bit easier than this!
Cheers
Paul
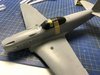
I had some real issues with that poor fitting canopy, filling the gaps and getting it smoothed onto the model. I had to re-fit the canopy a few times and in the end had to resort to using cement, not a good idea with canopies. I have some concerns about what it may be like under the masking in case capillery action has drawn cement under the mask and damaged the surface. I did lift a corner or two and did not see any damage but I will only be able to be sure when all the masking is removed.
View attachment 294136
Anyway.....
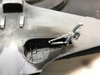
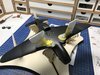
I decided to fit the u/c legs before painting. These are tricky as the lack of positive fit make it fairly difficult.
View attachment 294135
As you can see from the top picture I glued a piece of sprue to the front to act as a hanger while drying. Its a bit of overkill because MRP dries so fast....
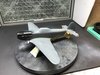
Anyway - I applied MRP Black Surface Primer
View attachment 294137
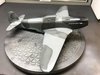
Overall, not too bad. Some of the areas where I expected to see flaws are fine but those seams are really stubborn. Already I have spent hours of sanding and yet they are still showing through. I will need to apply Mr Dissolved Putty along the seams, sand some more and then see how it is with another primer coat. I really do not know why the seams on this kit are not responding to treatment like others do, every single fuselage seam needs treating along its full length!...
View attachment 294136
Anyway.....
I decided to fit the u/c legs before painting. These are tricky as the lack of positive fit make it fairly difficult.
View attachment 294135
As you can see from the top picture I glued a piece of sprue to the front to act as a hanger while drying. Its a bit of overkill because MRP dries so fast....
Anyway - I applied MRP Black Surface Primer
View attachment 294137
Overall, not too bad. Some of the areas where I expected to see flaws are fine but those seams are really stubborn. Already I have spent hours of sanding and yet they are still showing through. I will need to apply Mr Dissolved Putty along the seams, sand some more and then see how it is with another primer coat. I really do not know why the seams on this kit are not responding to treatment like others do, every single fuselage seam needs treating along its full length!...
Attachments

rickoshea52
Active member
1/3
I had some real issues with that poor fitting canopy, filling the gaps and getting it smoothed onto the model. I had to re-fit the canopy a few times and in the end had to resort to using cement, not a good idea with canopies. I have some concerns about what it may be like under the masking in case capillery action has drawn cement under the mask and damaged the surface. I did lift a corner or two and did not see any damage but I will only be able to be sure when all the masking is removed.
View attachment 294136
Anyway.....
I decided to fit the u/c legs before painting. These are tricky as the lack of positive fit make it fairly difficult.
View attachment 294135
As you can see from the top picture I glued a piece of sprue to the front to act as a hanger while drying. Its a bit of overkill because MRP dries so fast....
Anyway - I applied MRP Black Surface Primer
View attachment 294137
Overall, not too bad. Some of the areas where I expected to see flaws are fine but those seams are really stubborn. Already I have spent hours of sanding and yet they are still showing through. I will need to apply Mr Dissolved Putty along the seams, sand some more and then see how it is with another primer coat. I really do not know why the seams on this kit are not responding to treatment like others do, every single fuselage seam needs treating along its full length!...
Get some speed tape on those seams, just like in the modern world!
I have been working the seams.
View attachment 294201
Above you can see how the underside fuselage was concave. I filled the middle and sanded it down level.
View attachment 294202
Above you can see all the areas on top after sanding and get a feel of just how difficult these seams are. Remember these have been filled and sanded a few times before I applied the primer.
View attachment 294203
However it is looking up. After respraying primer I went over the areas still in need of treatment and reapplied Mr Dissolved Putty.
Attachments
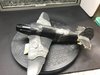
Finally I got to paint the wheel wells and legs A14 Faded Grey.
View attachment 294213
Next up was masking these areas off
View attachment 294214
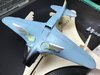
Then I painted the underside AMT7 Grey-Blue.
View attachment 294215
The MRP Paint simply enables me to easily produce the kind of colour modulation that was more difficult with other paints. Then of course the finish is perfect for washes and decals though most of the markings will be painted using a Montex set.
View attachment 294213
Next up was masking these areas off
View attachment 294214
Then I painted the underside AMT7 Grey-Blue.
View attachment 294215
The MRP Paint simply enables me to easily produce the kind of colour modulation that was more difficult with other paints. Then of course the finish is perfect for washes and decals though most of the markings will be painted using a Montex set.
Attachments
Attachments
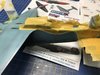
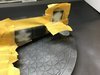
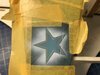
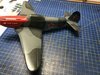
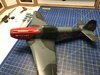
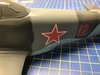
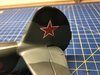
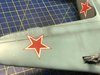
Been getting on with the camo and markings
Clever Putty masking
View attachment 294252
AMT 12 sprayed and mask removed.
View attachment 294253
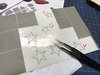
Masking for the red and some white.
View attachment 294255
View attachment 294254
View attachment 294256
View attachment 294257
View attachment 294259
View attachment 294260
View attachment 294262
View attachment 294261
View attachment 294263
View attachment 294264
View attachment 294265
View attachment 294266
As you can see I will need to do a bit of localised masking here and there for touch ups but all in all it worked out welll.
Clever Putty masking
View attachment 294252
AMT 12 sprayed and mask removed.
View attachment 294253
Masking for the red and some white.
View attachment 294255
View attachment 294254
View attachment 294256
View attachment 294257
View attachment 294259
View attachment 294260
View attachment 294262
View attachment 294261
View attachment 294263
View attachment 294264
View attachment 294265
View attachment 294266
As you can see I will need to do a bit of localised masking here and there for touch ups but all in all it worked out welll.
Attachments
-
 E6C0C9A2-D427-4724-9D79-B8050F356B10.jpeg3.4 KB · Views: 0
 -
 FE70B81E-2E05-40A4-9EF4-E3564E4C87C9.jpeg3.3 KB · Views: 0
 -
 D14A7C8D-DF75-4D1B-BFC9-7DBB76A7FBAA.jpeg3.4 KB · Views: 0
 -
 B5A80236-4D67-4624-9F6E-BED5C3CDB3AD.jpeg3.3 KB · Views: 0
 -
 1333DAA6-041C-4FF6-9E6F-C0C6A0923DA8.jpeg3.3 KB · Views: 0
 -
 67C51786-4109-4E67-8952-E1F220D09502.jpeg3.5 KB · Views: 0
 -
 0E94BCF2-E5BC-46E1-B071-14BB0BB08B82.jpeg3.7 KB · Views: 0
 -
 3998CF68-3AFA-417E-A875-E5C986AFC128.jpeg3.9 KB · Views: 0
 -
 49DACF72-B8B9-4D3E-9556-3067040F4DBC.jpeg3.3 KB · Views: 0
 -
 EA19CF92-A5AE-4C2C-98A8-F1B9CA58F50C.jpeg4 KB · Views: 0
 -
 C2232ED0-971A-4FE7-A1DF-E107988D6365.jpeg3.9 KB · Views: 0
 -
 D9585DDD-9F60-4355-888D-03BEEB531518.jpeg3.4 KB · Views: 0
 -
 E3F71F07-FAFE-4BFB-8355-E42CF714F758.jpeg3.5 KB · Views: 0
 -
 F3ACE1F8-009A-4E79-B05E-898448E8B601.jpeg3.6 KB · Views: 0
- Status
- Not open for further replies.
Legal Notice
scalemodelling.co.uk is a privately operated online discussion forum. All content posted by members reflects their own views and opinions and does not necessarily represent those of the forum owners or administrators. While reasonable efforts are made to moderate content, no responsibility is accepted for user-generated material. By using this site, you agree to comply with UK law and the forum rules.