Theme editor

Scale Model Shop

Classic Airframes 1/48 Fairey Gannet ASW

Status
Not open for further replies.

Ian M

Active member
Staff member
Admin
Joined
Dec 14, 2008
Messages
18,336
Reaction score
574
Points
113
Location
Falster, Denmark
1/3
Thread owner
View attachment 296570
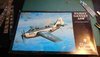
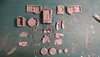
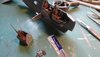
Feels like ages since I build a winged thing. After much box opening, rummaging and putting back on the shelf I found my eye kept being drawn towards this. So new blades in the Swan and Mortens, Micro saws dug out and dust mask found it was time to get stuck in to some resin and get them free of the casting blocks.
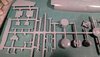
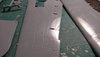
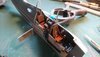
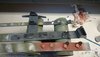
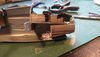
Lets just say some are easier than others and you sit wondering "Why the flip did they put it on the block like that!" Still I only broke one part which is an easy fix and have yet to cut the wheel wells off the blocks. Which naturally are mounted so the bottom of the wheel well is to the block. So Yet another nice big cut to make. Two actually... Grr.
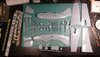
I will take a photo of the parts later, together with the plastic parts. No in progress pictures as I did not want to get resin dust all over my mobil phone.....
 

Attachments

  • DSC_0935.JPG
    DSC_0935.JPG
    2.5 KB · Views: 0
So you finally got one Ian!! Its not going to be a shake and bake but itll certainly look impressive when done, looking forward to the build ,cheers tony
 
Thread owner
So you finally got one Ian!!
It's been siting in the stash for over a year now Tony, so its about time I attacked it. lol
Right photos of the bits and bobs.
View attachment 296609
The resin parts all cut away from the casting blocks, except the two things that look like a sharks jaws. A quick swipe with a scalpel should take care of them just befor fitting. They are so thin they are see through!
View attachment 296610
The plastic parts are typical low run low pressure mouldings. A bit shiny, good detail and loads of clean up needed.
View attachment 296611
A few of the panel lines are a bit 'fuzzy' but the plastic is soft and takes a P cutter well. (read the scratches are easy to polish out). Talking of soft plastic, GENTLE sanding with a medium stick works best, but it does leave the area a bit fuzzy and needs a polishing stick (or a quick swipe of extra thin ;-) )
View attachment 296612
I can see a lot of cleaning, scraping and sanding in the near future...
Oh and for the feint of heart, there is not one locating pin on the wings or fuselage.... O.o
 

Attachments

  • DSC_0949.JPG
    DSC_0949.JPG
    2.7 KB · Views: 0
  • DSC_0947.JPG
    DSC_0947.JPG
    1.9 KB · Views: 0
  • DSC_0946.JPG
    DSC_0946.JPG
    2.7 KB · Views: 0
  • DSC_0945.JPG
    DSC_0945.JPG
    2.3 KB · Views: 0
Look at all that flash! Nice subject Ian and looking forward to this one, will definately watch.
Did all that resin come with the kit or is it 3rd party?
Cheers
Phil
 
Thread owner
Look at all that flash! Nice subject Ian and looking forward to this one, will definately watch.
Did all that resin come with the kit or is it 3rd party?
Cheers
Phil
Its all in the kit Phil.
 
Ooh ! Looks just like building an Amodel kit!! A proper exercise in modelling but perversely enjoyable!!:dizzy::dizzy:
 
Thread owner
Ain't that the truth Tony. Just for fun, I have two Aeroclub kits in the stash as well. Both bi-planes... groan. Why do I do this to myself? lol
Anyways... Got a few bits sorted, and the primer is drying as I write...
View attachment 296640
The propellers where a PITA. they look very 'tiny' for such a big bird. What ever. I got them whittled down and after much faffing about, got them to sit 'more or less' correctly. Got to love single blade props!
I hate myself. I remembered that I got a clear resin canopy for my Arado when I did that and hunted down where I got it from so I could pass the info on to Graham D for him to see.
What did I find there? A interior weapons set, weapons bay, 100gal. wing tanks... Bugger. problem is I am broke, as in skint! to make it even worse, Airwaves do a wing fold set....
What to do, what to do?
 

Attachments

  • DSC_0950.JPG
    DSC_0950.JPG
    2.9 KB · Views: 0
Ain't that the truth Tony. Just for fun, I have two Aeroclub kits in the stash as well. Both bi-planes... groan. Why do I do this to myself? lol
Anyways... Got a few bits sorted, and the primer is drying as I write...
View attachment 296640
The propellers where a PITA. they look very 'tiny' for such a big bird. What ever. I got them whittled down and after much faffing about, got them to sit 'more or less' correctly. Got to love single blade props!
I hate myself. I remembered that I got a clear resin canopy for my Arado when I did that and hunted down where I got it from so I could pass the info on to Graham D for him to see.
What did I find there? A interior weapons set, weapons bay, 100gal. wing tanks... Bugger. problem is I am broke, as in skint! to make it even worse, Airwaves do a wing fold set....
What to do, what to do?
Sell something lol
 
A Gannet, a lovely ugly bird. Don't forget weight, lots of weight.
 
The Gannet is understated and almost forgotten, but one of the most valuable platforms on the last of the proper British carriers. Look forward to seeing the build progress Ian.
 
Thread owner
So been a bit busy in the garden (at last! Sunday just past it was pushing 20c the Sunday befor we had 20cm of snow! )
Anyway. the back needed a rest so I got a bit more done.
View attachment 297027
The cock pit parts 'sort of' painted. Typical of RN aircraft its a coal hole so not a lot will be seen. Black-grey interior with black panels.
View attachment 297029
Knocked up some basic harnesses to add a bit of colour and detail. Can you guess what I used lol. Actually quite good as the foil has a thin plastic skin. A quick swipe with a find sanding stick and they take paint quite well.
View attachment 297028
View attachment 297030
As you can see they are a nice crisp blue. Some of the paint might get buggered when I fold them in place but a bit of touching up and they will do. Am I doing buckles for them? Erm.. no. lol
View attachment 297031
So I just need to paint the nose wheel bay and I can try to get her closed up....
 

Attachments

  • DSC_0972.JPG
    DSC_0972.JPG
    2.2 KB · Views: 0
  • DSC_0971.JPG
    DSC_0971.JPG
    2.4 KB · Views: 0
  • DSC_0970.JPG
    DSC_0970.JPG
    2.5 KB · Views: 0
  • DSC_0969.JPG
    DSC_0969.JPG
    2.7 KB · Views: 0
  • DSC_0968.JPG
    DSC_0968.JPG
    2.5 KB · Views: 0
Nice work Ian.
I've just got the Revell 1/72 version of this, I may start that soon.
 
Just before you close anything, just stick a bit of lead in there, just in case. I placed lead anywhere forward of the main gear. Like on top of the front wheel well, leading edges of the wings and the very front of the fuselage. And it still hasn't buckled under all that weight.
 
A bit slow on the uptake on your build Ian. There's some fantastic detail going on in that cockpit.will be following your progress.
 
Thread owner
Lead herewith added.
View attachment 297055
The nice hollow atop the wheel bay has been filled with lead. I found that some old lead tube that was about 6 mm ø then flattened down filled the hole quite well. Add to that the gaps have had small bits stopped into them. There is also a bit behind the bulkhead.
You might also see that I have added the pull straps to the harnesses and touched them up a bit to hid any scratches.
View attachment 297056
rather a pity with the wheel bay. All the good detail is towards the rear, where the triangle bit is. To be able to see that the doors need to be cut out. No detail on the back and having no luck finding a photo of them. If I find one I might have a go at them. 99.9% of pictures I have found the rear U/C doors are closed when on the ground anyway....Hmm
Now I get to wait until the Gator grip glue sets up and she is safe to move around. Then its time to zip it together! Should be fun.

Thanks for the comments
If the nice guys from airfix are sneaking a peak at this: Please can you make a nice plastic kit of this iconic aircraft in 1/48. There are enough in 1/72!
 

Attachments

  • DSC_0973.JPG
    DSC_0973.JPG
    2.6 KB · Views: 0
  • DSC_0974.JPG
    DSC_0974.JPG
    2.5 KB · Views: 0
Status
Not open for further replies.
Back
Top