Hmm me thinks you might be overdoing it with the glue. Tamiya extra thin normally evaporate away, the only sign left a slight glossy patch. These are often simple to magic away with a burnishing brush/glasfiber pencil. like this one: www.scalemodelshop.co.uk/product/4mm-glass-fibre-pencil-ak-interactive-ak-8058 If there is a blob, let it dry 110% then sand it off with some fine grade.I've tried just leaving the glue, and it created a "glue pool" which was visible in the paint work, so I thought I'd better do something else this time, since it was in a very visible place :-(

You are using an out of date browser. It may not display this or other websites correctly.
You should upgrade or use an alternative browser.
You should upgrade or use an alternative browser.
1:35 Dragon 6287 88mm Flak 37 (build version: 37, transport, extended shield)
- Thread starter Gauge1TrainsDK
- Start date
Thank you again - that is the solution I have not tried yet: Let the glue harden, then sand.Hmm me thinks you might be overdoing it with the glue. Tamiya extra thin normally evaporate away, the only sign left a slight glossy patch. These are often simple to magic away with a burnishing brush/glasfiber pencil. like this one: www.scalemodelshop.co.uk/product/4mm-glass-fibre-pencil-ak-interactive-ak-8058 If there is a blob, let it dry 110% then sand it off with some fine grade.
The drop of glue came when I was moving the glue brush back to the glass. What I have found is that sometimes the brush and screw lid will contain an extra amount of glue which will sometimes drop, and that's not good. I am not sure if this is caused by me shaking the bottle slightly to have the last pools attach to the brush, but I doubt it.
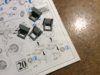
Boxes for boxing stuff, and holding the cable reels. The reels with the wire make me nervous, btw. Could use a shipbuilder for those ;-)
View attachment 365207
View attachment 365207
Attachments
G
Guest
Guest
Looking at a few photos, the cables weren’t generally wound perfectly on the reels. Not overly sloppily either, but certainly nowhere near as neatly as on a good winch with cable guides.
Thank you for the headsup - nice to know in advance!Looking at a few photos, the cables weren’t generally wound perfectly on the reels. Not overly sloppily either, but certainly nowhere near as neatly as on a good winch with cable guides.
G
Guest
Guest
In addition, it’s actually not all that easy to find photos of these guns with the cable reels even on the bogies … You could just leave them off entirely.
In addition, it’s actually not all that easy to find photos of these guns with the cable reels even on the bogies … You could just leave them off entirely.
This is my first time bullding one of the Dragon Flak 37, so I am going to try to include it all.
Besides, I really like the look of those things, and the challenge!
Thank you, regardless.
Thanks, I do try!The build maybe proving to be a bit of a challenge at times. However you are beating it into submission well. Keep up the great work
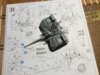
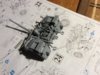
Next phase was build no.s 21 through 24: Adding cool stuff to the first bogie(?). And man, does it look like something even more now! A good part about it is, like most of the rest, it was not in general that difficult. The only pieces I had some trouble figuring out were F51 (how to place it on F48 so it interacts properly with the rest of the build. This was visible on the model itself, but not in the illustrations.) and the Z-piece tow cable string, which I am rather confident I have figured out now! It goes from the bogie to the E8 part on one of the legs which carry the gun itself, right? Parts F3-6 could be placef several ways, but should be exactly horizontal. Too bad the holes left open a lot of adjustment space and the instructions did mot specify. It only becomes apparent in later steps, when fitting the ligts, and I did not figure that out. Sometimes, it does help to read ahead in Dragon-instructions, and when I am actively trying to figure out where to place something at all, that's what I do.
Anyway, I hope you will enjoy this beautiful Dragon bogie")
View attachment 365402View attachment 365403View attachment 365404
Anyway, I hope you will enjoy this beautiful Dragon bogie
View attachment 365402View attachment 365403View attachment 365404
Attachments
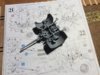

The photo-etch step in build step 23 gave me problems, and ultimately, I could not bend it to have the tread pattern part sit absolutely horizontal. Rather, it sits bent, maybe as if damaged by something heavy. So, I guess it's visually salvageable, but this is something which makes me less happy with my result, if not my effort. Good thing that I have another step to bend for the other bogie ;-)
The tools are kept separate for spraypainting in wood colour.
View attachment 365405
The tools are kept separate for spraypainting in wood colour.
View attachment 365405
Attachments
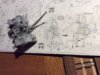
Lights and some sort of cases go on the wheel caps.
Z-cable I believe is meant to continue through on is step, it's probably not another piece of cable.
View attachment 365406
Z-cable I believe is meant to continue through on is step, it's probably not another piece of cable.
View attachment 365406
Attachments
Much appreciatedA thing of beauty. Wonderful work Christian
) It is an excellent kit to look at!Thank you - it's been a blast to build! Highly recommend it if you have patience, because so far I feel the build itself is doable, although maybe not for everyone to fiddle with. I find the parts to be of high quality and not breaking in any one case. (Compare to ICM!)Hi Christian
Looking very good so far
Well done.
Andrew
Thank you - it's been a blast to build! Highly recommend it if you have patience, because so far I feel the build itself is doable, although maybe not for everyone to fiddle with. I find the parts to be of high quality and not breaking in any one case. (Compare to ICM!)
Christian
I'd love to but I have no room left in the stash cupboard - literally none and so I think that may be pushing it domestically!! :flushed::fearful::sad:
ATB
Andrew
Well, at least your priorities are healthy ;-)Christian
I'd love to but I have no room left in the stash cupboard - literally none and so I think that may be pushing it domestically!! :flushed::fearful::sad:
ATB
Andrew
Well, at least your priorities are healthy ;-)
I try to!!
And it's my birthday tomorrow and I asked for another kit, then there's Christmas and I asked for another kit, and then there's the kit delivered to work yesterday I got with a £25 Amazon voucher courtesy of winning a prize draw at work.......I am in trouble!!!!
Legal Notice
scalemodelling.co.uk is a privately operated online discussion forum. All content posted by members reflects their own views and opinions and does not necessarily represent those of the forum owners or administrators. While reasonable efforts are made to moderate content, no responsibility is accepted for user-generated material. By using this site, you agree to comply with UK law and the forum rules.