
You are using an out of date browser. It may not display this or other websites correctly.
You should upgrade or use an alternative browser.
You should upgrade or use an alternative browser.
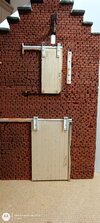
Regarding the doors, if you look closely at the photo it is held up by rollers behind the strip attached to the door. The long bar running above the doorway probably has a lip to prevent the roller from slipping off. An angled photo should reveal that.
Cheers,
Wabble
Cheers,
Wabble
G
Guest
Guest
Thanks AndyGreat building work John, looks really good.
Andy.
Thank you Wabble .Regarding the doors, if you look closely at the photo it is held up by rollers behind the strip attached to the door. The long bar running above the doorway probably has a lip to prevent the roller from slipping off. An angled photo should reveal that.
Cheers,
Wabble
Cheers Neil , still learning !Wow, just wow!
It sure is Andy, got it from Evil Bay, a seller called mtg-terrain £13.26 for 3 sheets 300x200mm x 10mm thick . Pleased with it .HTH.What type of foam is that John? XPS?
Looks so much more realistic with the joints cut deep like that. A lot better than I could manage with foamcore board.
As much as I like the foam board your right in the fact that you can't seem to get a such a deep joint . Might have a look at doing it on a 10 mm thick section of the Kappa Line, but the foam it's different in its make up .
Hi Fernando thanks , good to see you back on the forum buddy .Hi John, first thing I see since a long time when I entered the site another neat looking dio in the works from you:smiling4::thumb2:
Hope your ribs are fine again
Fernando
Ribs are getting better thank you , still painful on the left side . This is what happens when you forget how old you are !
Cheers Andrew .Simply outstanding already John.
Very well done indeed!
ATB.
Andrew
Ha, not quite a sling Rick, still trying to imagine how you would manage to do that ? :smiling2:. Cheers , pleased with it so far .OK JR....if you do this well with yer ribs in a sling, I don't think the competition has a prayer!.......keep it coming Sir, you are on your way to creating another "Show Stopper"!! :thumb2: :thumb2:
G
Guest
Guest
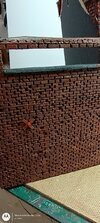
Today spent some time adding more brick shades , also painted the cil and the top concrete slabs .

 View attachment 478112
Once the additional colours were added and dry a coat of Matt AK 3rd Gen varnish was brushed over the bricks . Now in the house to dry over night fully . Tomorrow will attempt to do the mortar, two ways, 1 mix some white wall filler with some gray , make into a slurry . Cover the whole of the brick work and allowing a few minutes to semi dry,then wipe gently the surface with a damp cloth. The other way, 2 would be to make up a powder mix and apply to the bricks, dust off and then use a fixative such as VM .Need to experiment on a scrap section first I think .
Any tips welcome .
Thanks for the support and for looking in .
John .
View attachment 478112Once the additional colours were added and dry a coat of Matt AK 3rd Gen varnish was brushed over the bricks . Now in the house to dry over night fully . Tomorrow will attempt to do the mortar, two ways, 1 mix some white wall filler with some gray , make into a slurry . Cover the whole of the brick work and allowing a few minutes to semi dry,then wipe gently the surface with a damp cloth. The other way, 2 would be to make up a powder mix and apply to the bricks, dust off and then use a fixative such as VM .Need to experiment on a scrap section first I think .
Any tips welcome .
Thanks for the support and for looking in .
John .
Attachments
Check with Matron.......I'm sure she will be able to ummmm, help you out with that !! :tongue-out3: :tongue-out2: :tongue-out:Thanks Andy
Thank you Wabble .
Cheers Neil , still learning !
It sure is Andy, got it from Evil Bay, a seller called mtg-terrain £13.26 for 3 sheets 300x200mm x 10mm thick . Pleased with it .HTH.
As much as I like the foam board your right in the fact that you can't seem to get a such a deep joint . Might have a look at doing it on a 10 mm thick section of the Kappa Line, but the foam it's different in its make up .
Hi Fernando thanks , good to see you back on the forum buddy .
Ribs are getting better thank you , still painful on the left side . This is what happens when you forget how old you are !
Cheers Andrew .
Ha, not quite a sling Rick, still trying to imagine how you would manage to do that ? :smiling2:. Cheers , pleased with it so far .
")
Thanks John, I've ordered their mixture pack :thumb2:It sure is Andy, got it from Evil Bay, a seller called mtg-terrain ~
G
Guest
Guest
"Are you serious "Check with Matron.......I'm sure she will be able to ummmm, help you out with that !! :tongue-out3: :tongue-out2: :tongue-out:
G
Guest
Guest
Great Andy, I'm sure you will have some better results with it. Let us know .Thanks John, I've ordered their mixture pack :thumb2:
G
Guest
Guest
Thanks Jim, to me this is the best part.I've said it before John but you are really good at this stuff. Outstanding.
G
Guest
Guest
No photos as the board is damp and gives the wrong colours , but I've made up a mix of wall filler which was extremely fine, added several drops of grey and sandstone paint mixed well and applied to the brick work .
Frightening I can admit to cover all that previous work with a slurry of grey filler. Then wiping it off with a damp sponge in a downward movement. Not too hard as you will draw out the filler . Finding the amount of dampness needed to remove only the filler from the face of the bricks is unnerving. I found patting the surface with kitchen towel helpful at the end . Both sides are now sitting in the warm awaiting from tomorrow.
Then it's more brick painting , this time singularly to bring out the colour again . The application of mat varnish over the brick face before this is definitely worth it .
Hopefully tomorrow will bring some photos .
John .
G
Guest
Guest
Indeed Rick, good point ,luckily it's not in direct line of fire from the heater so should be ok .:thumb2:Sounds like good progress JR....careful on the drying temp for the wallboard filler....too high and it will crack.
G
Guest
Guest
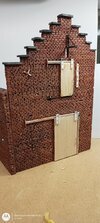
After drying over night I started painting each brick separately. Having a mix of colours I began . Took most of the day, had a long break at lunch time , then returned to the bench.
Managed to do one side , the front , so tomorrow will tackle the side , which is a lot smaller .
Already had a test on a section of wood for the doors, need that worn look from faded paint .
From this


To this.

Front , next will be a black tyre wash , very thin to pick out the brick face .
A long involved job, just switch off and paint !:nerd:
Thanks for following.
John .
Managed to do one side , the front , so tomorrow will tackle the side , which is a lot smaller .
Already had a test on a section of wood for the doors, need that worn look from faded paint .
From this
To this.
Front , next will be a black tyre wash , very thin to pick out the brick face .
A long involved job, just switch off and paint !:nerd:
Thanks for following.
John .
Legal Notice
scalemodelling.co.uk is a privately operated online discussion forum. All content posted by members reflects their own views and opinions and does not necessarily represent those of the forum owners or administrators. While reasonable efforts are made to moderate content, no responsibility is accepted for user-generated material. By using this site, you agree to comply with UK law and the forum rules.