
You are using an out of date browser. It may not display this or other websites correctly.
You should upgrade or use an alternative browser.
You should upgrade or use an alternative browser.
1/32 Revell/Special Hobby P 39 D Airacobra
- Thread starter Vaughan
- Start date
- Status
- Not open for further replies.
")
G
Guest
Guest
Amazing detail, superb work Vaughan.
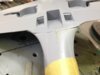
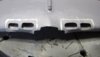
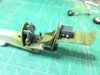
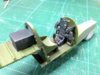
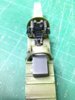
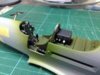
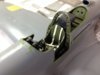
Hi All, thanks for all your comments. There has been a bit a pregnant pause I'm afraid to say on this one but I'm glad to say there has been some progress. Cockpit is all but finished, I used the decals provided for the instrument panel and I think it has come out quite well. I've just got to add some seat belts, I'm a bit strapped for cash so they maybe homemade. The office is now attached to the left hand side of the fuselage a bit of a fiddle to line it all up correctly. Still yet to close the fuselage and it looks like it will be tight fit. Wing halves are attached and radiator inlets are also fitted. The fit is poor requiring plenty of filler. Wings to fuselage looks to be a challenge at the roots will cross that bridge when I come to it. Wheel well covers have sprayed interior green and have been weathered too. Hopefully the next update will be soon.
View attachment 111578
View attachment 111579
View attachment 111580
View attachment 111581
View attachment 111582
View attachment 111583
View attachment 111584
View attachment 111585
View attachment 111586
View attachment 111587
View attachment 111588
View attachment 111589
View attachment 111590
View attachment 111591
View attachment 111592
View attachment 111593
View attachment 111594
View attachment 111595
View attachment 224601
View attachment 224602
View attachment 224603
View attachment 224604
View attachment 224605
View attachment 224606
View attachment 224607
View attachment 224608
View attachment 224609
View attachment 224610
View attachment 224611
View attachment 224612
View attachment 224613
View attachment 224614
View attachment 224615
View attachment 224616
View attachment 224617
View attachment 224618
Attachments
-
 150706_5119.jpg2.1 KB · Views: 0
 -
 152505_5117.jpg3.2 KB · Views: 0
 -
 152805_5104.jpg2.7 KB · Views: 0
 -
 152505_5115.jpg3 KB · Views: 0
 -
 152505_5114.jpg2.5 KB · Views: 0
 -
 150706_5120.jpg2.1 KB · Views: 0
 -
 150706_5122.jpg2.4 KB · Views: 0
 -
 150806_5127.jpg1.9 KB · Views: 0
 -
 150806_5129.jpg1.8 KB · Views: 0
 -
 150806_5130.jpg1.9 KB · Views: 0
 -
 150806_5131.jpg1.8 KB · Views: 0
 -
 150806_5133.jpg2.1 KB · Views: 0
 -
 152505_5105.jpg2.8 KB · Views: 0
 -
 152505_5107.jpg2.7 KB · Views: 0
 -
 152505_5108.jpg2.9 KB · Views: 0
 -
 152505_5109.jpg2.6 KB · Views: 0
 -
 152505_5111.jpg2.9 KB · Views: 0
 -
 152505_5113.jpg2.9 KB · Views: 0
Looking like a sweet kit, I like your masking technique the Eduard mask that came with my spitfire was just thin strips but it didn't fit all that well so had to custom a little. I think I'll try your technique on the next plane to start with.
Can't wait to see the finished product.
Regards
Phil
Can't wait to see the finished product.
Regards
Phil
G
Guest
Guest
Nice and clean so far
Hi Vaughan
Seems I spoke too soon regards the fit of the kit. I know you'll sort the issues though and it's these sorts of kits that properly test modelling skill. I know you're more than up to the task and I'm convinced the home made harness will look the business.
Cheers
P
Seems I spoke too soon regards the fit of the kit. I know you'll sort the issues though and it's these sorts of kits that properly test modelling skill. I know you're more than up to the task and I'm convinced the home made harness will look the business.
Cheers
P
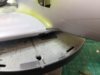
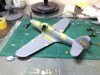
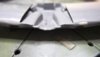
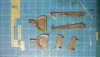
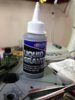
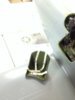
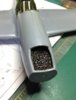
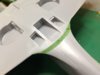
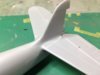
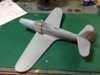
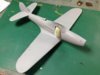
Well I've jumped from the Dauntless to the Airacobra I think this helps with the mojo. Fuselage is all buttoned up and wings fitted. Plenty of filler was required around the wing roots as well as the under wing to fuselage seam. Home made seat belts have been made out of textured foil from a lemonade can,which I think gives a good effect. This ones going to be a real tail sitter so I invested in a product called Liquid Gravity not cheap at over £8 but theres 250g of this free flowing stuff, so should do a couple more aircraft, the Airacobra used 50g. Easy to use you just pour the small grains into the cavity followed by some super glue to hold it in place. c of g is now perfect and no tail sitting. Images are all out of sequence as usual anybody prepared to give a tutorial on how to get it right?
View attachment 119208
View attachment 119209
View attachment 119210
View attachment 119211
View attachment 119212
View attachment 119213
View attachment 119214
View attachment 119215
View attachment 232230
View attachment 232231
View attachment 232232
View attachment 232233
View attachment 232234
View attachment 232235
View attachment 232236
View attachment 232237
Attachments

")
Great work on the Aeracobra - love those seatbelts. And, as always, your care with the filler and sanding sticks is payingoff big time.
The liquid gravity looks an interesting product. I've been buying divers' lead shot weight but the process seems to be the same. The shot in the product looks to be finer though and a little better at getting into the nooks and crannies.
It's a balancing act I find with Mojo. Have enough on the go to make things interesting but too much can be overwhelming. You seem to have the balance right there Vaughan and it's great to see you firing on all cylinders.
Cheers
Paul
The liquid gravity looks an interesting product. I've been buying divers' lead shot weight but the process seems to be the same. The shot in the product looks to be finer though and a little better at getting into the nooks and crannies.
It's a balancing act I find with Mojo. Have enough on the go to make things interesting but too much can be overwhelming. You seem to have the balance right there Vaughan and it's great to see you firing on all cylinders.
I think after you load your pics you can physically move them in 'the draft of the post'. If you edit your post you should still be able to move them. Simply click and drag them where you want. At least I think that's what I do.Images are all out of sequence as usual anybody prepared to give a tutorial on how to get it right?
Cheers
Paul
G
Guest
Guest
This is looking great Vaughan, nice office work . The repairs on the ill fitting areas are coming along nicely. Looking forward to the next update!
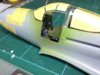
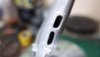
Thanks Guys, small update today canopy on and primmer down. One seam will need attention, glued but will need to allow the primmer to cure before I attempt to fill and sand.( it's that dreaded Vallejo primmer)  .
.
View attachment 120082
View attachment 120083
View attachment 120084
View attachment 233104
View attachment 233105
View attachment 233106
.View attachment 120082
View attachment 120083
View attachment 120084
View attachment 233104
View attachment 233105
View attachment 233106
Attachments

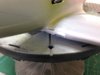
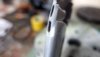
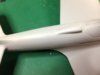
Fuselage seam sorted. I was a little impatient waiting for the primmer to cure so tried a new method of sanding. Once I'd cleaned up the excess glue with a blade I then sanded with a medium stick and then a fine stick. this left a stepped edge as I think we all know happens with Vallejo primmer. I then put some vallejo airbrush cleaner on some kitchen roll and then proceeded to rub the primmer on the stepped edge. This dissolved the primmer leaving a perfectly smooth edge. I have then resprayed the area and once cured will re-scribe the panel lines.
View attachment 120148
View attachment 233170
View attachment 120148
View attachment 233170
Attachments
- Status
- Not open for further replies.
Legal Notice
scalemodelling.co.uk is a privately operated online discussion forum. All content posted by members reflects their own views and opinions and does not necessarily represent those of the forum owners or administrators. While reasonable efforts are made to moderate content, no responsibility is accepted for user-generated material. By using this site, you agree to comply with UK law and the forum rules.