Thanks Richard :thumb2:
Steve - if the PE ones have detail etched in them could you stick them to some plastic card to give thickness?
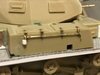
Si - when I bought them there were no alternatives other than Tamiyas appalling two handled version. They were pulled from the stash - £2.50 it says on the box. Apart from the lack of seam I don't think they are too bad but there are various others now available of course and with etch inserts for the seam - more expensive though for less cans. I am happy to mod the Italeri ones for now
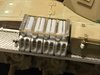
John - that sounds like the type. How robust were they once assembled? My links are very bendy and thin - they don't look like they will last very long
Cheers Paul - they are very time consuming
Jim - not done the keys yet, having problems getting the mechanism to work :smiling5:
Andy - yup, still trying
Mike - best tip would be ignore me and just build it out of the box!
No progress to report, sorry