Theme editor

Scale Model Shop

1/72 Italeri Douglas C-47 Skytrain

flyjoe180

SMF Supporters
Joined
Jan 18, 2012
Messages
13,275
Reaction score
1,070
Points
113
1/3
Thread owner
I started this a little while ago, but held off posting until the forum was sorted. I have two of these kits, the first here will be represented as a USAAF D-Day machine. That machine is C-47A 43-15109 ‘The Argonia’ of the 94th Squadron, 439th Troop Carrier Group, USAAF, 1944. This aircraft, flown by the C.O, at 0111 Hours on 6 June 1944 dropped some of the first elements of the 101st Airborne Division into Normandy.

There are many variations (guess work) on the exact marking of this C-47, but I'll just stick with what's in the box, or I'll never get anything finished this year.

IMG_1312.jpg

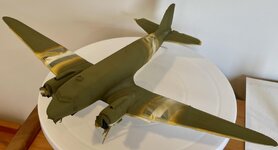
The windshield was a pest; the fuselage, and underside wing-to-fuselage areas, required a lot of filling. The cargo door was not a great fit. But overcame those and assembled per the instructions. Medium sized photos because there's nothing amazing to show yet.
IMG_1373.jpg

Engines, not going to town on them, this is it. Most of it is hidden inside the cowl and behind the propellers anyway.
IMG_1374.jpg

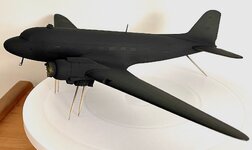
Eventually I ended up with this, primed in flat black.
IMG_1379.jpg
 

Attachments

  • IMG_1379.jpg
    IMG_1379.jpg
    335.3 KB · Views: 0
Thread owner
Landing lights fitted, not a great fit so used PVA to fill the gaps before masking.
Click image for larger version  Name:	IMG_1798.jpg Views:	1 Size:	830.8 KB ID:	1235668

Leading edges masked:
Click image for larger version  Name:	IMG_1799.jpg Views:	1 Size:	911.2 KB ID:	1235672

Because I primed in black I then masked off my black D-Day stripes and painted white. Some bleed, easily fixed with black paint. I also added some mottle for the OD
Click image for larger version  Name:	IMG_1799.jpg Views:	1 Size:	911.2 KB ID:	1235672
Click image for larger version  Name:	IMG_1803.jpg Views:	1 Size:	737.4 KB ID:	1235673

Found out I really dislike D-Day invasion stripes. Once fixed up, I masked them off for the main event:
Click image for larger version  Name:	IMG_1799.jpg Views:	1 Size:	911.2 KB ID:	1235672

I sprayed the Neutral Grey, then masked off the demarcation lines and applied my OD. The mottle on the top of the fuselage worked quite well. The photos, as usual, don't show it that well.
Click image for larger version  Name:	IMG_1799.jpg Views:	1 Size:	911.2 KB ID:	1235672
I've since unmasked, and there are bleed and other touch-ups to do, but nothing that won't take an hour or so. Then I'll move on to messing the thing up a bit. I'm a little concerned about those cockpit windows when unmasking them comes.
 

Attachments

  • IMG_1809.jpg
    IMG_1809.jpg
    114.4 KB · Views: 0
Looks great Joe, already a lot of work done 👍. An older kit, so lots of filler but you managed that well I see. Have fun, cheers
 
Great work Joe. It sounds like there's a few issues to deal with, but you've kicked them into shape.
The skytrain (Dakota over this side of the pond) was a massive step forward in aircraft design. I like the old Engineering saying, 'if something looks right, it probably is right'
General Eisenhower said that this aircraft was one of the four most important pieces of equipment that led to victory in Africa during WW2 - we can't say much more than that can we ?
 
Thread owner
I spent a few hours today tidying up the paint work. Quite happy so far, although when fitting the oil coolers, both decided to vanish into the exposed wheel wells and stick inside the wings somewhere. You know that feeling when it all seems to be going rather well...? 😂

Anyhow, here it is at close of play for the day. I've fabricated new oil coolers from 3.5mm sprue runners and will fit them tomorrow before starting the landing gear and glossing the aeroplane.

IMG_1810.jpg
 
Back
Top