Theme editor

Scale Model Shop

1/72 Revell Tornado "Eye of the Tiger"

HAWKERHUNTER

Active member
SMF Supporters
Joined
Feb 29, 2012
Messages
2,103
Reaction score
862
Points
113
Location
Halifax, West Yorks.
1/3
Thread owner
Just about to start work on this Revell Tornado. Its the German Tigermeet entry for 2009 called "Eye of the Tiger". As I have found with Revell the pieces seem nicely detailed with some crisp definition. The decal kit looks clean and fairly comprehensive. For the first time I shall be using some PE parts. These have been made by Eduard. I would welcome any pointers from anyone who has built this kit particularly any problems that you may have encountered.

I had also better point out chaps that this isnt going to happen overnight. I anticipate a build time of 6-8 weeks so please dont get to excited. Anyway looking forward to getting started and will up date this thread as I go along.

View attachment 42089View attachment 42090View attachment 42091

View attachment 45470

View attachment 45471

View attachment 45472

View attachment 158496

View attachment 158497

View attachment 158498
 

Attachments

  • 001.jpg
    001.jpg
    2.5 KB · Views: 0
  • 004.jpg
    004.jpg
    2.6 KB · Views: 0
  • 003.jpg
    003.jpg
    2.5 KB · Views: 0
Good luck with this, its a cool looking plane. Just did my first PE, fiddly stuff but really added to the build and look of the finished kit. You got some tricky looking decals there too. M
 
Thread owner
The decals do look challenging Mike but Ive just built Revells 2009 Belgium F16 Tigermeet entry and after that build I will never be afraid of a decal again.
 
Oh A Tonka, always gets my attention! I will be keeping an eye on this one. An interesting scheme as well.

Ian M
 
i love these anyversary camos...

good luck in build

I have similar tornado at home

Roman
 
I built a 1:72 Revell Tornado a while back. During the normal research we all do, I discovered that this kit is considered the best 1:72 by the Tornado experts. So, good choice Steve.

Colin M..
 
Hi Steve,

I have been looking at this kit for some time in my local model shop so will be watching this build with interest.

Swagman (Steve)
 
Thread owner
\ said:
Hi Steve,I have been looking at this kit for some time in my local model shop so will be watching this build with interest.

Swagman (Steve)
Just hope you have some patience Steve as Im not the fastest of builders. I have made a start on the cockpit and hope to post an update soon.
 
i made this kit when i first got back into modelling and made a balls of it(i thought it was great at the time),will enjoy seeing it done properly..may even get another one in the future and try again.
 
Thread owner
\ said:
i made this kit when i first got back into modelling and made a balls of it(i thought it was great at the time),will enjoy seeing it done properly..may even get another one in the future and try again.
What happened Andrew? Any information might help me so I dont make the same mistake.
 
Looking forward to this Steve i love the Tornado i'm looking to get a 1/48 one
 
\ said:
What happened Andrew? Any information might help me so I dont make the same mistake.
nothing happened really,think it was one of my first builds and i had glue everywhere,brush marks everywhere,cloudy canopy,basically i managed to do everything wrong,thats about the time i started getting tips on here so i wouldnt make all the same mistakes again
 
\ said:
Looking forward to this Steve i love the Tornado i'm looking to get a 1/48 one
Quick heads up ian, dont get the airfix ones (f3 or Gr1/4) theyre a bit pants(very poor fit,mixture of raised and engraved lines , in fact the f3 i used to have had raised lines on the fuselage upper half and recessed on the bottom half!!!!!!)i think the italeri one is loads better cheers tony
 
I second that for the Italeri one in 1/48. It builds up nice. The Hobby boss (I think) is also a good one costs a lot though.

I have built both and I think they are comparable.

Ian M
 
Thread owner
Hi Guys..Just a quick update on this in case you thought I had gone to sleep on it. I have been working on the cockpit all week and in particular using photetched parts for the first time. Frustrating is an under statement. I bought the eduard prepainted set only to find that the seat belts are painted a dark grey and the ones I need should be a mixture of browns and blue. I had hoped to get away with the dark gray but when I came to fit them you could hardly see the things against the colours of the seat. So I have reluctantly decided to paint them.On top of that one half of the instrument panel that had been glued has dropped off. I wont waste your time with any pictures at this stage but at least hope to have made some better progress in the next few days.

Steve
 
Thread owner
Hi Guys.

Well before I post these pictures let me apologise for the quality. The camera I have is pretty basic and when I eventually mastered the micro setting and came to view the pictures they looked awful. The parts look like they have painted with a tin of dulux and a stick. I can assure you that they dont look quite this bad in the flesh.

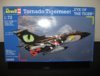
So this is my first attempt with PE parts and please remember this is 1/72 scale.

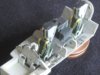
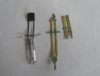
View attachment 43660I initially bought some Airwaves harnesses which are the ones on right(brass coloured) but when I realised they wernt painted decided to get a set of Eduard painted ones. They are on the left as you look. But they came as a grey color and were a lot thinner than the Airwaves ones. I also noticed that on the Martin Baker ejection seat the straps that run down from the headrest go behind a piece of padding on the seat so you cant see them, and that two shoulder straps then hang down infront of that back rest padding. The eduard set did not have these shoulder straps which did come with the airwaves. so in the end I made a piece of padding for the seat from plasti card, ditched the Eduard set and went with the airwaves. Because I do not feel confient enough to paint them without destroying the fine detail on them I left then the brass/brown colour and just coated with matt varnish to take the shine off.

View attachment 43661View attachment 43662

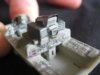
I then moved onto the cock pit and used the decals supplied with the kit for the centre consul. Im not a lover of these dacals but if I try and dry paint something this small the consul just looks a total mess so its the better of the two options for me. I used the PE eduard set for the front instrument panel. To fit these you have to file away the panel to make it thinner so that it can take the etched panel and plastic backing panel with the dials painted on. This was such a phaff to fit that I left it out and just stuck the etched panel on to the facia.

View attachment 43663View attachment 43664

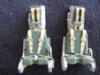
I will leave the ejector seats out until the model is completed so they dont get in the way and damaged.

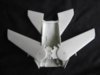
The wings were then assembled but you have to fit the pylons early in the build. This is because they actually rotate so that when you drop the wings back you can adjust the pylons so that they always face forward. The mechanism used is a plastic circlip that just pushes onto the pylon once it is in position in the wing. They say not to use any glue but I secured the circlip with some epoxy to stop it springing off once the two wing halfs were joined. I just hope the pylons dont interfere with the under wing decals later.

I have also filled the nose with some small lead shot which is just coated in PVA and stuffed in to set and completed the rear stabaliser assembly which also rotates

View attachment 43665View attachment 43666

So thats it so far. Not much progress but I always find the cockpits take me ages and things should progress a bit more in the next week. Once again, sorry for the picture quality.

Steve

PS Cant wait to start on my next build. 1/24 scale. At least I will be able to see the parts LOL)

View attachment 46903

View attachment 46904

View attachment 46905

View attachment 46906

View attachment 46907

View attachment 46908

View attachment 46909

View attachment 159929

View attachment 159930

View attachment 159931

View attachment 159932

View attachment 159933

View attachment 159934

View attachment 159935
 

Attachments

  • tail nose (2).jpg
    tail nose (2).jpg
    1.6 KB · Views: 0
  • wing mech.jpg
    wing mech.jpg
    2.1 KB · Views: 0
  • ejec in cockpit.jpg
    ejec in cockpit.jpg
    2.7 KB · Views: 0
  • cockpit 2.jpg
    cockpit 2.jpg
    2.5 KB · Views: 0
  • eject 2.jpg
    eject 2.jpg
    2.9 KB · Views: 0
  • ejec 1.jpg
    ejec 1.jpg
    2.8 KB · Views: 0
  • tail nose.jpg
    tail nose.jpg
    1.5 KB · Views: 0
really really good start,and the harnesses in 1/72 eeekkk,micro surgeons would have trouble doing it,and you did it really well indeed

mobear
 
Thread owner
Hi Guys..Just a couple more shots of progress to date. The plane is starting to come together. The tail fin is not glued on and will be attached after painting. This will make applying the fin decals easier. The rear exhaust assembly will also be painted and attached on completion. I checked it for snugness of fit and after some minor trimming am confident that because it is a seperate colour from the fuselage that it will just look great fitted at the end.

View attachment 43999View attachment 44000View attachment 44000

I have also made an executive decision and decided to remove the rotating pylons. I undserstand why revell have done this so that if the wings are retracted you can alter the direction of the pylons and pods to face forward. However I felt that the pylons would cause problems with the underwing decal application and that once completed may damage the paintwork by being moved. So I have decided to model this with wings extended and glue the pylons on at the end.

I also noticed that once I had glued the top of the fuselage to the lower section that by retracting the wings it put a strain on the seam and caused it to open up at the front.

View attachment 44001

I have reglued the joint and reinforced it with epoxy on the inside. I wont be moving my wings once the model is completed but if you intend on doing so with your Tornado then you need to make sure that you have full freedom of movement without causing this pressure spot.

In addition I have painted the exhaust intakes on the inside prior to fitting so that I could get the paint all the way back into the intakes.

Thats it for now.

Steve

View attachment 47207

View attachment 47208

View attachment 47209

View attachment 160233

View attachment 160234

View attachment 160235
 

Attachments

  • exhaust2.jpg
    exhaust2.jpg
    1.7 KB · Views: 0
  • tor2.jpg
    tor2.jpg
    1.8 KB · Views: 0
  • wing seam.jpg
    wing seam.jpg
    1.8 KB · Views: 0
Thread owner
Thanks for looking Aaron. Hopefully it will have some paint on next week.
 
Back
Top