
Neil Merryweather
Active member
1/3
Well I needed a break after that tartan, but I didn’t expect it to be 7 months!
I haven't been posting lately due to work and life, and I wasn't really going to bother blogging this part, but I decided to in the end. I'm still quite busy with work so who knows when the next installment will be, but here goes. I DO want to get the damn thing finished, though!
Part of the reason for the delay was uncertainty about the base. I want to protect it from household dust (I don’t have a cabinet- yet…), so I was looking for a suitable receptacle. I finally found a glass dome on Amazonia for a sensible price, so that was a step nearer completion.

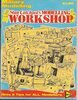
I didn't like the nasty wooden cheeseboard type of pedestal, so the first thing I did was to create and 3D print a better one in a nice shiny black plastic. I thought I had taken a pic of it before working on it, but I can’t have done, so here’s an image of the file

Waterloo took place in fields of rye after a night of very heavy rain, and I learnt how to do rye from the Stan Catchpol Bible when I did my Imperial Guardsman a while back, so I won’t go into it again here. Briefly, it is made from raffia and bristles, with fine sand for the seed heads.
View attachment 414431
I have been making stock of it on and off since July.

I have refined Stan’s technique a bit. If you’re interested you can find it HERE
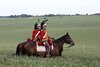
I also confirmed that it would definitely be green, as per these re-enactors at a Waterloo anniversary
View attachment 414434
The next step was to create a ploughed earth effect using Sculptamold. I mixed it with brown acrylic to avoid the white showing through. I wanted to show puddles so I took the furrows right down to the flat base. I’ve been walking a lot in the local woods during lockdown and lately it’s been incredibly muddy, so I have made good use of my time and researched mud in great depth…. I was surprised to find that there can be many different colours close together and the water is a different colour again! I also realised I would need hoof prints and lots of them, so I made a little hoof stamp with a horse shoe and pressed it all over the place randomly. These would also become puddles. I painted the puddles with a much lighter shade ink and made the water from successive applications of Klear. There are probably better products out there, but I got impatient and Klear is what I have to hand. I kept the rest of the mud slightly less glossy by using a brown ink wash.
As I wasn’t planning to blog this I didn’t take any WIP shots, but here it is ready for the trampled rye.


This is as far as I have got.
Thanks for following
Neil
I haven't been posting lately due to work and life, and I wasn't really going to bother blogging this part, but I decided to in the end. I'm still quite busy with work so who knows when the next installment will be, but here goes. I DO want to get the damn thing finished, though!
Part of the reason for the delay was uncertainty about the base. I want to protect it from household dust (I don’t have a cabinet- yet…), so I was looking for a suitable receptacle. I finally found a glass dome on Amazonia for a sensible price, so that was a step nearer completion.
I didn't like the nasty wooden cheeseboard type of pedestal, so the first thing I did was to create and 3D print a better one in a nice shiny black plastic. I thought I had taken a pic of it before working on it, but I can’t have done, so here’s an image of the file
Waterloo took place in fields of rye after a night of very heavy rain, and I learnt how to do rye from the Stan Catchpol Bible when I did my Imperial Guardsman a while back, so I won’t go into it again here. Briefly, it is made from raffia and bristles, with fine sand for the seed heads.
View attachment 414431
I have been making stock of it on and off since July.
I have refined Stan’s technique a bit. If you’re interested you can find it HERE
I also confirmed that it would definitely be green, as per these re-enactors at a Waterloo anniversary
View attachment 414434
The next step was to create a ploughed earth effect using Sculptamold. I mixed it with brown acrylic to avoid the white showing through. I wanted to show puddles so I took the furrows right down to the flat base. I’ve been walking a lot in the local woods during lockdown and lately it’s been incredibly muddy, so I have made good use of my time and researched mud in great depth…. I was surprised to find that there can be many different colours close together and the water is a different colour again! I also realised I would need hoof prints and lots of them, so I made a little hoof stamp with a horse shoe and pressed it all over the place randomly. These would also become puddles. I painted the puddles with a much lighter shade ink and made the water from successive applications of Klear. There are probably better products out there, but I got impatient and Klear is what I have to hand. I kept the rest of the mud slightly less glossy by using a brown ink wash.
As I wasn’t planning to blog this I didn’t take any WIP shots, but here it is ready for the trampled rye.
This is as far as I have got.
Thanks for following
Neil
")


