Theme editor

Scale Model Shop

54mm Charge of the Scots Greys

I shudder to think what your Google search history looks like....
Great Gods this is getting better every day- Glad that its not me that has to paint it though!
 
Well done for adding Dobbin's 'bits' and the 'grey' looks a lot more comfortable without that wire up his bum!! Good solution.

(I'm more comfortable at last thanks and will hopefully be able to work next week. Shingles is torture!)

Andy
 
Thread owner
Afternoon Chaps!

Having finally settled on a position for the grey it was time to begin the rider, so I made up the saddle, which fitted very nicely thank you. Then I fitted the rolled greatcoat(or whatever) and here is where I pay the price for raising the horse’s neck- there’s no room for it in front of the saddle!
IMG_20191116_114121443.jpg

I am quite capable of sculpting a new one to fit, but that would involve making all the straps and buckles, and I’m feeling lazy at the moment, so I left it a bit while I built the rider.

This is how he would look if I used him straight out of the box- all hunched over –
IMG_20191116_115408737_HDR.jpg
whereas the painting requires for him to be leaning right back
crop 2.jpg

So more butchery is required.

I cut him above the girdle and carved a wedge out of the back of both parts to lean him back.
IMG_20191116_122925524_HDR.jpg

I also slightly compressed his legs so he's more standing up in the stirrups. I didn't want to do it too much, because I remember back in the mists of reading that they kept the stirrups quite deep-not like a racing jockey who has them very shallow.

This time I didn’t bother with the arms from the kit as, although the right arm is straight, the right hand is very poorly moulded.

IMG_20191116_122721678.jpg

So I just found a gauntleted right hand in the spares box (Airfix Polish Lancer, I think) carved out the cuff and drilled in a piece of copper wire. The left hand is from the kit, treated in the same way.
IMG_20191116_141529821_HDR.jpg

I also gave him a bit of a twist at the waist to bring his left arm forward more.

And then I came up with a lazy solution to the rolled greatcoat problem. I cut out the middle section, wired the two ends together and bent them to fit, which means I only have to sculpt a little bit and one strap.
cloak.jpg


Result!
Here is another view which is closer to the painting
IMG_20191116_141510984_HDR.jpg

As always, many thanks for looking in, and for all the encouragement.

Neil
 
Neil,
Really enjoying this build and watching the conversions come to life.
Mike.
 
Hi Neil, building up poses with armatures is much less back breaking and minute adjustments are much easier if you're comfortable with sculpting the vacant areas after it. Always seems simpler using existing parts but after the surgery it's much harder to manipulate the poses. 
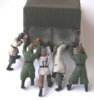
To get a pose I wanted for my paratrooper lying in the back of a jeep I had to resort to using two left legs. :tears-of-joy:

Pose looks great.

Cheers,
Richard
 
Neil, Watching closely. I'm full of admiration for people like yourself who can achieve the poses they want with figures. It's not an area I have had success with.
 
Thread owner
Neil, Watching closely. I'm full of admiration for people like yourself who can achieve the poses they want with figures. It's not an area I have had success with.
Thanks Scottie,
as we have said before - each of us has his strengths-this just happens to be mine. Personally , I am in admiration of your micro detailing.
That's what makes this forum great
 
His arms are a bit thin, LOL
On a more serious note....
Great alterations to the mounted rider. Now we can really get a sense of what is what and what is where.... You know what I mean.
 
This is a wonderful build blog Neil. Great attention to detail. It's gonna be an awesome figure once done. Great stuff
 
Hi Neil - just been having a catch up as have got behind with this one.

Great stuff so far - brings back memories of the old articles we used to get in MM

I was going to suggest cutting out the center section of the rolled coat but you beat me to it further down the page :thumb2::smiling3:
 
come on Richard let's see it- you KNOW you want to
Hi Neil, you've done a good job on the pose and it's taking shape just like the reference picture. I'm a lazy guy at heart and will avoid the armature sculpting although I have done some like for these guys arms...

View attachment 363858 View attachment 363859

Found the picture with the two not left but right legs...HERE
It's the sixth picture...

Cheers,
Richard
 

Attachments

  • 511357.jpg
    511357.jpg
    2.6 KB · Views: 0
  • 511362.jpg
    511362.jpg
    2.8 KB · Views: 0
Thread owner
wow that's fantastic! Full of life and incidents, just like Shep Paine says!
and not so shabby with the sculpting either.
you know it's like any skill- the more you do it the better you get- you should do more.
 
Thread owner
Hi Neil - just been having a catch up as have got behind with this one.

Great stuff so far - brings back memories of the old articles we used to get in MM

I was going to suggest cutting out the center section of the rolled coat but you beat me to it further down the page :thumb2::smiling3:
welcome back, Simon! thanks.
I know what you mean- I learned a lot from those articles - especially by the amazingly talented Bill Horan
 
Back
Top