I have a good day to daLooking very good John, really like how the office turned out, why not leave the canopy open?
Have fun painting all the ordnance.:thumb2:

You are using an out of date browser. It may not display this or other websites correctly.
You should upgrade or use an alternative browser.
You should upgrade or use an alternative browser.
A-10 by Tamiya, First wingy thing project
- Thread starter wotan
- Start date
- Status
- Not open for further replies.
")
wotan
Active member
- Joined
- May 16, 2018
- Messages
- 1,273
- Location
- Brome Lake Quebec
- First Name
- John
1/3
Thanks for looking in guys.
Bob still working up to that. "Stiffen up the sinews, summon up the blood"........ and all that.
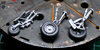
Most of the wheelie bits are done, just have to connect up the brake lines.
View attachment 316120
Also I have blocked up all her holes, if I may put it like that , ready for primer and painting.
View attachment 316121
View attachment 316122
John
Bob still working up to that. "Stiffen up the sinews, summon up the blood"........ and all that.
Most of the wheelie bits are done, just have to connect up the brake lines.
View attachment 316120
Also I have blocked up all her holes, if I may put it like that , ready for primer and painting.
View attachment 316121
View attachment 316122
John
Attachments

- Joined
- Apr 27, 2018
- Messages
- 15,043
1/3
John,
Great work on the undercarriage very nice details.
Great work on the undercarriage very nice details.
Hi John
Definitely getting there. In my very limited experience of wingy things canopies are definitely created to drive you mad. They scratch easily, don't fit and masking them is a nightmare. Lion taming or bomb disposal both seem easier options!
Jim
Definitely getting there. In my very limited experience of wingy things canopies are definitely created to drive you mad. They scratch easily, don't fit and masking them is a nightmare. Lion taming or bomb disposal both seem easier options!
Jim
G
Guest
Guest
Well It looks as if you have mastered it, nice job on that under carriage.:thumb2:
John.
John.
wotan
Active member
- Joined
- May 16, 2018
- Messages
- 1,273
- Location
- Brome Lake Quebec
- First Name
- John
1/3
Thanks gents I appreciate your optimisim.
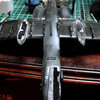
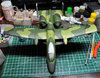
Now we paint. Good grief... two problems that I had not foreseen. Firstly its a three colour camo job, and secondly it goes on the bottom as well as the top. Double jeopardy.
I started by freehanding the camoshapes using flat black in the air brush.
View attachment 316212
I thought this might help and provide a little preshading as well. It helped a bit but the preshading idea went out the window pretty fast as the paint covered it up.
View attachment 316213
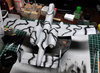
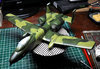
Little did I know this was the easy bit. Next came the dreaded blutac worms to provide masking. Since there are three colours this process had to be repeated. Much verbal abuse ensued until something vaguely ressembling what I was going for emerged.
View attachment 316214
Not completely rubbish but not what I was hoping for. Touchup will be the order of the day and then guess what....? I get to do it all again on the even more complicated bottom. Oh much joy.
I am trusting to the weathering to save the day.
John
Now we paint. Good grief... two problems that I had not foreseen. Firstly its a three colour camo job, and secondly it goes on the bottom as well as the top. Double jeopardy.
I started by freehanding the camoshapes using flat black in the air brush.
View attachment 316212
I thought this might help and provide a little preshading as well. It helped a bit but the preshading idea went out the window pretty fast as the paint covered it up.
View attachment 316213
Little did I know this was the easy bit. Next came the dreaded blutac worms to provide masking. Since there are three colours this process had to be repeated. Much verbal abuse ensued until something vaguely ressembling what I was going for emerged.
View attachment 316214
Not completely rubbish but not what I was hoping for. Touchup will be the order of the day and then guess what....? I get to do it all again on the even more complicated bottom. Oh much joy.
I am trusting to the weathering to save the day.
John
Attachments
- Joined
- Apr 27, 2018
- Messages
- 15,043
1/3
John,
That looks pretty damn fine to me.
That looks pretty damn fine to me.
The Warthog is one of my faves & one of the few wingy things I've attempted (failed to finish-donated to a friend). Your effort seems very well along. Some excellent details and I'm certain your finishes will do them justice. PaulE
1/3
Camo is going well, nice progress.
She is looking good John - the blutac worms method works great. One suggestion for that type of camo that I find works a treat is the 'Panzer Putty' type of product, also known as Clever Putty. it has no tac at all and is reusable.
Hi John, the lizard scheme looks good and definitely looks great from here too. Blu-Tac or Silly Putty gives the best Sharp Soft edge and working from the smallest coverage to the largest is one way to go.
Cheers,
Richard
Cheers,
Richard
wotan
Active member
- Joined
- May 16, 2018
- Messages
- 1,273
- Location
- Brome Lake Quebec
- First Name
- John
1/3
gentlemen you are all most gracious. This is turning into a much longer build than I am used to. I hope my stamina persists to see it finished.
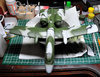
This is an old kit and therefore it has raised rather than scribed, panel lines. This meant that the clean panels that Richard and Barry always produce on their models are not really possible. With this in mind I decided to go for the dirty well campaigned look. So after a coat of Future varnish I went ahead with a dirty oil wash made up of a mix of van Dyke Brown and Ultramarine blue. I'm not sure that it has completely worked but I don't hate it. See what you think.
View attachment 316573
I have also learned that airplane have gazillions of decals. I guess that will be the next step. Oh I did manage to assemble to PE gun which is now installed.
John
Attachments
Great looking paint job and weathering John.:thumb2:
Love the undercarriage work too, are the brake lines your own work or PE?
Good luck with the stencils, I mostly start with the bigger ones first and the smaller later as when applying the bigger ones can shift the smaller ones.:rolling:
Also helps to work one part to the next, like underside first then topside and so on.HTH
- Status
- Not open for further replies.
Legal Notice
scalemodelling.co.uk is a privately operated online discussion forum. All content posted by members reflects their own views and opinions and does not necessarily represent those of the forum owners or administrators. While reasonable efforts are made to moderate content, no responsibility is accepted for user-generated material. By using this site, you agree to comply with UK law and the forum rules.