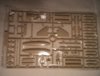
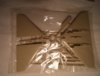
Well with the Hummer nearly done and having to wait for the Phantom SIG thought i'd start this View attachment 58881 View attachment 58882 View attachment 58883 View attachment 58884 View attachment 58885 There's two versions View attachment 58886 View attachment 58887 Going for the American and all OOB
View attachment 60703
View attachment 60704
View attachment 60705
View attachment 60706
View attachment 60707
View attachment 60708
View attachment 60709
View attachment 173729
View attachment 173730
View attachment 173731
View attachment 173732
View attachment 173733
View attachment 173734
View attachment 173735
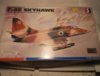
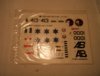

") Not so sure about the 'F-4E' designation on the box, but you sure have good taste. The A-4 is one of my favourite aeroplanes.
Not so sure about the 'F-4E' designation on the box, but you sure have good taste. The A-4 is one of my favourite aeroplanes.