Theme editor

Scale Model Shop

Airfix 1/48 Folland Gnat

Status
Not open for further replies.

Dave W

New member
Joined
Jan 8, 2011
Messages
4,713
Reaction score
0
Points
0
1/3
Thread owner
View attachment 96583

View attachment 96584

View attachment 96585

View attachment 96586

View attachment 96587

View attachment 96588

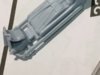
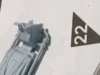
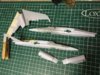
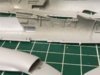
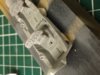
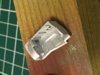
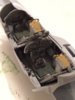
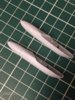
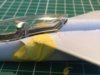
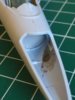
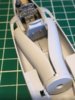
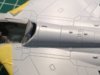
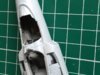
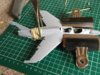
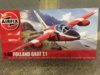
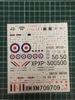
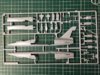
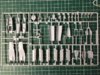
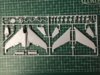
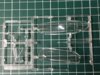
this is a new mould from Airfix and it looks really good.Finely engraved panel lines,well detailed cockpit and a nice decal sheet.Only faults I've found so far is the head box isn't properly formed on one of the ejection seat sides and the open canopy section has two long cracks in it.The canopy isn't a problem as I intended doing the closed option anyway.I will have to fix the seat though.View attachment 209606

View attachment 209607

View attachment 209608

View attachment 209609

View attachment 209610

View attachment 209611
 

Attachments

  • image.jpg
    image.jpg
    3 KB · Views: 0
  • image.jpg
    image.jpg
    3.1 KB · Views: 0
  • image.jpg
    image.jpg
    3.4 KB · Views: 0
  • image.jpg
    image.jpg
    3.6 KB · Views: 0
  • image.jpg
    image.jpg
    3.2 KB · Views: 0
  • image.jpg
    image.jpg
    3.1 KB · Views: 0
Nice model Dave. Airfix have certainly come along way. They do have to sort their clear plastic. Every piece on sprue on the Merlin had a fault and that extended to all 8 replacement sprues they sent.

Looks like a long decal session/s

Laurie
 
I'll pull up a chair for this one Dave, it's on my shopping list so it'll be good to see how you get on. What scheme are you doing it in? They both look like they'll require some delicate masking but I do like the Little Riss version.
 
I did the 1/72 scale of this kit and yours in 1/48 will be even better and I look forward to your progress Dave watching with interest
 
I did the 1/72 version not too long ago for my son.......trying to coax him into modeling. (not to much avail as I'm competing against Minecraft and the like) :(

Lovely little kit, will love to see this in 1/48!! :)
 
Look forward to this Dave, looks like it is a very nice kit. A change of pace for you from all those Mosquitoes.
 
Thread owner
\ said:
I'll pull up a chair for this one Dave, it's on my shopping list so it'll be good to see how you get on. What scheme are you doing it in? They both look like they'll require some delicate masking but I do like the Little Riss version.
I will be doing the red and white one Jason.
 
Thread owner
View attachment 96891

View attachment 96892

View attachment 96893

View attachment 96894

View attachment 96895

View attachment 96896

I've assembled most of the cockpit and given it a coat of light grey.I left the control columns out as I intend applying the instrument panel decals first.Then I repaired the hole in the seat head box.Intake trunking was assembled next .Then the undercarriage bays and fuselage cockpit sides were given a coat of paint.View attachment 209914

View attachment 209915

View attachment 209916

View attachment 209917

View attachment 209918

View attachment 209919
 

Attachments

  • image.jpg
    image.jpg
    2.1 KB · Views: 0
  • image.jpg
    image.jpg
    2 KB · Views: 0
  • image.jpg
    image.jpg
    3.2 KB · Views: 0
  • image.jpg
    image.jpg
    2.7 KB · Views: 0
  • image.jpg
    image.jpg
    2.7 KB · Views: 0
  • image.jpg
    image.jpg
    2.6 KB · Views: 0
Chuffing Nora Dave, you're knocking these builds out at a rate. This looks like a really nice kit, but that seat is disappointing. The 1:72 was nice, this should be even better.
 
That looks kinda cool, you know I admire you folks who can work in this scale because I can barely see the parts.

scott
 
Thread owner
I managed to fix the seat with a piece of plastic card and some filler.I then painted the seats and the cockpit.And I applied the instrument panel decals.They settled down nicely over the raised detail with some Microsol.After they had dried,I glued the cockpit to the right fuselage half.Then I glued the fuselage halves together.Ive clamped the forward end as the halves didn't want to come together above the front instrument panel.Last thing I did this evening was assemble the external wing fuel tanks.These are made up of three parts each and are going to need a bit of filling and sanding.

View attachment 97102

View attachment 97103

View attachment 97104

View attachment 97105

View attachment 97106


View attachment 210125

View attachment 210126

View attachment 210127

View attachment 210128

View attachment 210129
 

Attachments

  • image.jpg
    image.jpg
    2.5 KB · Views: 0
  • image.jpg
    image.jpg
    3.3 KB · Views: 0
  • image.jpg
    image.jpg
    3.6 KB · Views: 0
  • image.jpg
    image.jpg
    2.1 KB · Views: 0
  • image.jpg
    image.jpg
    2.3 KB · Views: 0
Nice job on the pit Dave , i'm tempted by the 1/72 new tool Gnat , ive just seen them in home bargains for 5.99 ! cheers tony
 
Thread owner
View attachment 97204

View attachment 97205

View attachment 97206

View attachment 97207

View attachment 97208

View attachment 97209

View attachment 97210

BI was just about to fit the wing on when I came across a problem.The cockpit rear bulkhead appears to be too tall and doesn't locate under the front of the wing.At first I thought I'd put the cockpit in the wrong location.But the front bulkhead is located correctly against a raised line inside the nose.and it can't sit any lower because the nose wheel bay is glued to the cockpit underside and is also in the correct position.The cockpit rear bulkhead cannot be angled further back as it is located correctly against the back of the cockpit tub.So I don't know what's wrong.Ive removed the rear seat and cut off the protruding piece of bulkhead.I will fill the remaining gap.Another problem is the instrument coaming that goes over the rear instrument panel wouldn't fit properly.The front seat and bulkhead was angled too far back.So I've removed this and glued the coaming on.I was really enjoying this build up to this point.View attachment 210227

View attachment 210228

View attachment 210229

View attachment 210230

View attachment 210231

View attachment 210232

View attachment 210233
 

Attachments

  • image.jpg
    image.jpg
    2.5 KB · Views: 0
  • image.jpg
    image.jpg
    2.8 KB · Views: 0
  • image.jpg
    image.jpg
    3.2 KB · Views: 0
  • image.jpg
    image.jpg
    2.2 KB · Views: 0
  • image.jpg
    image.jpg
    2.2 KB · Views: 0
  • image.jpg
    image.jpg
    3.5 KB · Views: 0
  • image.jpg
    image.jpg
    3.2 KB · Views: 0
Dave , maybe the bulkhead was designed to attach the canopy in the open position , if doing it closed you might have had to cut the offending bit off anyway ? Just a thought as the angle of the bit sticking up looks just right to attach the canopy at the correct angle , cheers tony
 
Thread owner
\ said:
Dave , maybe the bulkhead was designed to attach the canopy in the open position , if doing it closed you might have had to cut the offending bit off anyway ? Just a thought as the angle of the bit sticking up looks just right to attach the canopy at the correct angle , cheers tony
If that was Airfix intention,I think they would have put something in the instructions and provided a part to fill in the hole left by cutting the top of the bulkhead off.Ive emailed them as I think there is a problem with the kit.I also said I wasn't after a replacement or a refund.
 
Thread owner
\ said:
Dave , maybe the bulkhead was designed to attach the canopy in the open position , if doing it closed you might have had to cut the offending bit off anyway ? Just a thought as the angle of the bit sticking up looks just right to attach the canopy at the correct angle , cheers tony
Having had another look at the model Ive changed my mind and think you may be right Tony.Ive sent Airfix another email asking if this is the case.
 
Thread owner
View attachment 97222

View attachment 97223

Be just removed the tape and I'm pleased to say the fairing over the rear instrument panel is fixed in the correct position.Ive now glued the wing on and clamped it into position whilst the glue sets.Next job will be to sort out the hole in the rear bulkhead.The pictures in the instructions show it located under the front edge of the wing section.I advise anyone building this kit not to attach the rear bulkhead to the cockpit tub until you are ready to fit the wing.I believe I've followed the instructions correctly.View attachment 210245

View attachment 210246
 

Attachments

  • image.jpg
    image.jpg
    2.9 KB · Views: 0
  • image.jpg
    image.jpg
    3.4 KB · Views: 0
Thread owner
\ said:
Having had another look at the model Ive changed my mind and think you may be right Tony.Ive sent Airfix another email asking if this is the case.
I've changed my mind again Tony.In a later stage photo you can see the bulkhead fitted under the wing!.so I've either assembled it wrong or the angle of the Bach of the cockpit tub is too upright.I suspect the later.
 
Status
Not open for further replies.
Back
Top