Theme editor

Scale Model Shop

Airfix 1:48 Hawker Fury l

Status
Not open for further replies.

colin m

Moderator
Staff member
Moderator
Joined
Dec 26, 2008
Messages
9,113
Reaction score
381
Points
83
Location
Stafford, UK
1/3
Thread owner
I started building this just before Cosford, but then had to put it to one side whilst completing my Cosford build. So with my odd helicopter thing out of the way, on with the old dear.
IMG_2992.JPG
A new tool kit, well it was in 1980, K5674 is the only flying Fury left. I saw this machine flying at the 2018 Cosford air show. It was a lovely sight to see, if I can say, quite a glamourous aircraft in the air.
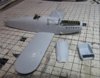
However, to the detail of what's in the box. This kit was second hand. As you can see, the engine has been built. That is as far the previous owner got. I think I know why.
IMG_2997.JPG

Maybe he saw the shape of the banana style fuselage, and quickly put the model on ebay.
Never mind, a bit of hot water will fix that.
IMG_3002.JPG

As you can see, classic Airfix detail and lots of free plastic which I now have to remove.
IMG_3000.JPG

What a year for Airfix.
IMG_3003.JPG

And the pilot, not too bad I think, well sort of.
IMG_2998.JPG

This is literally the cockpit. So, pilot office A. fix ready for duty.
IMG_3033.JPG

I'll be leaving these clamps on overnight then slowly squeezing the rest of the fuselage together, slowly removing the warp as I go.
IMG_3036.JPG
 
Looks nicely detailed colin ( apart from the bare cockpit) im sure youll soon have it looking ship shape ( even though its an aircraft!) , looking forward to the build , cheers tony
 
Watching this Colin. Always nice to see an Airfix build.

Cheers,
Richard
 
Thread owner
Well I've spent far too much time in the garden so the Fury has suffered a bit of neglect. However, I've managed an hour or two here and there.

The radiator was just a flat surface, a bit of plastic grill bought that to life.
IMG_3010.JPG

The instructions want you to install the exhaust manifolds before permanently fixing the engine cover. Which means painting the little things would be quite difficult. So, even though it doesn't look much, the engine cover has been well an truly fettled so the fit is greatly improved, meaning I can spray it separately and add it later, after the fuselage has been painted and the exhaust manifolds added. A bit of plasticard was needed to take up a bit of slack.
IMG_3039.JPG

The exhaust manifolds were drilled and scraped to a shape of some sort. They aren't meant to be round, so shaping was a bit difficult.
IMG_3085.JPG

The cabane struts are a one piece affair. This could be good news or bad. I would normally fit the cabane struts after the wing struts. Looks like this time, they will be attached first. Mind you, attached to what ? The attachment points are under that flash somewhere.
IMG_3044.JPG

Cabane struts fitted, but luckily, I've managed to leave them loose, just to give me a bit of wiggle room later. You also see in this picture, my preferred method for rigging, tiny little wire 'eyes'.
IMG_3080.JPG

And finally, some more pieces fitted. No real drama was encountered here. Naturally a bit of filling and sanding, but nothing over the top, even for a vintage kit like this.
IMG_3082.JPG
 

Attachments

  • IMG_3080.JPG
    IMG_3080.JPG
    2.8 KB · Views: 0
Hi Colin, great adjustments to the kits build. It's more enjoyable if you don't have high expectations for the kit's flash and fit and are ready to plan ahead. This is looking good. Interested on how you use the tiny eyelets for rigging. Are the eyelets scratched from wire?

Cheers,
Richard
 
Gets a wow from me Colin, any one who can work at that scale and do rigging !
 
Thread owner
It's more enjoyable if you don't have high expectations for the kit's flash and fit and are ready to plan ahead
There is something nice about tackling an old kit, knowing you're in for a bit of a ride ! Then again, that's why I like old Matchbox kits. Still vintage, but the fit is generally very good.
work at that scale and do rigging !
Thanks John, but rigging in 1:48 is ok. Here's one I did earlier. If ever I think a bit of rigging is getting to me, I look at this picture to remind me of the hours spent, slowly going mad whilst rigging this.

DH2 Engine.JPG
 
Oh my Colin , that's something else, I can see how it effected you the prop's on the wrong end ! :smiling3::smiling2:.
Really impressive.
 
Thread owner
Primer is on and sanded back a touch.
IMG_3086.JPG

Ready for this, gloss black.
IMG_3091.JPG

This is the undercoat for the Alclad I'll be using. The forward end of the Fury is polished aluminium. And it's taking forever to harden. I think it's time for new paint.
 
Colin, gorgeous...there's something about putting primer on a kit. Sometimes I'd be tempted to leave it at that finish. Perhaps I might do one that way.

Cheers,
Richard
 
There is something nice about tackling an old kit, knowing you're in for a bit of a ride ! Then again, that's why I like old Matchbox kits. Still vintage, but the fit is generally very good.

Thanks John, but rigging in 1:48 is ok. Here's one I did earlier. If ever I think a bit of rigging is getting to me, I look at this picture to remind me of the hours spent, slowly going mad whilst rigging this.

Try 1/72 Colin I did.
:astonished:
 
Thread owner
Colin, gorgeous...there's something about putting primer on a kit. Sometimes I'd be tempted to leave it at that finish. Perhaps I might do one that way.

Cheers,
Richard
I undercoated my 1:72 Lightning in gloss black, it did look rather cool in an overall gloss black. I nearly stopped there !
 
Thread owner
Try 1/72 Colin I did.
:astonished:
Been there and was in no hurry to return to 1:72 rigging. However, I have the lovely 1:72 Airfix Tiger Moth sitting next to me.
 
Thread owner
A bit more, in between all the gardening. Everything is painted and ready for assembly.
IMG_3101.JPG

Decals, and the unmasking of pilot officer A. fix. I always build bi-planes the same way, decals before final assembly. Imagine dropping the thing an knocking a carefully aligned top wing off.
IMG_3105.JPG

And, with no real drama, the top wing is fitted. At the moment it's all clamped up on a warm window sill trying to persuade the upper wing just to 'give' a little. I'll release the clamps later. Hopefully a day in the sun has relaxed things a bit.
 
Status
Not open for further replies.
Back
Top