
You are using an out of date browser. It may not display this or other websites correctly.
You should upgrade or use an alternative browser.
You should upgrade or use an alternative browser.
Airfix 1/48 Sepecat Jaguar
- Thread starter langy71
- Start date
")
Thanks guys,
pulled the trigger on some replacement exhausts.... looking forward to having a play with them when they arrive.
time to find some pics of the cans, lol
pulled the trigger on some replacement exhausts.... looking forward to having a play with them when they arrive.
time to find some pics of the cans, lol
Managed to throw some extra thin at this over the weekend, it's starting to look less like a load of plastic bits and more like a Jaguar,
It goes together perfectly, with no gaps, (I have ended up using a micro smear of filler on a couple of bits but that's down to user error and not manufacturer issues),
Those dropped slats and flaps are almost too easy to assemble yet look perfect when fitted. you can really see that Airfix 'did their sums correctly' when desigining this model, everything just 'falls together easily'.

And the replacement exhausts turned up today, The detail on these is stunningly crisp, these will be next up on the 'build' list..


It goes together perfectly, with no gaps, (I have ended up using a micro smear of filler on a couple of bits but that's down to user error and not manufacturer issues),
Those dropped slats and flaps are almost too easy to assemble yet look perfect when fitted. you can really see that Airfix 'did their sums correctly' when desigining this model, everything just 'falls together easily'.
And the replacement exhausts turned up today, The detail on these is stunningly crisp, these will be next up on the 'build' list..
Last edited:
Looking beautiful chris , the 3d printed exhausts look superb , really going to add that bit extra to an already very nicely detailed model .
So, moving onto the exhausts,
is there any special colour they need to be ?, I'm thinking of going with a burnt steel kind of colour,
would the insides be a really dark sooty black like the rolls royce spey engines or did the ardour engine run 'cleaner'?
(and why is it that once you start down the path of 'replacement ' upgraded parts you can't stop ?, I'm now looking at 1/48 scale ladders and trying to find a 1/48 scale photographer figure for a dio idea I'm having for this.)
Last edited:
1/3
Great progress Chris.
So, moving onto the exhausts,
is there any special colour they need to be ?, I'm thinking of going with a burnt steel kind of colour,
would the insides be a really dark sooty black like the rolls royce spey engines or did the ardour engine run 'cleaner'?
Chris, the exhausts appear to be a dulled steel colour, and I went with a black sooty interior when I built mine. The heat shield beneath the tail shows more weathering from heat staining, and exhaust soot.

Chris, the exhausts appear to be a dulled steel colour, and I went with a black sooty interior when I built mine. The heat shield beneath the tail shows more weathering from heat staining, and exhaust soot.
Brilliant stuff, thanks buddy.
")
Had a bit of time to finish of the main parts of the build, and throw some primer at her,
totally love the way it looks with a splash of Mr surfacer 1500 black...never used this before and I'm really pleased with the results..(I even went a bit 'thick' on one area and it levelled down perfectly).
Might need to do some remedial smoothing of the spine to hide the join line I've missed...
Undercarriage is base coated... ready for a panel line wash to make the detail pop.
Also started work on the ordnance..
The drop tanks have been painted in a rough freehanded camo pattern, which will get covered in hairspray for the chipping and wear on them when I apply the top coat.
I'm toying with changing the supplied Sidewinders to resin versions, the Airfix ones have a pretty obvious and ugly join line at the rear where the fins attach, maybe a swipe of filler will hide the seams. gonna give that a try before I buy replacements.


Legs...

Exhaust cans nearly complete.. really pleased how these came out ..


Drop Tanks..


1000 lb retarded bomb.

totally love the way it looks with a splash of Mr surfacer 1500 black...never used this before and I'm really pleased with the results..(I even went a bit 'thick' on one area and it levelled down perfectly).
Might need to do some remedial smoothing of the spine to hide the join line I've missed...
Undercarriage is base coated... ready for a panel line wash to make the detail pop.
Also started work on the ordnance..
The drop tanks have been painted in a rough freehanded camo pattern, which will get covered in hairspray for the chipping and wear on them when I apply the top coat.
I'm toying with changing the supplied Sidewinders to resin versions, the Airfix ones have a pretty obvious and ugly join line at the rear where the fins attach, maybe a swipe of filler will hide the seams. gonna give that a try before I buy replacements.
Legs...
Exhaust cans nearly complete.. really pleased how these came out ..
Drop Tanks..
1000 lb retarded bomb.
Last edited:
Nothing much done on the actual Jaguar as I'm waiting for paint to arrive, mabye I'll start the marbling ready for the top coat, and finish the undercarriage.
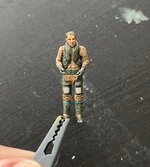
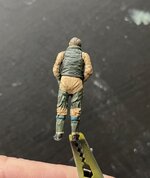
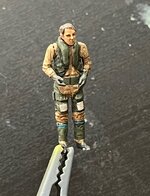
However, the pilot 'Steve' got a new set of clothes, not sure he's 100% accurate, but it's close enough, unless anybody else can see anything I've missed / bodged up on..
However, the pilot 'Steve' got a new set of clothes, not sure he's 100% accurate, but it's close enough, unless anybody else can see anything I've missed / bodged up on..
Attachments

And a bit of marbling, not my best, but it'll do what I need it to do..
(quick question, when you guys 'black base' do you bother marbling the undersides of the aircraft ?,
Been watching a few build vids and most of them do the whole aircraft, however I can't see the purpose of this as the marbling is supposed to create faded panels / colours on the top of the aircraft, when the sides and underwings wouldn't be exposed to the sunlight in the same way, does this make sense ?)
Nice work Chris, looking good.
I like to marble the underside as well, gives it a more uniform weathered look, undersides gets dirty too from liquids and takeoff/landing, not really UV weathering but I like the effect.
In the end do what you like best ; )
I like to marble the underside as well, gives it a more uniform weathered look, undersides gets dirty too from liquids and takeoff/landing, not really UV weathering but I like the effect.
In the end do what you like best ; )
Legal Notice
scalemodelling.co.uk is a privately operated online discussion forum. All content posted by members reflects their own views and opinions and does not necessarily represent those of the forum owners or administrators. While reasonable efforts are made to moderate content, no responsibility is accepted for user-generated material. By using this site, you agree to comply with UK law and the forum rules.