
You are using an out of date browser. It may not display this or other websites correctly.
You should upgrade or use an alternative browser.
You should upgrade or use an alternative browser.
Airfix 1:72 fairy Swordfish Mk1 Floatplane
- Thread starter colin m
- Start date
- Status
- Not open for further replies.
This is a great kit! to think it is "only" 1/72 scale is quite something! And I might add that you are doing a great job of it as well!
The 'rigging' on the Swordfish was indeed rod rather than wire. Stainless steel which was more often than not painted, (the degree of how much paint stayed on them is another thing).
I would think that it might be possible to fix the rigging in the fuselage and thread it through the wings, as you build them, then trap them in the ends of the wings as you glue them together at the tips... maybe.")
Ian M
The 'rigging' on the Swordfish was indeed rod rather than wire. Stainless steel which was more often than not painted, (the degree of how much paint stayed on them is another thing).
I would think that it might be possible to fix the rigging in the fuselage and thread it through the wings, as you build them, then trap them in the ends of the wings as you glue them together at the tips... maybe.
Ian M
Well then, I haven't forgotten about this build, work is progressing, but unfortunately the big computer is broken and whilst we have a 'bank' of laptops ( Collective term for laptops ? I think I made that up) around the house, I can't stand the things. So, the wings are polished, ready for assembly and rigging - here we go.........1:72 rigging...........yeah............
Thanks for the vote of confidence Dave.
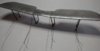
Somewhere above I mentioned the wings are in eight pieces, two pieces for each wing. So I'm going to trap the rigging in between the two halves. Like this.
View attachment 76603
Which looks like this on the other side.
View attachment 76604
Which will then be threaded through the bottom wing.
This update and pics are all being sent from my phone, sorry if it displays badly, it's all a learning curve for me !
View attachment 189626
View attachment 189627
Attachments
Thanks for the input lads. I've had a bit of a break due to a dodgy computer hence no updates. But I have done a bit, really.
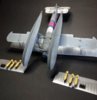
All painted up ready for some decals and a wash. No problems to report to get to this stage. I did pre-shade first which has worked quite well, even through the silver. I used dark grey under the grey bits and black under the silver. Rudder and elevators are both off set, just because the kit allows you to do so if you wish.
View attachment 76969
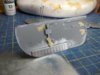
The top wing, pre-rigged. The ends of the rigging is glued and trapped inside the two wing halves. Which means no unsightly blobs of glue on the wing surfaces.
View attachment 76970
The funny thing is I'm not totally sure how I'm going to line all this up, having built it in this fashion. Hopefully, by the end of the day, I'll have the answer.
Colin M...
View attachment 189992
View attachment 189993
All painted up ready for some decals and a wash. No problems to report to get to this stage. I did pre-shade first which has worked quite well, even through the silver. I used dark grey under the grey bits and black under the silver. Rudder and elevators are both off set, just because the kit allows you to do so if you wish.
View attachment 76969
The top wing, pre-rigged. The ends of the rigging is glued and trapped inside the two wing halves. Which means no unsightly blobs of glue on the wing surfaces.
View attachment 76970
The funny thing is I'm not totally sure how I'm going to line all this up, having built it in this fashion. Hopefully, by the end of the day, I'll have the answer.
Colin M...
View attachment 189992
View attachment 189993
Attachments
G
Guest
Guest
This is looking excellent Colin!!
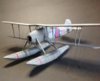
A bit of slow progress.
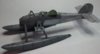
After the gloss coat, decals and wash. The large red and blue decal was a bit of a pain. It was well oversized and had to be cut carefully to fit. And yellow bombs, what's not to like about yellow bombs.
View attachment 77299
View attachment 77300
Matt coat done with a hint of grey in the mix. Rigging in 1:72 scale is a bit silly - but doing control wires borders on madness !
Now to fit the upper wing and see if my slightly daft rigging idea is going to work.
View attachment 190322
View attachment 190323
Attachments
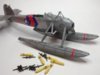
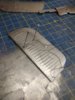
View attachment 77308
Wings all attached (well sort of)
View attachment 77309
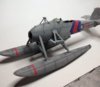
After making the rigging taut, the bottoms should just slip into place.
View attachment 190331
View attachment 190332
Wings all attached (well sort of)
View attachment 77309
After making the rigging taut, the bottoms should just slip into place.
View attachment 190331
View attachment 190332
Attachments
- Status
- Not open for further replies.
Legal Notice
scalemodelling.co.uk is a privately operated online discussion forum. All content posted by members reflects their own views and opinions and does not necessarily represent those of the forum owners or administrators. While reasonable efforts are made to moderate content, no responsibility is accepted for user-generated material. By using this site, you agree to comply with UK law and the forum rules.