It seems the Buccaneer was quite a popular aircraft, its low level ride was fairly smooth (unlike its successor the Tornado) indeed there was a belief that the only replacement for a Buccaneer, was, another Buccaneer !
XX895 was delivered to the RAF on the 12 May 1975 and in early January 1976 issued to 12 Sqn, RAF Honnington.
January 1991 saw XX895 prepared for deployment to the Gulf on operation Granby, which included being painted desert ARTF (Alkali Removable Temporary Finish) and the code ‘G’ applied.
17th March 1991 saw XX895 return to RAF Lossiemouth. This model will be built with this transit payload simply because I like the asymmetric look !
During ‘Granby’ XX895 was to take part in 10 missions, 3 were DNCO (Duty not carried out) one was down to weather, another was no in flight refuelling available and the final DNCO down to a U/S Tornado ! The Buccaneer was to prove so reliable that the two reserves left behind in the UK were never needed.
So, the build. Well I haven’t done much building recently as I’ve been busy decorating the house, but once in a while when there’s a lull in decorating I’ve done a bit on the Bucc’.
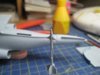
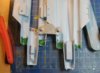
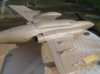
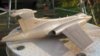
The Airfix 1:72 Buccaneer is an old mould lacking in detail. Hence the build started with the purchase of a cockpit PE set and scribing in some surface detail. The scribing was a bit of a nightmare. It was one step forward two back. But, just doing it bit by bit seemed the way forward. Anyway, on with the build.
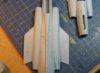
I started with the scribing of various panel lines and access panels, lots of artistic license was used here. With so little detail, it was just crying out for some attention.
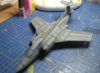
The intakes will need a lot of work.
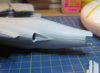
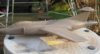
As will the seams, well it is a very old mould !
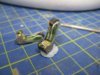
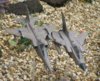
The one and only Sidewinder is getting new fins, the kit ones were just too thick
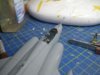
The bang seat. The kit item has gained 11 pieces of PE each. What a pain !
The cockpit was quite straight forward, except I dropped the IP into the fuselage, but luckily, recovered it through the exhaust port !
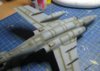
And that's it for now. Time for a bit of preshading.
View attachment 44089
View attachment 44090
View attachment 44091
View attachment 44092
View attachment 44093
View attachment 44094
View attachment 44095
View attachment 157115
View attachment 157116
View attachment 157117
View attachment 157118
View attachment 157119
View attachment 157120
View attachment 157121
XX895 was delivered to the RAF on the 12 May 1975 and in early January 1976 issued to 12 Sqn, RAF Honnington.
January 1991 saw XX895 prepared for deployment to the Gulf on operation Granby, which included being painted desert ARTF (Alkali Removable Temporary Finish) and the code ‘G’ applied.
17th March 1991 saw XX895 return to RAF Lossiemouth. This model will be built with this transit payload simply because I like the asymmetric look !
During ‘Granby’ XX895 was to take part in 10 missions, 3 were DNCO (Duty not carried out) one was down to weather, another was no in flight refuelling available and the final DNCO down to a U/S Tornado ! The Buccaneer was to prove so reliable that the two reserves left behind in the UK were never needed.
So, the build. Well I haven’t done much building recently as I’ve been busy decorating the house, but once in a while when there’s a lull in decorating I’ve done a bit on the Bucc’.
The Airfix 1:72 Buccaneer is an old mould lacking in detail. Hence the build started with the purchase of a cockpit PE set and scribing in some surface detail. The scribing was a bit of a nightmare. It was one step forward two back. But, just doing it bit by bit seemed the way forward. Anyway, on with the build.
I started with the scribing of various panel lines and access panels, lots of artistic license was used here. With so little detail, it was just crying out for some attention.
The intakes will need a lot of work.
As will the seams, well it is a very old mould !
The one and only Sidewinder is getting new fins, the kit ones were just too thick
The bang seat. The kit item has gained 11 pieces of PE each. What a pain !
The cockpit was quite straight forward, except I dropped the IP into the fuselage, but luckily, recovered it through the exhaust port !
And that's it for now. Time for a bit of preshading.
View attachment 44089
View attachment 44090
View attachment 44091
View attachment 44092
View attachment 44093
View attachment 44094
View attachment 44095
View attachment 157115
View attachment 157116
View attachment 157117
View attachment 157118
View attachment 157119
View attachment 157120
View attachment 157121