
You are using an out of date browser. It may not display this or other websites correctly.
You should upgrade or use an alternative browser.
You should upgrade or use an alternative browser.
Andrew's 1/35 North Africa Vignette (SimonT Tribute GB)
- Thread starter adt70hk
- Start date
1/3
Very nice Andrew, like the metal barell
Coming together nicely Andrew, the barrels are certainly a big improvement over the kit parts.
Very nice Andrew, like the metal barell
Aber barrels are usually a lot better than RB. They certainly look the biz
Gents. Thanks for the support much appreciated.
Graeme, Bob - sorry for the late acknowledgement. Somehow missed your comments.
ATB
Andrew
Thanks Jim. Much appreciated.Hi Andrew
Lovely neat build and as the others have said the metal barrels are very nice.
Jim
I'm waiting on something I found online to turn up in the next day or too that will add even more to my large list of firsts with this build, so keep watching....
ATB
Andrew
1/3
Just caught this one Andrew,
I had to do a double take when i saw the kit........ welcome to the land of the giants Sir!!!! :tears-of-joy:
I`ll be following all the way,just gotta love them barrels..... they look SUPERB !
!
Cheers,
Andy
I had to do a double take when i saw the kit........ welcome to the land of the giants Sir!!!! :tears-of-joy:
I`ll be following all the way,just gotta love them barrels..... they look SUPERB
!Cheers,
Andy
Just caught this one Andrew,
I had to do a double take when i saw the kit........ welcome to the land of the giants Sir!!!! :tears-of-joy:
I`ll be following all the way,just gotta love them barrels..... they look SUPERB
Cheers,
Andy
You did a double take. Imagine my reaction when I assembled it! If my maths is right it's roughly 8 times the size of my normal offerings - twice as long, twice as wide and twice as high!!:surprised: The barrels are nice aren't they!! :smiling:
The idea when I got it was that it was going to be a nice simple OOB introduction to 1/35. Someone mentioned it over on the other site we were on as a nice simple kit to start with. Well it's about to get a WHOLE lot more complicated so watch this space....
Nice looking build Andrew, I went with the metal barrels when I built one and as you said such an improvement on the kits offerings.
Mick, thanks for stopping by and the support it is appreciated. And the kit ones are very basic as you say.
ATB
Andrew
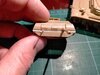
Hi all
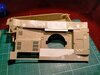
So pending the arrival of some more 'essentials for this build, I blanked off the open holes in the hull top above the tracks and filled in the sink holes with scrap bits of styrene and filler. It's not pretty and you can see a fair bit of it through the turret 'ring' but as the turret is not coming off that won't be an issue.
I've also been working on some basic turret improvements but they're not quite ready yet, so you'll have to wait for the big reveal
ATB
Andrew
View attachment 406254
View attachment 406255
View attachment 406256
Attachments
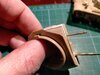
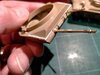
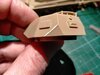
Hi all
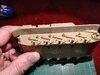
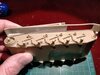
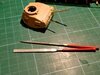
So now for turret update.....
The gun mounting was very loose and so it had to either point all the way up or all the way down - anything in between and it just dropped. Looking at it last night, after looking at the Fort Benning Walk around of their Pz II F, I realised there were large gaps top and bottom of the mounting. So I added in some some thin strips of styrene to close them up. It look so much better and now the gun stays nicely in whatever elevation it's put in.
I also noticed some missing weld seams on the turret. I've never done it before on anything but have seen it done using styrene and various modelling putties. I ended going with styrene. I softened it with TET, scored it with a knife and then squashed it down with a rough 2mm round needle file, to give it some texture. It's worked out ok but might need a light sand once the glue has dried. They also stand out a lot what with white styrene on the light brown plastic.
As an FYI, my macro lens kicked in when I took these, so they are very close up!, but it's hard to see the texture properly
ATB
Andrew
View attachment 406257
View attachment 406258
View attachment 406259
View attachment 406260
View attachment 406261
Attachments
- Joined
- Apr 27, 2018
- Messages
- 15,128
1/3
Andrew,
Some evry nice work on the welds and infills.
Some evry nice work on the welds and infills.
G
Guest
Guest
Fine work Andrew. You're really knocking this old kit into shape.
Andrew,
Some evry nice work on the welds and infills.
Hi Andrew
Great job. The welds will look much less obvious under paint.
Jim
Good job on adding the welding beads, Andrew.
Cheers,
Richard
Yup, that's the ticket Andy......looks real good so far, keep it going. Rick H. :thumb2:
Gentleman, thank you vey much for the supportive comments, it is appreciated as always.
Jim, as for looking less obvious under paint that is my hope....:cold-sweat:....roll on the first coat of primer!
Thanks again and all the best.
Andrew
Thanks Peter. Trouble is I'm waiting for it to decide whether or not it's going to put up a fight - so far it's been ok. The next stage could be the interesting bit!Fine work Andrew. You're really knocking this old kit into shape.
Thanks as always for taking the time to stop by.
ATB
Andrew
1/3
Nice welding Andrew. I always think it’s the little bits that lift a build from the ordinary.
TimNice welding Andrew. I always think it’s the little bits that lift a build from the ordinary.
Thanks for the support. The weld seams look much better in real life - even under an optivisor. Must remember not to use the macro lens for any more shots - it shows are too much detail!
Thanks again.
ATB
Andrew
Legal Notice
scalemodelling.co.uk is a privately operated online discussion forum. All content posted by members reflects their own views and opinions and does not necessarily represent those of the forum owners or administrators. While reasonable efforts are made to moderate content, no responsibility is accepted for user-generated material. By using this site, you agree to comply with UK law and the forum rules.