G
Guest
Guest
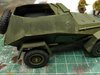
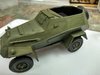
wow reproduction of an historical picture... LOVE it... well don TOVARISCH ZHON
благодарю вас
Dzhon

wow reproduction of an historical picture... LOVE it... well don TOVARISCH ZHON

Thanks Si.Evening John,
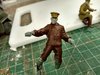
Blimey this is going together very quickly. And a fine job your making of things too sir:smiling4:
Hope you’ve been enjoying the garden over the weekend, I know I have
Keep it coming :thumb2:
Thank Lee, if it comes out half as good as your trailer I shall be glad !Looking good JR can’t wait for paint
Quite honestly Lee it's been a battle, yours is looking really good, looking fwd to the cab .I’m sure it will probably better
Cheers mate, will do.John, love the work mate, hanging in for the finish.
cheers
Ross
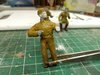
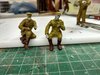
John, good to see you persevering and kicking this kit into submission. I agree with Neil on the figure heads. If all four were facing to the front would be most natural not unless you have a fifth figure on the ground making eye contact with one on the vehicle.
Try using a 30 degree sharp blade to carve the CA and then final clean up with needle files. If you have Tamiya aircraft fillers you can use that to fill smaller gaps and then clean up with Gunze thinner which will dissolve the putty and not the plastic to smoothen it down.
Cheers,
Richard
Richard, just looked a list of SM blades, a bewildering collection but can't see and mention of 30 deg. as writtenJohn,
You'll find cocktail toothe picks one of the best tools for applying and sculpting putty.
Cheers,
Richard
Thanks Neil.John,
I assume you use SM 10A blades?
SM no 11 blades are long and thin -possibly 30 degrees as Richard suggests. I also like their no 15 blades which are small and curved , and can give you an almost flat cutting angle like a chisel.
good luck
N
scalemodelling.co.uk is a privately operated online discussion forum. All content posted by members reflects their own views and opinions and does not necessarily represent those of the forum owners or administrators. While reasonable efforts are made to moderate content, no responsibility is accepted for user-generated material. By using this site, you agree to comply with UK law and the forum rules.