
You are using an out of date browser. It may not display this or other websites correctly.
You should upgrade or use an alternative browser.
You should upgrade or use an alternative browser.
BarryW's Hawker Typhoon Airfix 1:24
- Thread starter BarryW
- Start date
- Status
- Not open for further replies.
Awesome, I love the detail on the cockpit, and the overall details of the kit looks great to, as far as I can see. To be honest I never did a big build like that.
So I will keep watching and learning.
Keep it up.
Cheers Richi
So I will keep watching and learning.
Keep it up.
Cheers Richi
Attachments
An update.
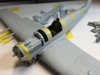
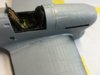
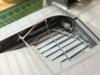
I have spent a couple of sessions fitting fuselage panels. I mentioned before the tight tolerances and by eye my model looked just right but I had issues with the fit of panels and I cannot blame the kit. I suspect a small imperceptable error possibly the thickness of paint skewed the fit causing the issues. A fair bit of filler has has to be used and I will start the clean up tonight. Mostly ipa dipped cotton buds will do, preserving detail but I will need to sand in a couple of places and rescribe. Some pics of the issues. Reviewers also report the same kind of thing
View attachment 97575
View attachment 97576
View attachment 97577
View attachment 97578
View attachment 97579
The pics also show up some shrinkage in the filler to deal with...oh what fun but nothing to what some of you with the old Airfix 1/24s must be facing.
View attachment 210598
View attachment 210599
View attachment 210600
View attachment 210601
View attachment 210602
Attachments
G
Guest
Guest
Holy crap, I missed the earlier updates, but that Cockpit is simply amazing! Great work!
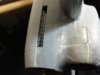
Bit of work to do on those joins Barry (is that a fingerprint I see near the intake?), but what you've finished so far is beautiful. I know you've had to hide a lot of your stuff before - particularly engines - but it seems criminal to hide all the detail you've got here. You sure you're having this one all buttoned up? We couldn't talk you into leaving off a panel or six?
Yes Gern, it is a fingerprint, fortunately only paint......
Yes there is a bit of work but they have mostly cleaned up fine with a cotton bud dipped in ipa. I just have a couple of gaps where it is uneven to sand plus some light sanding on a join or two.
As for opening it up,no well past such decisions now. Others are doing it opened and we need a bit of a contrast. I really do prefer my models closed up to see the lines of the plane. But as I said before I may do another in due course.
G
Guest
Guest
Looks good to me Barry. I shall be very interested to see how you go about the weathering as there is a hell of a lot of detailing. This all especially as most of it seems to be rivet work. Found that difficult on the Merlin which had rivets either side of the panel lines all collecting Afghanistan dust.
Laurie
Laurie
Yes Laurie. I am looking forward to that
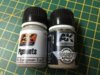
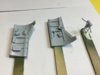
My initial thoughts are once the panel line pin wash has been sealed with the first matt coat to use pigments, brushed lightly around the rivets in strategic places. I also have a dust wash which I might decide to use instead or as well as.
These are what I am considering using
View attachment 97662
View attachment 210685
Attachments
Hi Vaughan. It is quite minor as things go and it is a great kit. Thanks to meetings and commitments I have not had much chance to do much for a couple of days but I hope to post some progress by Monday. I have already cleaned up most of the filler. The sanding will not be a big issue.
G
Guest
Guest
Looking great Barry. The fit issues in the pics do'nt look all that hateful , just so close to all that fine detail! looking forward to seeing the next update!
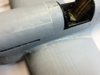
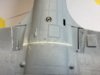
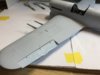
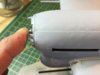
I am hoping to pick up the pace again this week after not getting in much bench time last week. Here is where I am at. I have cleaned up the filler and seams with very little damage to detail. Tomorrow I will have some rivets to put back and a few lines to scribe, mostly icon one side of the nose. I also found a problem where I needed to use a spot of plastic card as below. View attachment 98130
Once the cement had dried I clipped it back and sanded it to blend it into the cowl and now it looks like this:
View attachment 98131
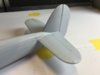
Tail is now fitted with a some minor sanding to do at the root.
View attachment 211153
View attachment 211154
Once the cement had dried I clipped it back and sanded it to blend it into the cowl and now it looks like this:
View attachment 98131
Tail is now fitted with a some minor sanding to do at the root.
View attachment 211153
View attachment 211154
Attachments
View attachment 98132\ said:I am hoping to pick up the pace again this week after not getting in much bench time last week. Here is where I am at. I have cleaned up the filler and seams with very little damage to detail. Tomorrow I will have some rivets to put back and a few lines to scribe, mostly icon one side of the nose. I also found a problem where I needed to use a spot of plastic card as below. View attachment 99616Once the cement had dried I clipped it back and sanded it to blend it into the cowl and now it looks like this:View attachment 99617
Tail is now fitted with a some minor sanding to do at the root.
Flaps and ailerons are in place
View attachment 98133
Plus the final cockpit parts are ready for priming painting and weathering.
View attachment 98134
Tomorrow I will finish the sanding and clean up then do the rivets and scribing. I may then get a chance to lay down the first primer coat to check all the seams joins etc.
(Sorry post appeared in two parts it is thick fingers on an iPhone)
View attachment 211155
View attachment 211156
View attachment 211157
Attachments
Another update. Been preparing some sub-assemblies and finishing the clean up ready for the first primer coat.
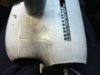
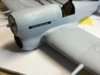
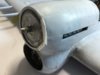
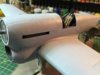
A couple of shots of the nose now I have trimmed and sanded the plastic card fillet. I might have to do a little more work when I see it under primer. It has also been rescribed.
View attachment 98430
The second pic shows a prop base plate held in position to view the fit of the plastic card. It looks ok for now I'm fact I am rather pleased with it.
View attachment 98431
Just a tweak more with the sander I think once the primer on on.
I have painted and weathered the cockpit sides and will fit them before priming.
View attachment 98432
I have also installed the plumbing in the wheel wells. This was very fiddly and the fit is not great and I still have a 'end' to glue down somehow that just doe not fit. I might leave it as it is difficult to see and even then you would need to look for it.
View attachment 98433
Finally here some more sub assemblies being prepared. The wheels are large and have large locating pins and holes but, nevertheless they are a loose fit with some 'give' and not at all a good fit. After a lot of fiddling around and clamping I managed to get the best fit I could before cementing but I will have a fair bit of sanding to do and maybe some Mr Dissolved putty will be needed.
View attachment 98434
Anyway despite the issues which are really minor and very manageable this remains one of the most enjoyable builds I have done. Hopefully I will be able to post more progress tomorrow
View attachment 211453
View attachment 211454
View attachment 211455
View attachment 211456
View attachment 211457
Attachments

- Status
- Not open for further replies.
Legal Notice
scalemodelling.co.uk is a privately operated online discussion forum. All content posted by members reflects their own views and opinions and does not necessarily represent those of the forum owners or administrators. While reasonable efforts are made to moderate content, no responsibility is accepted for user-generated material. By using this site, you agree to comply with UK law and the forum rules.