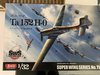
Theme editor

Scale Model Shop

BarryW’s Zoukei Mura 1/32 Ta152 H-0

Status
Not open for further replies.

BarryW

SMF Supporters
Joined
Jul 23, 2011
Messages
6,145
Reaction score
457
Points
83
Age
70
1/3
Thread owner
The box lid
View attachment 319635
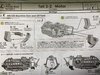
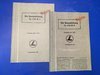
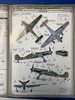
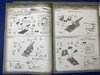
Instructions - nicely produced and detailed.
View attachment 319636
View attachment 319638
View attachment 319637
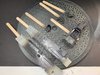
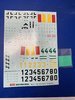
The decals. Not sure if I will use them yet.
View attachment 319639
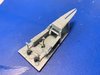
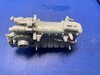
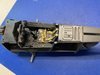
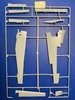
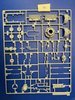
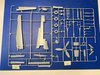
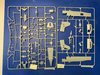
Sprues
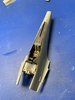
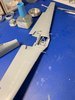
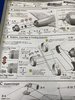
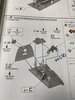
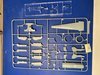
View attachment 319640View attachment 319641View attachment 319645View attachment 319646View attachment 319647
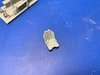
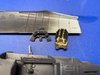
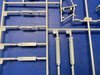
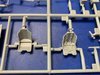
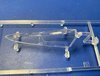
A couple of close ups. All nice, clean and crisp. Transparencies are very nice.
View attachment 319642
View attachment 319643
View attachment 319644
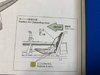
There are just two changes between the H-0 and H-1 so I notated the differences for the H-0 on the instructions that are for the H-1.
View attachment 319648
View attachment 319649
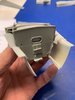
It is all looking very nice indeed. Detail is good and crisp.
 

Attachments

  • 1D100B5F-8C6F-4EDB-82A9-2B11111CC3F8.jpeg
    1D100B5F-8C6F-4EDB-82A9-2B11111CC3F8.jpeg
    4 KB · Views: 0
  • FA229FA1-367A-4947-844D-C72FD72DA277.jpeg
    FA229FA1-367A-4947-844D-C72FD72DA277.jpeg
    3.9 KB · Views: 0
  • F0B39643-3B32-49CD-8C49-E62A067330AF.jpeg
    F0B39643-3B32-49CD-8C49-E62A067330AF.jpeg
    3.3 KB · Views: 0
  • FC7F4AEC-0640-49B0-8B21-47A0B201D8AA.jpeg
    FC7F4AEC-0640-49B0-8B21-47A0B201D8AA.jpeg
    4.1 KB · Views: 0
  • 2488E9C7-50D8-4097-8870-1E26DC153E43.jpeg
    2488E9C7-50D8-4097-8870-1E26DC153E43.jpeg
    2.8 KB · Views: 0
  • AC031B9E-89F5-4FA9-81F6-4A9E3D172CAC.jpeg
    AC031B9E-89F5-4FA9-81F6-4A9E3D172CAC.jpeg
    3.8 KB · Views: 0
  • D6528D48-8815-4223-A4D2-CB785D40FE66.jpeg
    D6528D48-8815-4223-A4D2-CB785D40FE66.jpeg
    3.7 KB · Views: 0
  • 70128B97-C22B-41F4-B0FF-C31F95A2CB4B.jpeg
    70128B97-C22B-41F4-B0FF-C31F95A2CB4B.jpeg
    3.7 KB · Views: 0
  • C41EFE22-5279-4527-BEE7-0BFC6044DE5F.jpeg
    C41EFE22-5279-4527-BEE7-0BFC6044DE5F.jpeg
    4 KB · Views: 0
  • 91935938-AA71-43E0-BC5E-02874ED11BDD.jpeg
    91935938-AA71-43E0-BC5E-02874ED11BDD.jpeg
    4.6 KB · Views: 0
  • 337B8A67-7ACB-43CB-AF5D-2104FF483CC1.jpeg
    337B8A67-7ACB-43CB-AF5D-2104FF483CC1.jpeg
    3.9 KB · Views: 0
  • 8FDD103E-B2BF-46F5-9E58-092DF981FEB9.jpeg
    8FDD103E-B2BF-46F5-9E58-092DF981FEB9.jpeg
    4.2 KB · Views: 0
  • 3B48254A-6609-403D-805F-3ADFC374C9CB.jpeg
    3B48254A-6609-403D-805F-3ADFC374C9CB.jpeg
    3.2 KB · Views: 0
  • E685F4B9-A489-4EF6-9178-2DF7063F1A99.jpeg
    E685F4B9-A489-4EF6-9178-2DF7063F1A99.jpeg
    4.2 KB · Views: 0
  • C919F1BB-8D46-4CA2-ACE4-497B26CB7E48.jpeg
    C919F1BB-8D46-4CA2-ACE4-497B26CB7E48.jpeg
    4.4 KB · Views: 0
Let's hope you have better luck with this Z-M kit than you did with your last one Barry.

Is it just me or does that prop look a bit teeny tiny?
 
Lovely looking kit. Like the Phantom I'm currently building it should be a pleasure to put together.
 
Thread owner
Let's hope you have better luck with this Z-M kit than you did with your last one Barry.

Is it just me or does that prop look a bit teeny tiny?
Hi Dave
I blame myself for the P51 problem, not ZM. While the engineering did provide more scope to go wrong it was still a good kit. The ZM Skyraider I did many years ago was a very good build, giving me a good result and this one looks better, partly because they have dropped the three colour plastic approach so now all the sprues are consistent not just in colour but the way the plastic handles.

From reviews I am expecting some challenges along the way, but then that is the same for all kits.

I have not heard of any problems or issues regarding the prop. I will see.

I did get a little time last night to cut plastic and a dry fit looked good...

Hopefully I will get to post more tomorrow.

After that Avenger - there do not seem to be many parts to this kit!
 
Like Paul I've never heard of this company before. Will have to have a search.
Good luck Barry, looks a nice kit.
John.
 
Thread owner
Like Paul I've never heard of this company before. Will have to have a search.
Good luck Barry, looks a nice kit.
John.
They are a very high-end brand and a bit expensive but I think they are worth it - they make some unusual subjects that offer different challenges to other brands. Here is a link to their website. http://www.zoukeimura.co.jp/en/concept.html
 
Thanks for the link Barry. Going now ..........
Well some nice looking models and a very impressive site. Some nice items,esp that wood grain mask ! More of a wingy place with plenty of add ons to the kits.
John.
 
Thanks for the link Barry. Going now ..........
Well some nice looking models and a very impressive site. Some nice items,esp that wood grain mask ! More of a wingy place with plenty of add ons to the kits.
John.

Yup John, for some you could say it's like the RR in kit form. I brought back from Japan the 1/32 Ho 229 Horten for a friend and had a look in it and was impressed by the full clear body although I'm not a fan of that particular plane. They have separate ground crew and pilots even.

Barry, the TA looks beatiful even on the sprue.

Cheers,
Richard
 
Thread owner
I have started with the cockpit and am focussing on bringing together the sub-assemblies ready to paint the interior. I cannot complain about the fit, at all.
View attachment 319775

I have decided to see what the seat with molded in harness looks like when painted. if I am unhappy I will be able to use a second seat without harness and use an aftermarket set.
View attachment 319776
That seat looked a lot closer in when I photographed it!

I do like these instructions. They go to a lot of trouble to make sure that you can see how parts fit even though there are clear location points. Look at this for the fitting of the seat...
View attachment 319777

That is it for now. Hopefully more tomorrow. I am not sure why the photos are so small today... I think I must have done something in the setting without realising it. I will check it over tonight.
 

Attachments

  • IMG_0508 (002).jpg
    IMG_0508 (002).jpg
    2.4 KB · Views: 0
  • IMG_0509 (002).jpg
    IMG_0509 (002).jpg
    2 KB · Views: 0
  • IMG_0510 (002).jpg
    IMG_0510 (002).jpg
    2.2 KB · Views: 0
Watching this build. Love everything Fw190 and the Ta152 is just an extension of that love.
 
Thread owner
A bit of an update.
I have painted the pit RLM66. Note that I am painting both i.panels. I have not decided which option to use yet, probably the individual dial decals.
View attachment 320268

At the same time I am working on the very nice engine. I will not be having panels open so it won’t be seen so I am building it for the fun of it but without painting it.
View attachment 320267
A pic following of the instructions. I love how they explain what you are doing. You can learn so much about the actual aircraft. Over engineered, perhaps, but I love it.
View attachment 320269
 

Attachments

  • 5659D676-0812-4496-BAFB-5139DCA18CA4.jpeg
    5659D676-0812-4496-BAFB-5139DCA18CA4.jpeg
    3 KB · Views: 0
  • FD269597-1DC2-477F-9665-046F60E262B5.jpeg
    FD269597-1DC2-477F-9665-046F60E262B5.jpeg
    3.4 KB · Views: 0
  • 964B6D1E-79A6-41BA-ADAE-484ED9ACFFEF.jpeg
    964B6D1E-79A6-41BA-ADAE-484ED9ACFFEF.jpeg
    3.8 KB · Views: 0
Thread owner
More progress
The sides are joined. I have left some sections free of cement to be manipulated into position as I join the wings etc.
View attachment 320770
The long, long wingspan
View attachment 320771
I have to cuts some parts away inside the fuselage which will help attach the engine. I am not sure how that could possibly work if I had not done so.
View attachment 320772
 

Attachments

  • B1BA2E53-DB6D-413E-8A9A-FB7B183099E3.jpeg
    B1BA2E53-DB6D-413E-8A9A-FB7B183099E3.jpeg
    2.9 KB · Views: 0
  • 0D801DEB-7644-442A-BCEC-3D1AB56995F8.jpeg
    0D801DEB-7644-442A-BCEC-3D1AB56995F8.jpeg
    3.6 KB · Views: 0
  • D58C4F60-388D-4608-B009-6F84E820800C.jpeg
    D58C4F60-388D-4608-B009-6F84E820800C.jpeg
    3.4 KB · Views: 0
Status
Not open for further replies.
Back
Top