Theme editor

Scale Model Shop

Colin M's 1:72 Hasegawa Sea Harrier FRS Mk1

Status
Not open for further replies.

colin m

Moderator
Staff member
Joined
Dec 26, 2008
Messages
9,113
Reaction score
380
Points
83
Location
Stafford, UK
1/3
Thread owner
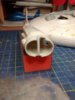
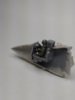
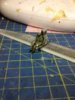
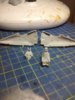
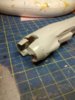
I'm in and here it is. I've never built a Hasegawa kit and even this old one looks nice. Fine recessed panel lines, generally a good level of detail. I was thinking about building it in flight, but that's not a kit option. However, you do get an access ladder, so that might get used instead.
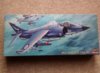
The box.

View attachment 79405
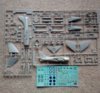
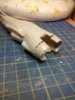

And the Sprues.

View attachment 79406


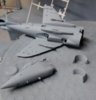
The canopy (not shown here) even has the 'explosive wire thing' moulded into the top of it. Not sure I'll be highlighting that in this scale, unless of course, you know how.

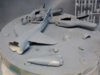
Two schemes are offered, I'm going for the original grey over white, rather than the operational single colour scheme. These are the colours I remember when I built a Matchbox Shar many many years ago.

Anyway, weather is great, time to get back into the garden.

Colin M..

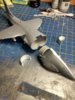
View attachment 192428

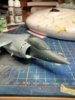
View attachment 192429
 

Attachments

  • The Box.jpg
    The Box.jpg
    2.4 KB · Views: 0
  • Sprues.jpg
    Sprues.jpg
    3.4 KB · Views: 0
Awesome Colin, this should be a good one. Lucky they moudled the Miniature Detobation Chord into the canopy for you, I'm pondering whether I bother with it in my GR.3 or not. If the MDC is recessed into the inside of the canopy then you can 'fill' the recessed lines with the appropriate colour using a wash or something like that. It will flow into the gaps and you can wipe away the excess. I've seen it done on the Airfix Hawk but haven't had the opportunity to try it myself yet.
 
Nice kit Colin , the grey/white sceme always looks very neat . Personally I would just leave the MDC on the canopy as it is, theyre only just noticeable on photos of the real thing so the moulding should be visible enough without highlighting or painting it. cheers tony
 
Thread owner
Ah now then. I like the idea of leaving it alone Tony, but It can't hurt just to try a simple water based wash as Joe suggest, then if it doesn't work, off with it and back to plan A.
 
Thread owner
Firstly if this goes wrong, forgive me, I'm typing from my phone.

View attachment 80172


If the pic has appeared, it shows quite a bare cockpit. I'll stick a few little bits in to break it up a bit.

View attachment 80173


Some time later the tub nears completion, the pilot just needs a harness.

View attachment 80174


Looks like I forgot the harness !

View attachment 80175


The fuselage needs a bit of work. It doesn't line up hence the spreader bar to stretch the fues' wider.

I'll hopefully get a bit more done tonight.

I forgot to mention, the pilot is moulded with a separate right arm, nice touch I thought.

View attachment 193195

View attachment 193196

View attachment 193197

View attachment 193198
 

Attachments

  • IMG_20140328_204311526.jpg
    IMG_20140328_204311526.jpg
    2.7 KB · Views: 0
  • IMG_20140331_220525966.jpg
    IMG_20140331_220525966.jpg
    1.3 KB · Views: 0
  • IMG_20140331_213336052.jpg
    IMG_20140331_213336052.jpg
    2.8 KB · Views: 0
  • IMG_20140325_203741125.jpg
    IMG_20140325_203741125.jpg
    2.8 KB · Views: 0
Looks a nice kit Colin.The MDC on the 1/48 Revell Harrier I'm building is provided as a decal.When I worked on Tornado's many moons ago, this miniature detonating cord was light grey in colour and approximately 8mm diameter.Im assuming it's the same on the Harrier.So in 1/72 scale it would appear as a very thin line.Hopefully your wash should do the trick.
 
Thread owner

Attachments

  • IMG_20140403_212606090.jpg
    IMG_20140403_212606090.jpg
    2.8 KB · Views: 0
  • IMG_20140403_212544499.jpg
    IMG_20140403_212544499.jpg
    2.8 KB · Views: 0
Nice work Colin. I made flaps for the vents too out of card. Must update my build thread. Yours is looking good so far.
 
Thread owner
So, it's been a while since I managed any update to my SHAR. Strange things like a family holiday got in the way. But anyway, I've moved on just a bit.

View attachment 81477


View attachment 81478


The general fit of the pieces up to now can only be described as ok. I expected more of my first Hasegawa kit, but then again, it is an old one.

So, the observant might be wondering why has the fool primered the model, before attaching the cockpit. Well it's just because I'm doing the old two tone scheme of gray over white, and the white runs in side the air intake which might mean some tricky masking and spraying, hence most of the paint will be applied before connecting things up. Sure the paint will need touching up but hopefully shouldn't be too difficult.

For the Cosford boys, all built so far with my new watery liquid glue -nice stuff.

View attachment 194500

View attachment 194501
 

Attachments

  • Primer 2.jpg
    Primer 2.jpg
    2.7 KB · Views: 0
  • Primer 1.jpg
    Primer 1.jpg
    2.3 KB · Views: 0
Thread owner
\ said:
Looking good Colin.Ive lost interest in mine.
Strange thing is Dave, I'm not that interested in this one either. I think it's just because I'm so busy outside in the garden.
 
Looks good work Colin, the painting scheme does like a tricky one but I am sure your will pull it off.

Si:)
 
Thread owner
Thanks for looking in Gentlemen. So, what happened today. Well I spent 6 hours in the greenhouse potting on - but that's not what you want to hear about, so:

Here's was the SHAR ready to connect the cockpit and fuselage up.

View attachment 81552


And then, success. With only a tiny bit of filler and sanding required. Things should be a bit easier on the painting front now.

View attachment 81553


View attachment 194575

View attachment 194576
 

Attachments

  • Ready to join 2.jpg
    Ready to join 2.jpg
    3.2 KB · Views: 0
  • Joined.jpg
    Joined.jpg
    3.1 KB · Views: 0
Looking Colin. See that Hawsaga put in the air vents on the inlets. Amazing on the Tamiya 1/48 they just had a mark on the plastic. This is a nice aircraft it is just enjoyable to build. It is just amazing how much they managed to get into such a small frame. A great feat of engineering and imagination. Often study mine on the shelf and marvel even with out the omitted inlets.

Laurie
 
Status
Not open for further replies.
Back
Top