Theme editor

Scale Model Shop

Colin M's Cold war group build Sea Vixen

Status
Not open for further replies.

colin m

Moderator
Staff member
Joined
Dec 26, 2008
Messages
9,113
Reaction score
381
Points
83
Location
Stafford, UK
1/3
Thread owner
Well at last the hall, stairs and landing along with 11 doors are finished. Meaning I can put down the Dulux and pick up the Vallejo.
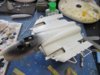
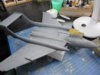
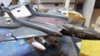
Whilst decorating, I have managed to do the odd bit of work on my build, but with progress so slow I didn't post anything, so here we are, this is me right up to date.
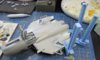
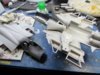
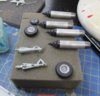
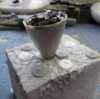
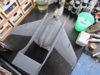
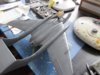
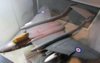
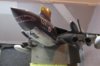
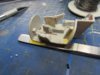
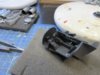
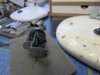
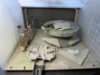
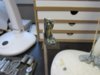
True, it all looks a bit did-jointed at the moment. That's because I'm waiting on some 'steel grey' paint to finish off the wheel wells before I can stick the fuselage together.
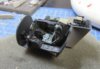
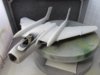
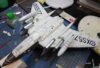
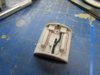
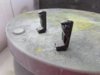
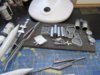
The standard seats are good, but I went with a bit of Eduard PE just to liven the seats up a bit. I've also added a few bits and pieces around the cockpit and air brake bay.
View attachment 285976

View attachment 285977

View attachment 285978

View attachment 285979

View attachment 285980

View attachment 285981

View attachment 285982

View attachment 285983

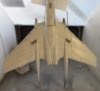
So there we are. I can't talk much about fit at the moment, as I haven't fitted much, but the few bits I have, have all behaved themselves.

Colin M.
 

Attachments

  • 1.JPG
    1.JPG
    2.4 KB · Views: 0
  • 2.JPG
    2.JPG
    2.7 KB · Views: 0
  • 3.JPG
    3.JPG
    2.2 KB · Views: 0
  • 4.JPG
    4.JPG
    2.6 KB · Views: 0
  • 5.JPG
    5.JPG
    2.7 KB · Views: 0
  • 6.JPG
    6.JPG
    2.5 KB · Views: 0
  • 7.JPG
    7.JPG
    3.1 KB · Views: 0
  • 8.JPG
    8.JPG
    2.7 KB · Views: 0
That ejection seat looks sweet and the cockpit looks as though it will be every bit as good.
Looking forward to the progress Colin.
Cheers
P

BTW, I hear ya with the decorating I've been at it for 6 months
 
Thread owner
Thanks for you interest gentlemen. Now the decorating aftermath has all been tidied away, I've made progress. I'm actually at the stage now of putting plastic together, instead of just building and painting loads of sub-assemblies.
The seats have been installed into the cockpit. The pilot seat needed a bit of a shave and that was before any PE was added.
View attachment 286135

This has to be the most strangest looking aircraft build I have ever done. Normally at this stage, the fuselage is sort of long and thin. Look at this odd thing.
View attachment 286136

A close up of the seats poking out nicely from the fuselage - I sense there could be trouble ahead, maybe I should have left the seats out until later ?
View attachment 286137

Wheels and weapons done, although the rocket pod heads look a little too shiny at the moment. The main wheels are separate from the tyres, a nice touch making painting a lot easier.
View attachment 286138

So, how do you stick this add looking thing together ? Bit by bit I reckon. Stbd wing 'stub' first for me, working my way around to the nose.
View attachment 286139

Done, all stuck together. There's a slight miss alignment around the cockpit which I just couldn't correct. I have a feeling it's something to do with the position of the cockpit. It's not bad, there are no gaps, just a bit of sanding required - I think.....
View attachment 286140

So, at this stage, it still looks more Sci-fi than 50's cold war aircraft. It needs some wings, quickly.

Colin M..
 

Attachments

  • 14.JPG
    14.JPG
    3.2 KB · Views: 0
  • 13.JPG
    13.JPG
    2.6 KB · Views: 0
  • 9.JPG
    9.JPG
    2.5 KB · Views: 0
  • 10.JPG
    10.JPG
    3.3 KB · Views: 0
  • 11.JPG
    11.JPG
    2.8 KB · Views: 0
  • 12.JPG
    12.JPG
    3.3 KB · Views: 0
Ooo, now that's is nice. Cockpit looks awesome Colin.
I'm sure you'll solve any slight misalignment. I'm actually thinking this looks a very good Airfix, kit looking at surface detail etc.

Keep up the great work Colin!

Oh, btw should be swapping the paint roller for a zero brush in a couple of weeks. I'm really looking forward to sticking bits of plastic together again!!!

Cheers
P
 
Excellent work Colin , the seats and cockpit look amazing (although once the canopy is on not a lot will be visible , especially the navigators 'coal hole'!) It does look rather strange at this stage but im sure it will all of a sudden start to look like an aircraft . albeit a strange shaped one ! keep it up , cheers tony
 
Thread owner
Yes Tony, even in 1:48, the 'pit openings are tight, but both will be open, so hopefully something will be seen.

Airfix recommend 35g of weight in the nose. This is what 40g of lead looks like. This is actually quite a large nose, with a lot of space inside - just not enough for 40g of lead.
View attachment 286424
So I placed each piece in carefully trying to minimise wasted space. Then glue, lots of glue.
View attachment 286425

The rest of the build is just about ready for priming.
View attachment 286426
But until I can attach the nose, there isn't much I can do. Can you believe it, the house to myself, undisturbed modelling time, and I've stalled.
 

Attachments

  • 16.JPG
    16.JPG
    2.5 KB · Views: 0
  • 17.JPG
    17.JPG
    2.4 KB · Views: 0
  • 15.JPG
    15.JPG
    3.3 KB · Views: 0
Thread owner
Nose dried (I used the oven in the end) and attached so on with the primer. Which showed a little problem with the fuselage seam, little ! it looked like I had made no attempt to clean the seam at all.
View attachment 286482

That little problem was rectified and re-sprayed. Then onto the underside. It is white, it just looks a bit yellow in the early morning sun. Hopefully, you can see the slightly patchy effect I managed with just a bit of random spraying here and there.
View attachment 286483
The panel lines have high lighted themselves nicely. One job less to do.
 

Attachments

  • IMG_1393.JPG
    IMG_1393.JPG
    1.6 KB · Views: 0
  • IMG_1394.JPG
    IMG_1394.JPG
    2.5 KB · Views: 0
looking good colin, at least you didn't make the mistake someone i knew made and set the oven too high - he came back to a very mishapen lump of plastic.
 
Thread owner
Thanks for stopping by gentlemen. Well, upstairs is now painted as well. No pre-shading, just straight on with the colour, followed by a lightened mix for post shading. The post-shading is really subtle, I don't think it really shows up in pic's here.
View attachment 286703

View attachment 286704

Again, the panel lines stand out quite nicely by themselves. To wash or not to wash - that's not a personal question.
 

Attachments

  • 20.JPG
    20.JPG
    2.9 KB · Views: 0
  • 21.JPG
    21.JPG
    3.4 KB · Views: 0
That is a fantastic looking model and you have done it proud.

Look forward to your next update.
 
Thread owner
That is a fantastic looking model
Thanks Tony. I don't know your modelling history, but if you built Airfix as a lad, these new tool models are nothing like the old ones of the past. They really are very good.
Well, it's all shiny, but for some odd reason the Klear doesn't seem to want to settle. I'll leave the upper surface for a day just to make sure all is ok.
View attachment 286720

But the gloss white underside is a different story. Here I've made a start on the 1.2 million decals kindly provided by Mr Airfix.
View attachment 286721
I'm guessing tonight I can make a start on the upper side decals.
 

Attachments

  • 22.JPG
    22.JPG
    3.1 KB · Views: 0
  • 23.JPG
    23.JPG
    3.2 KB · Views: 0
Looking good col , i had problems with the klear too on my mig, first it didnt give enough of a gloss to attempt the panel line wash , so i glossed it with galeria over the top but this stayed tacky for weeks. Maybe its something to do with the age ( of the klear not the modeller!!)
 
Thread owner
something to do with the age
Actually, as I approach 50, I'm using that as a great excuse for just about anything.
Anyway, the build continues. Underside decals in place, so I thought I'd stick some bits on. Rocket pods and tanks, all made much earlier.
View attachment 286880

Top side decals in place and a final gloss coat applied.
View attachment 286881

Panel lines had a wash, but I'm trying to keep this quite a clean machine. The pic below is after a coat of satin varnish. It still might be a bit too glossy. I'll have to look at some pictures to see if it needs to be a touch more mat. Even though in this picture, it looks fairly mat already, it's not.
View attachment 286882

And why choose this scheme ? Well look, a shark's mouth. I can't resist a shark's mouth.
View attachment 286883

That's it for tonight. I'll fade the decals a touch tomorrow and maybe add the landing gear.
 

Attachments

  • 24.JPG
    24.JPG
    3 KB · Views: 0
  • 25.JPG
    25.JPG
    2.5 KB · Views: 0
  • 26.JPG
    26.JPG
    2.2 KB · Views: 0
  • 27.JPG
    27.JPG
    2.3 KB · Views: 0
Status
Not open for further replies.
Back
Top