Theme editor

Scale Model Shop

Dave Ward's Eduard 1/48 SSW D.III - Brad9826's WWI Memorial GB

Status
Not open for further replies.
Thread owner
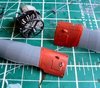
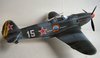
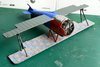
Engine ready to fit, and the first coat of Vallejo Scarlet applied to the front fuselage
View attachment 310754
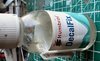
For those who are not familiar with this................
View attachment 310756
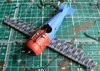
Unlike other decal solutions, this is a single part, as I have said, it is a bit fierce, and you need to be careful!
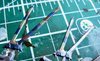
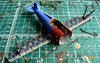
The outer struts have decals applied to the inner & outer faces - with these, I just placed the decal on the surface no rubbing with cotton buds etc, and applied a thin(ish) coat of DecafFixView attachment 310755

The solution hasn't quite dried yet, but it has sucked the decal down around the struts. I'll leave it overnight to really dry.
Dave
 

Attachments

  • Engine & Scarlet.jpg
    Engine & Scarlet.jpg
    4.3 KB · Views: 0
  • Humbrol DecalFix.jpg
    Humbrol DecalFix.jpg
    3 KB · Views: 0
  • Struts decal.jpg
    Struts decal.jpg
    3.6 KB · Views: 0
Thread owner
Boring!!!! This is the result of adding 50+ rib tape decals............................
View attachment 310858

I'll apply a satin varnish, to seal everything in. It's a real slog, adding these decals - luckily there are a few spare...............
Dave
 

Attachments

  • boredom.jpg
    boredom.jpg
    2.6 KB · Views: 0
Going great gun's Dave. Decals are well popping, .. In what way is decalfix fierce Dave, as I have a bottle, but not used it yet? Cheers bud.
 
Thread owner
Brad,
DecalFix will find any flaws in decals - I've had older decals disintegrate, and if you get a fold in a decal, you're in trouble. It's not like other decal solutions, you have to get the positioning pretty close first time, as moving the decal is not easy. Having said that it does suck the decal down onto the surface very well.View attachment 310862
View attachment 310863
Humbrol direct you to soak the decal in neat DecalFix. - I dilute the solution 70% water 30% DecalFix, and only use neat Decalfix to brush the location, and after placing. Avoid touching the decal with fingers, as it seems to stick to fingers pretty well!
Dave
 

Attachments

  • p - finished 04.jpg
    p - finished 04.jpg
    2.6 KB · Views: 0
  • yak fin 04.jpg
    yak fin 04.jpg
    2.1 KB · Views: 0
Thanks Dave, all noted.. If I ever get to a stage of applying decals..:thumb2:
 
Thread owner
Wings satin coated - when fully dried, I'll clear the holes for the struts and the rigging - seat and simple belts added.View attachment 310972

I've joined the fuselage, and primed...............View attachment 310971

I think it's going to come together pretty quickly, now.
Whilst I was applying the rib tapes, I was thinking about my next build - and I think I'm going to have a crack at this-View attachment 310973
It's being calling me for a while now! Not plain green, but a camo finish.
Dave
 

Attachments

  • zvezda msta.jpg
    zvezda msta.jpg
    3.6 KB · Views: 0
  • wings satin coated.jpg
    wings satin coated.jpg
    2.7 KB · Views: 0
  • fudelage primed.jpg
    fudelage primed.jpg
    2.4 KB · Views: 0
I had the same problems with Decalfix - decals stuck to the first surface they touched, usually fingers. The ones I managed to get onto the model refused to move to the right place.

Pete
 
Hiya
I use Microsol and microset (which is the one Decalfix sounds like). I may have it wrong, and I may have misunderstood what you have said, but I though you were supposed to brush it on the surface after the decal has been positioned, not use it as the decal is being placed? It softens the decal to an extreme allowing it to conform to the surface, so would make them really difficult to handle?
Tim
 
Humbrol have a video showing decals being soaked in Decalfix to remove them from the backing paper.

Pete
 
Funny that, microset states not to touch the decal after application until the decal has dried out again....whichever works I suppose...
Cheers
Tim
 
Thread owner
Here's a link to the YouTube video * Humbrol DecalFix* on how they recommend how it should be applied. It being a single part solution, it is used differently to the 2 part MicroSol/Set
Dave
 
Thread owner
Bottom wing and fuselage offered up for the first time
View attachment 311031

It makes you wonder why, after going to the trouble of printing the complex lozenge camouflage canvas, the planes were then painted in such bright colours? A complete contrast to the drab RFC/RAF PC10!
Dave
 

Attachments

  • fuselage wings.jpg
    fuselage wings.jpg
    3.5 KB · Views: 0
Thread owner
The engine and cowling added - a little jiggling needed to get things to fit, and the machine guns added.
View attachment 311117
Now begins the tricky bit - top wing, and the centre section rigging, this is not something you can rush, you have to have steady hands, so no double espresso for me today!
Dave
 

Attachments

  • engine cowling mg added.jpg
    engine cowling mg added.jpg
    3.8 KB · Views: 0
Hello Dave,
I've built a couple of these Eduard kits and really like them. Although to be honest, with all these decals, I might avoid this one. But hat's off to you for tackling it. It's certainly turning into quite a colourful beast.
 
Thread owner
Top Wing added - all struts present and correct
View attachment 311137View attachment 311138
Sadly, my rigging on the centre section went awry, so I'll have to revisit that - but tomorrow, when my hands will be steadier........
Dave
 

Attachments

  • top wing added 02.jpg
    top wing added 02.jpg
    2.8 KB · Views: 0
  • top wing added 01.jpg
    top wing added 01.jpg
    1.9 KB · Views: 0
Thread owner
Wing rigging added - !!!! PHEW !!!! - I used 0.1mm elastic line ( like EZ-Line ). I found out that it didn't like my Loctite CA - it didn't 'grab', so I had to revert to my backup el-cheapo unbranded...................
View attachment 311365View attachment 311366
At the moment they are natural white colur, but I'll use Vallejo Game Ink to give a dark grey finish. All the rigging holes in the wings will be made good - the lozenge decals will cover up a lot! A lot of squinting, holding my breath and blasphemy has got me over this hurdle! :smiling6:
Dave
 

Attachments

  • P1050308.JPG
    P1050308.JPG
    1.9 KB · Views: 0
  • P1050311.JPG
    P1050311.JPG
    2.1 KB · Views: 0
Status
Not open for further replies.
Back
Top