
You are using an out of date browser. It may not display this or other websites correctly.
You should upgrade or use an alternative browser.
You should upgrade or use an alternative browser.
Dave w's Matchbox 1/32 Spitfire mk24
- Thread starter Dave W
- Start date
- Status
- Not open for further replies.
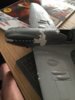
That looks alright. I would sooner have a tight fit than big gaps to deal with later.\ said:View attachment 132552 That's the wing glued to the fuselage.As you can see the two assemblies need some encouragement to join together!.
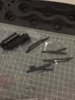
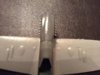
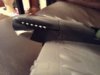
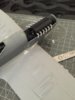
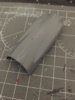
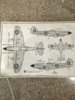
i thought I'd have another go at this kit. Soon after my last post of this build I was made redundant. So I lost interest in models for a while. I'm currently doing contract work in Manchester. So I've brought some modelling gear with me to keep me out of the pub in the evenings. First thing to do was fit the engine. I decided not to bother with the engine bearers .So departing from the construction sequence I glued on the engine cowling side panels. Then I juggled the engine in and set it in place with superglue. The top cowling is in two pieces. So I glued them together and then to the model. As you can see, there are some large gaps to deal with.
View attachment 254437
View attachment 254438
View attachment 254439
View attachment 254440
View attachment 254441
View attachment 254442
View attachment 254437
View attachment 254438
View attachment 254439
View attachment 254440
View attachment 254441
View attachment 254442
Attachments

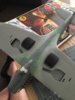
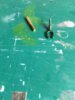
Let the filling begin!. Im using plastic card where i need to rescribe panel lines. And ive put a smear of squadron green on the underside.
View attachment 254600
View attachment 254601
View attachment 254600
View attachment 254601
Attachments

I would seriously consider painting the markings, particularly the roundels, fin flashes etc. If you don't fancy the masking yourself there are pre-cut masks available, though they might cost more than the kit!
Painted markings will always look better in such a large scale. Here's a Trumpeter 1/24 Spitfire floatplane with a Grey Matter Figures tail, on which I painted all the markings.
Cheers
Steve
View attachment 254609
Painted markings will always look better in such a large scale. Here's a Trumpeter 1/24 Spitfire floatplane with a Grey Matter Figures tail, on which I painted all the markings.
Cheers
Steve
View attachment 254609
Attachments
Hi Dave
Firstly, sorry to hear of your redundancy but Its good that you're working again. It's always a worrying time.
i'll be interested to see the outcome of this old kit, from the outside it doesn't seem all that bad. I know there's a few gaps but I've seen far worse. You also seem to be dealing with them really well.
The old Matchbox kits really take me back, with the 2 coloured plastics - they seemed really smart and cutting edge back in the day. Have you ever built the Revell kit, how does this compare? Or are they the same moulds?
Keep up the great work
Paul
Ive not built the Revell rebox of this Kit.I hear the nose cowling parts are a bit warped in it. No problems like that with this original kit. Kits like this with lots of filling needed used to be the norm for me. So i dont mind the extra work. Im also building the new Tamiya 1/32 Mosquito. All thats needed on that kit is a tiny bit of filler on a small part of the fuselage. So this kit satisfies my squadron green cravings!. As for being made redundant, i am now a self employed licensed aircraft engineer with my own ltd company. So far this year i havent had a week without work. And im earning much more money than in my last 'permanent' job, where i was under paid. The only down side is i have to work away from home. Im currently working at Thomas Cook in Manchester airport, which is a bit of a drive from Southend every week.
As for being made redundant, i am now a self employed licensed aircraft engineer with my own ltd company
Great to hear you're doing well. I did pretty much exactly the same thing about 5 years ago - never looked back.
You're like me in terms of fixing the short comings of a kit. Sometimes that's the satisfying part of the model. Many can build the modern engineered kits but it takes patience and modelling skill to bring out the best in older kits.
All the best
Paul
used to love these old matchbox kits back in the day, think i had (at one time or another) - Douglas Dauntless, Spitfire, Me109 and the puma. At the time my dad was working for weeks at a time away in scotland, so used to bring me one back as a present on each return. Did try for Tamiya's 1/32 F14 - instead got revells version instead, lol ")
Looking good
Looking good
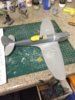
I've filled the gaps around the engine cowling with plastic card and filler. And I've glued on the under wing radiators and the air intake under the nose. Still some more filling and sanding to do.
View attachment 254862
View attachment 254863
View attachment 254862
View attachment 254863
Attachments
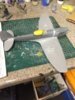
After much filling and sanding its almost ready for primer. The canopy is typical of kits from this era. Its got a seperate frame and glass section. The glass needs a bit of filler along the back edge.
View attachment 255506
View attachment 255505
View attachment 255506
View attachment 255505
Attachments
G
Guest
Guest
This looks like a lot of work, looking good though you seem to be taming the beast.
scott
scott
G
Guest
Guest
Old school hard-core building Dave! you're doing really well
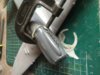
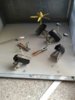
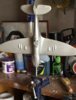
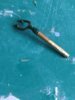
you're doing really well Ive finally finished all the filling,sanding and rescribing. And ive decided to finish it as an all silver machine of no.603 sqdn in 1950. So ive sprayed it all over with Xtracolour Duralumin. I will give it a coat of alclad gloss clear before applying the decals.I managed to break the tailwheel assembly. So ive taken one from a 1/32 Revell Hurricane kit and glued it to a piece of brass tube to give it a bit of strength. It should be square section and not round. But it shouldnt be too noticeable once the tail wheel doors are on.
View attachment 256278
View attachment 256279
View attachment 256280
View attachment 256281
View attachment 256282
View attachment 256278
View attachment 256279
View attachment 256280
View attachment 256281
View attachment 256282
Attachments
- Status
- Not open for further replies.
Legal Notice
scalemodelling.co.uk is a privately operated online discussion forum. All content posted by members reflects their own views and opinions and does not necessarily represent those of the forum owners or administrators. While reasonable efforts are made to moderate content, no responsibility is accepted for user-generated material. By using this site, you agree to comply with UK law and the forum rules.