
You are using an out of date browser. It may not display this or other websites correctly.
You should upgrade or use an alternative browser.
You should upgrade or use an alternative browser.
Dave's Revell 1/48 B24D Liberator
- Thread starter Dave W
- Start date
- Status
- Not open for further replies.
Come to think of it I used yellow on my 1/24 Spitfire .I liked the result so will do it on this one.\ said:Looking good Dave.
For the lightening of the olive drab, you might want to try yellow instead of white. Have a play and see which you think best.
View attachment 108705
View attachment 108706
View attachment 108707
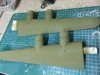
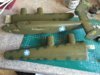
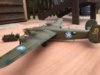
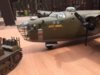
This evening I've had a go at fading the paint finish.Ive added some yellow to the olive drab and sprayed it in the centre of some panels.Last time I tried this I toned it down with a fine over spray of the base colour.Then after several coats of klear and Matt coat the effect was almost lost.So I'm not going to tone it down this time.This aircraft also had some medium green blotches on the wings and tail.Thats tomorrow's job.View attachment 221728
View attachment 221729
View attachment 221730
View attachment 108706
View attachment 108707
This evening I've had a go at fading the paint finish.Ive added some yellow to the olive drab and sprayed it in the centre of some panels.Last time I tried this I toned it down with a fine over spray of the base colour.Then after several coats of klear and Matt coat the effect was almost lost.So I'm not going to tone it down this time.This aircraft also had some medium green blotches on the wings and tail.Thats tomorrow's job.View attachment 221728
View attachment 221729
View attachment 221730
Attachments

View attachment 108891
View attachment 108892
View attachment 108893
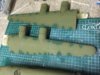
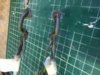
This aircraft had medium green blotches sprayed on the leading and trailing edges of wings & tailplanes.My conversion chart gave Humbrol 149 as a match for the FS number.So I sprayed some on free hand.Then I did some fading of the underside neutral grey colour.View attachment 221914
View attachment 221915
View attachment 221916
View attachment 108892
View attachment 108893
This aircraft had medium green blotches sprayed on the leading and trailing edges of wings & tailplanes.My conversion chart gave Humbrol 149 as a match for the FS number.So I sprayed some on free hand.Then I did some fading of the underside neutral grey colour.View attachment 221914
View attachment 221915
View attachment 221916
Attachments

View attachment 108959
View attachment 108960
View attachment 108961
View attachment 108962
View attachment 108963
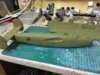
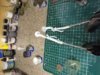
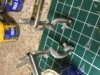
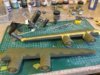
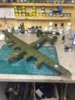
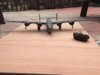
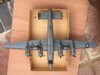
I've painted the leading edge de icing boots on the wings.Then I finished painting the undercarriage legs and my scratch built brake lines.I was about to mask the tailplanes and the Inlaws turned up.So I will have to do that tomorrow night.View attachment 221982
View attachment 221983
View attachment 221984
View attachment 221985
View attachment 221986
View attachment 108960
View attachment 108961
View attachment 108962
View attachment 108963
I've painted the leading edge de icing boots on the wings.Then I finished painting the undercarriage legs and my scratch built brake lines.I was about to mask the tailplanes and the Inlaws turned up.So I will have to do that tomorrow night.View attachment 221982
View attachment 221983
View attachment 221984
View attachment 221985
View attachment 221986
Attachments

View attachment 109798
View attachment 109799
View attachment 109800
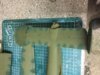
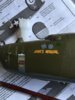
After painting the black de-icing strips on the tail surfaces I gave the whole model a coat of Klear. Then I applied all of the decals. The national markings on the fuselage sides took several applications of Microlsol to get them to settle over the wind deflectors forward of the gun positions.And I had to touch them in with paint where they split.View attachment 222821
View attachment 222822
View attachment 222823
View attachment 109799
View attachment 109800
After painting the black de-icing strips on the tail surfaces I gave the whole model a coat of Klear. Then I applied all of the decals. The national markings on the fuselage sides took several applications of Microlsol to get them to settle over the wind deflectors forward of the gun positions.And I had to touch them in with paint where they split.View attachment 222821
View attachment 222822
View attachment 222823
Attachments
Looking good Dave and a pity about that decal splitting.
I think the best bet now is to cut the decal along the edge of the deflectors add some more sol so the decal sits flush to the sides so you don't see the split then paint the gap
I think the best bet now is to cut the decal along the edge of the deflectors add some more sol so the decal sits flush to the sides so you don't see the split then paint the gap
View attachment 110444
View attachment 110445
This ones not far from the finishing line.Ive got quite a bit done since my last post.Whilst glueing the wings on I dropped the model.Only from about 6 inches onto my cutting may.But because of all the weight in the nose it was enough to break the nose transparency off.And it broke into two pieces.So I glued the broken pieces together and superglued them back onto the model.The join goes through the middle of a window pane.But I will just have to live with it. All that's left to do is build the gun turrets,attach the props and do some more weathering.View attachment 223467
View attachment 223468
Attachments
") Nice job on the repair.
Nice job on the repair.
G
Guest
Guest
Looking good Dave, the broken section is hardly noticeable - I had to look hard to see it!
View attachment 112313
View attachment 112314
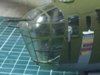
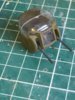
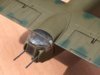
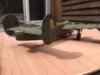
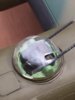
The tail gunners turret is moulded in two halves split vertically. And as the top of the turret on the real aircraft was a clear panel it's impossible to hide the join.There is an aftermarket Vacform canopy set for this model, but it's doesn't include the turret.Because of the shape it's probably not possible to mould it in one piece. So I've just sanded and polished the join. Then I painted on an imaginary frame to hide the join.View attachment 225336
View attachment 225337
View attachment 112314
The tail gunners turret is moulded in two halves split vertically. And as the top of the turret on the real aircraft was a clear panel it's impossible to hide the join.There is an aftermarket Vacform canopy set for this model, but it's doesn't include the turret.Because of the shape it's probably not possible to mould it in one piece. So I've just sanded and polished the join. Then I painted on an imaginary frame to hide the join.View attachment 225336
View attachment 225337
Attachments
View attachment 112318
View attachment 112319
View attachment 112320
View attachment 112321
View attachment 112322
View attachment 112323
View attachment 112324
View attachment 112325
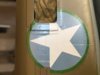
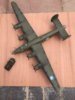
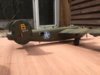
Named after its original pilot,John Jerstad, who flew it on five missions,this plane carries a record of its colourful history. The markers represent a U-boat sunk in the Gulf of Mexico, five enemy fighters destroyed by the crew and a record of its bombing missions. The plane participated in the famous Ploesti oil field raid ,but was eventually lost over Austria on October 1st 1943.
The kit is an old Monogram moulding reboxed by Revell. It has raised panel lines which I didn't attempt to rescribe. I used oil paints diluted with white spirit to apply a bit of weathering. These aircraft received heavy oil staining on the wings in service. I've tried to represent this with Tamiya smoke and burnt sienna oil paint. I've also built the tractor that comes with the kit. I used Eduards cockpit detail set, but none of it can be seen. The money would have been better spent on some metal gun barrels. I also added quite a lot of lead to the forward fuselage and the model sits nicely on its tricycle undercarriage. no need for after market metal undercarriage as the kit items are strong enough to take the extra weight. If anyone thinks I've forgotten to paint the upper turret framing,the Consolodated A6 turret didn't have any metal framework!.
View attachment 112326
View attachment 225341
View attachment 225342
View attachment 225343
View attachment 225344
View attachment 225345
View attachment 225346
View attachment 225347
View attachment 225348
View attachment 225349
View attachment 112319
View attachment 112320
View attachment 112321
View attachment 112322
View attachment 112323
View attachment 112324
View attachment 112325
Named after its original pilot,John Jerstad, who flew it on five missions,this plane carries a record of its colourful history. The markers represent a U-boat sunk in the Gulf of Mexico, five enemy fighters destroyed by the crew and a record of its bombing missions. The plane participated in the famous Ploesti oil field raid ,but was eventually lost over Austria on October 1st 1943.
The kit is an old Monogram moulding reboxed by Revell. It has raised panel lines which I didn't attempt to rescribe. I used oil paints diluted with white spirit to apply a bit of weathering. These aircraft received heavy oil staining on the wings in service. I've tried to represent this with Tamiya smoke and burnt sienna oil paint. I've also built the tractor that comes with the kit. I used Eduards cockpit detail set, but none of it can be seen. The money would have been better spent on some metal gun barrels. I also added quite a lot of lead to the forward fuselage and the model sits nicely on its tricycle undercarriage. no need for after market metal undercarriage as the kit items are strong enough to take the extra weight. If anyone thinks I've forgotten to paint the upper turret framing,the Consolodated A6 turret didn't have any metal framework!.
View attachment 112326
View attachment 225341
View attachment 225342
View attachment 225343
View attachment 225344
View attachment 225345
View attachment 225346
View attachment 225347
View attachment 225348
View attachment 225349
Attachments
G
Guest
Guest
Superb work Dave!
Is a beauty and....a beast as well
Magnificent paintwork, I like it a lot!
Cheers
Is a beauty and....a beast as well
Magnificent paintwork, I like it a lot!
Cheers
Dave, I can't give you a GB thing because of the thread it's under. If you put it in the Completed Group Builds thread it will be noticed better. Great work though, love it, and great background history to the real thing.
- Status
- Not open for further replies.
Legal Notice
scalemodelling.co.uk is a privately operated online discussion forum. All content posted by members reflects their own views and opinions and does not necessarily represent those of the forum owners or administrators. While reasonable efforts are made to moderate content, no responsibility is accepted for user-generated material. By using this site, you agree to comply with UK law and the forum rules.