Theme editor

Scale Model Shop

Ebbro Lotus type 49C.

outrunner

New member
Joined
Apr 12, 2019
Messages
2,420
Reaction score
0
Points
0
1/3
Thread owner
Here goes.
View attachment 398294
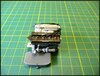
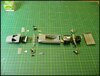
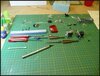
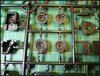
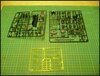
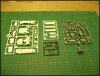
Sprue shots.
View attachment 398295
View attachment 398296

View attachment 398297
I reckon a lot of that chrome will have to go as there would not be a lot of chrome on a race car that was built to be light, anyway, I think a nice alloy/silver would be best.
View attachment 398298
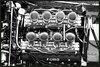
Some fine detail on the parts.
View attachment 398299
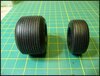
I don't think I have ever seen tyres like this, there is a seam down the middle but it does not stand proud like some other tyres I have dealt with.
View attachment 398300
View attachment 398301
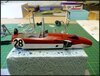
I only hope I can do justice to this lovely kit and before it is done I must buy a case to put it in.

Andy.
 

Attachments

  • 50331441097_739e2a67a7_b.jpg
    50331441097_739e2a67a7_b.jpg
    3.2 KB · Views: 0
  • 50346899302_b6bb77a697_b.jpg
    50346899302_b6bb77a697_b.jpg
    3.2 KB · Views: 0
  • 50346900042_4d96aa58e2_b.jpg
    50346900042_4d96aa58e2_b.jpg
    3.3 KB · Views: 0
  • 50346899927_427f4047e4_b.jpg
    50346899927_427f4047e4_b.jpg
    4.2 KB · Views: 0
  • 50346741261_c5930b715b_b.jpg
    50346741261_c5930b715b_b.jpg
    2.6 KB · Views: 0
  • 50346047428_7c1d539298_b.jpg
    50346047428_7c1d539298_b.jpg
    3.1 KB · Views: 0
  • 50346741551_52b2fb0b29_b.jpg
    50346741551_52b2fb0b29_b.jpg
    3.1 KB · Views: 0
  • 50346047758_62a8d679d6_b.jpg
    50346047758_62a8d679d6_b.jpg
    3.1 KB · Views: 0
Hi Andy
I didn't get round to voting but I would have chosen this :tongue-out3: Never heard of this maker and an unusual scale perhaps. Looks nice especially the tyres which are such a major part of a race car. I don't particularly like ready chromed parts on models. Always feels too bright, somehow out of scale, and the chrome coating softens detail on the part. Will you use those large decals or mask and paint?
Jim
 
I read that Ebbro was set up by ex-Tamiya staff - which accounts for the 1/20 scale - they are based in Japan, but production is carried out in China. So far I've seen nothing but really positive reviews.......................
Dave
 
Thread owner
Hi Andy
I didn't get round to voting but I would have chosen this :tongue-out3: Never heard of this maker and an unusual scale perhaps. Looks nice especially the tyres which are such a major part of a race car. I don't particularly like ready chromed parts on models. Always feels too bright, somehow out of scale, and the chrome coating softens detail on the part. Will you use those large decals or mask and paint?
Jim
Don't worry, the chrome will be visiting the bleach bath as on the real thing it's more stainless and polished alloy. As for the decals I am not sure, if it comes to it I could use them to make up masks.


Andy.
 
Thread owner
A few sub assemblies built and primed along with a lot of the other sprues.
View attachment 398396
I tend not to paint on the sprue but for primer it's fine. Waiting for some paints to arrive, colours that are not that common to me, also ordered a PE seat belt set, some thin wire for plug leads and what I hope will be suitable clear tube for fuel lines.

Andy.
 

Attachments

  • 50353626026_c69eeeff27_b.jpg
    50353626026_c69eeeff27_b.jpg
    3.2 KB · Views: 0
Thread owner
I spent a bit of time looking through some bits I ordered for the construction of the engine, wire for plug leads, fuel tubing and some paints I needed, but now I would like some opinions/advice.
This is the distributor cap with the wire leads inserted, I used 0.4mm wire as specified on the instruction sheet but I tend to think it looks a wee bit thin.
50369108546_ee9540d76c_b.jpg
Perhaps it will look better when the engine is assembled, but then it will be too late to alter it.
Next is the tubing to represent the fuel feed to the intake trumpets, it is 0.5mm inside diameter as that was the smallest I could find and there was no mention of it in the instructions but I think it is far too large
50368405153_2c506c590b_b.jpg
50369109691_c58a9019ff_b.jpg
Here is a picture of the real thing which shows that my tubing is very wrong.
View attachment 398625
Again, it might look better built, it's just that I used to be indecisive but now I'm not so sure. All comments, help, rude remarks will be gladly accepted.

Andy.
 

Attachments

  • 50369408647_4cfeb02223_z.jpg
    50369408647_4cfeb02223_z.jpg
    4 KB · Views: 0
Hi Andy
i think you’ve answered your own questions here. The distributor wire would look better as about 0.6 and would be an easy fix.
The fuel lines look like they could profitability be similar in size. Making the fuel lines look clear might be a struggle though. You could use white nylon thread or fishing line etc. You’d also have to modify the trumpet end, possible by cutting off the attachment and drilling for the line. You’d have to mimic the connection using paint. To be honest, it might be worth looking at a site like Hiroboy to see if there’s any suitable aftermarket for the fuel lines.
 
Thread owner
Yes, thanks Tim as you have just comfirmed what I was thinking, the wire is readily available but the fuel lines will take a bit of thought. I did see some on a US site, but 25 dollars plus postage meant that was never a consideration, I am sure I will come up with something as even if there are no fuel lines shown on the completed model it does not mean I cannot put lines on to please myself.

Andy.
 
Andy a great looking kit , so will take a seat.
Tim's comments and your thought seem right. Just that small increase in plug lines will make it look to scale. As for that clear fuel line good hunting, that one you showed was far too large.
 
Thread owner
This model is slowly creeping along, lots to think about before throwing glue at it.
View attachment 398872
I may have to re-do the ford lettering on the rocker covers.
Some body parts awaiting paint.
View attachment 398873
Those parts are in Halfords rattle can primer, the inside of the drivers tub is to be painted neutral grey which I bought only to find it is the same colour as the primer.

Andy.
 

Attachments

  • 50380431972_e2dbbf60f2_b.jpg
    50380431972_e2dbbf60f2_b.jpg
    3 KB · Views: 0
  • 50380432227_b4e270cf8b_b.jpg
    50380432227_b4e270cf8b_b.jpg
    3 KB · Views: 0
Thread owner
I am still waiting for some fuel tubing to finish building the engine but at least I now think the plug leads are right.
View attachment 398948
Parts of the body and suspension are slowly coming together but I will need to have a real think about how I paint this model but I am sure it will all be fine, after all, how hard can it be?? ;)

Andy.
 

Attachments

  • 50382918323_68aaa08fd8_b.jpg
    50382918323_68aaa08fd8_b.jpg
    3.3 KB · Views: 0
Thread owner
Some more sub-assemblies put together while waiting for an order to come as some clown (me) ordered the wrong thing so it had to be re- ordered. I have still not decided on how to paint this model as it would be a nightmare to mask all the bits before painting the body.
View attachment 399314
I do not like painting body panels then glueing them all together as it can sometimes get a bit messy, on the other had I could build it and brush paint it, err, I don't think so, not with my brush skills.

Andy.
 

Attachments

  • 50402500562_bf543a7f70_b.jpg
    50402500562_bf543a7f70_b.jpg
    2.8 KB · Views: 0
Thread owner
Been a while since anything has been shown here mainly because I have not done a lot as the weather has been very kind up here so many miles covered on the motorbike. I have been doing little bits here and there although the board looks like an explosion in a garage. Still trying to find an adhesive that will stick the plastic fuel tube to the intake trumpets, I have tried TET, Gorilla superglue and Contacta to no avail so may try another type of CA.
View attachment 400598

Andy.
 

Attachments

  • 50483104591_48b97af559_b.jpg
    50483104591_48b97af559_b.jpg
    3.1 KB · Views: 0
Thread owner
Just a little bit more done, loose fit of bodywork. View attachment 400823
Been fiddling with exhaust headers and rear suspension, still not able to securely fix the fuel tubing yet and running out of ideas. unfortunately I have no Slo-Zap left and there are no model shops near me to get some so it will have to be online, another wait. :confused:

Andy.
 

Attachments

  • 50494659483_6e4c290403_b.jpg
    50494659483_6e4c290403_b.jpg
    3.6 KB · Views: 0
Thread owner
Oh dear, tonight I did something I have never done before, must be an age thing. Reaching to the back of the bench for a small file I knocked the model on to the floor and as I was getting off my swivel office type chair I slipped, staggered. a bit and stood on the bloody thing. Sadly it is crushed beyond help so has been consigned to the bin which is a pity as I really did like the look of it as assembly progressed. Not to worry, these things happen and it's not the end of the world.

Andy.
 
That’s a bit of a bugger Andy......did something similar once, but not as destructive. I dropped a plastic figure I was painting, and without thinking moved the chair back on it’s wheels to look for it....yep, ran the wheels right over the figure. All you can do is swear, have a break, and get back on the horse with something else....don’t let it get you down.
 
Back
Top