Theme editor

Scale Model Shop

Esci 1/48 Henschel 129 finished and ruined.

Status
Not open for further replies.

Dave W

New member
Joined
Jan 8, 2011
Messages
4,713
Reaction score
0
Points
0
1/3
Thread owner
View attachment 37443View attachment 37444View attachment 37445View attachment 37446View attachment 37447View attachment 37448

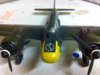
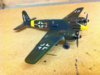
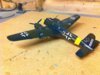
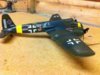
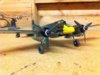
Finally finished the Henschel.As a finishing touch i thought i would add an antenna from fishing line.Couldnt get it taught. So after a few beers this evening i decided to try and tighten it by applying a bit of heat. only i got too much heat near it and melted the fuselage!. I spent a lot of time on this model and was feeling very pleased with it.Was going to chuck it in the bin.Then i thought i would keep it as a reminder of my stupidity!.The 34 year old decals went on well.The only ones i replaced were the wing and fuselage crosses.Thats because the kit ones were black and the kit instructions and reference photo's i have showed them to be white

View attachment 41624

View attachment 41625

View attachment 41626

View attachment 41627

View attachment 41628

View attachment 41629

View attachment 154650

View attachment 154651

View attachment 154652

View attachment 154653

View attachment 154654

View attachment 154655
 

Attachments

  • IMG_1064.jpg
    IMG_1064.jpg
    2.7 KB · Views: 0
  • IMG_1065.jpg
    IMG_1065.jpg
    2.6 KB · Views: 0
  • IMG_1068.jpg
    IMG_1068.jpg
    2.8 KB · Views: 0
  • IMG_1061.jpg
    IMG_1061.jpg
    3.3 KB · Views: 0
  • IMG_1070.jpg
    IMG_1070.jpg
    2.8 KB · Views: 0
  • IMG_1066.jpg
    IMG_1066.jpg
    2.8 KB · Views: 0
Thats a real shame Dave, such a nice job you did there. Just a quick tip that works for me. Pick a piece of cotton the color you need, cut it longer than you need and stretch it between to nails in a piece of wood or some thing like so you can get it tight. Mix some PVA glue and paint it all along the length and wait to dry. It will be straight and rigid when dry. Just cut it to length and tack glue in place. This idea works great on rigging for ships also.

Cheers

Andy
 
Dave I feel for you.

When one daft mistake can ruin hours of work.

Hope the next one comes out as nice looking as this one has.

Tony.
 
Thread owner
Thanks.Thats a good trick.Will bare it in find for future builds.
 
Great job dave , shame about the melting business.If its any consolation youre not the first and wont be the last!! I did a similar thing on one of mine trying to taughten the aerial wire, i got too close to the tail and melted a little bit of it! After a lot of broken wires and near misses ive found that a cocktail stick thats been lit then blown out so its just glowing orange, is just about the right amount of heat and controllability, just a quick waft and it tightens up nicely. Its still a great build and proof that you can get a superb result from an old kit , cheers tony
 
Thread owner
Thanks Tony.Just goes to show even with age and experience we can still mess up!.Anyway,it looks fine on a high shelf veiwed from the left side!.
 
Could make it into a diorama with a pilot and his mechanics looking at his heavily landed aircraft which broke it's back ;)
 
Thread owner
Thanks chaps.Not going to beat myself up about it.Got more kits to build,so on to the next one.
 
\ said:
Could make it into a diorama with a pilot and his mechanics looking at his heavily landed aircraft which broke it's back ;)
Actually, this sounds like a cracking idea. Crack the undercart on one side, bend the prop blades back and drill some holes in the wing around the engine, add lots of smoke-blackening and a base with some Luftwaffe personnel and you've turned a disaster into the beginnings of a neat looking dio.

Edit: also, damn shame as it was looking like a great model.
 
I'm a huge fan of beer, almost to a level where I might call it a hobby. I'm childishly fascinated with scale modelling and it is what I would call my primary hobby, but never the two shall meet or mix - not in harmony anyway.

I have had my share of alcohol induced modelling mishaps. I feel with you and know exactly how frustrating it is, not having any exterior entity to project the blame on.

Cheers!

/Daniel
 
\ said:
Actually, this sounds like a cracking idea. Crack the undercart on one side, bend the prop blades back and drill some holes in the wing around the engine, add lots of smoke-blackening and a base with some Luftwaffe personnel and you've turned a disaster into the beginnings of a neat looking dio.
Certainly would be a very convincing crash landing. Always look for a positive in what you make :)
 
1. Great build. well done.

2. That was a real shame

3. what did you use to melt the antenna with? A blow torch ?!?!?!

Ian M
 
Thread owner
Actually Ian i never thought of using my blow torch.Got one i use for the occasional plumbing task around the house.What i did was put the antenna close to a spot lamp i use for modelling in my shed.The light has a 50 watt bulb and gets quit hot.Handy for keeping my hands warm whilst modelling in the shed during winter!..It worked fine.But probably due to the beer i drank earlier in the evening,i held the model at the wrong angle and too close to the light!.I cant repeat the names i called myself.But some of them began with the letter T and w .. And ended in 'er,!!.Im affraid to say i havent learned my lesson.Just been drinking more beer whilst assembling the cockpit of a Zero!.
 
Dave glad to hear I'm not alone drinking and building! I even gauge drying times by pints !
 
Thread owner
Many years ago when i was in the RAF,a modelling chum of mine used to be partial to the occasional joint.He got stonned one evening and decided to continue building a stuka.In the morning when the effects had worn off ,he noticed he had glued the wings on upside down!.
 
Status
Not open for further replies.
Back
Top