Theme editor

Scale Model Shop

Gern's 1/24 P47

Status
Not open for further replies.
Despite all the issues you are doing a great job. I wish I could do the same with mine.
 
Thread owner
I've not been totally idle over the last couple of weeks. Got some more bits done:

View attachment 98010


The gun barrels supplied are just straight bits which I could have drilled out - but they're oval not round so I'm replacing them with some brass tube.

View attachment 98015


Got the fuselage interior sprayed - not too fussy as it will be very hard to see.

View attachment 98011


Main cylinder block. Sprayed with Vallejo Aluminium with a very light wash of AK Track wash.

View attachment 98012


Drilled holes under each stub on the ignition harness and fixed thin copper wire in each. The entire harness isn't fixed in place yet, I'm still trying to make sure I get the engine lined up correctly.

Ian - I think you were right when you said the ignition wires would lead to the same place front and back of the cylinders. That's the best guess I've been able to make from all the pictures I've seen so that's where they're going.

View attachment 98013


View attachment 98014


You can see from these pictures that the two parts of the intake ducts don't line up correctly. I don't think that's my fault as there are large locating pins and holes. I've had to cut out a section of the rear piece and remove quite a lot of plastic from the support rib as they were stopping the cylinder block lining up properly with the mounting points. I'm not at all sure why I've had to do this - there's no mention of it in the online builds I've looked at. Anyway, I think the cylinder block now locates properly on the mounting points so problem solved - I hope!

View attachment 211033

View attachment 211034

View attachment 211035

View attachment 211036

View attachment 211037

View attachment 211038
 

Attachments

  • Barrels.JPG
    Barrels.JPG
    1.5 KB · Views: 0
  • Interior.JPG
    Interior.JPG
    2.6 KB · Views: 0
  • Intake2.JPG
    Intake2.JPG
    2.1 KB · Views: 0
  • Intake1.JPG
    Intake1.JPG
    1.9 KB · Views: 0
  • Ignition1.JPG
    Ignition1.JPG
    2.1 KB · Views: 0
  • Engine1.JPG
    Engine1.JPG
    2 KB · Views: 0
\ said:
I don't think that's my fault as there are large locating pins and holes. I've had to cut out a section of the rear piece and remove quite a lot of plastic from the support rib as they were stopping the cylinder block lining up properly with the mounting points.
Hmm odd. I think I would have tried removing the locating pins first and saw how things lined up...

Still, you got it sorted in the end.

Ian M
 
Thread owner
I hadn't thought of removing the pins, but I've just checked and if I'd done that and moved the intake ducts downwards so the cylinder block fitted properly, then it would have stopped the bottom part of the cowling fitting.:cool:

One of the reviews I looked at said something about changes having to be made to the initial production kit - mainly instructions. I wonder if I've maybe got an early version. I don't know, and at this stage, I don't care. I'm just lurching from one problem to the next hoping I'll not find anything beyond my ability to cope.
 
Hey Dave

The Thunderbolt looks excellent so far, magnificent work on the cockpit.

Really looking forward to the rest of the build and seeing this large scale 'Jug' come to gather.

Cheers

Paul
 
Thread owner
I was hoping to be able to say 'onwards and upwards' with this but I'm still lurching from one problem to another.


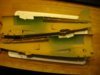
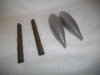
I got the underwing stores ready to install (I need to check if there are any decals first)


View attachment 105318


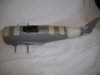
The fuselage halves have gone together nicely but there are a few spots where I'll need some filler


View attachment 105316


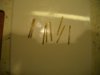
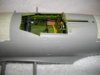
... and the cockpit looks OK. I've still got to fit the gunsight but I didn't want to break it off while fitting the cockpit. I've got my patented LRPC ready to protect it when the fuselage glue has dried.


View attachment 105314


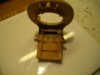
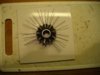
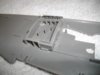
Whatever you do, don't follow the instructions for assembling the engine. They say you should fix these pipes to the manifold before attaching it to the engine - WRONG! If you do that, you'll never get them to fit at the cylinder end as there are no locating points on the manifold. I removed the locating lug on the manifold so I could rotate it relative to the cylinders to get them lined up correctly. Then I added the exhausts.


View attachment 105315


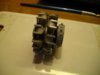
I fitted the gun bays to the wings a couple of weeks ago. I tacked the gun ports into the wings to check the gun alignment and it's a good job I did! If you line up the gun bays to fit the locating bars, they don't sit square or line up with the gun ports! I had to remove the bays and re-fit them so they lined up properly. Of course, with the gun ports in place, you can't fit the assembled guns as they won't tilt far enough to clear the gun bay walls. The guns themselves have just a single locating pin which fits in a hole in the gun bay. This means they are free to swivel from side to side and vertically. I'm going to have fun trying to get them all lined up when I re-fit the barrels!


View attachment 105317


Notice how the bay doesn't line up with the locating bar.


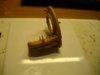
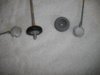
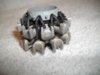
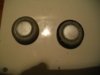
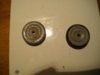
The wheels are decidedly odd. They have vinyl tyres which I like because they usually make painting so much simpler. However, these are moulded complete with the inner hub where it attaches to the axles! The outer hub is fitted inside the tyre as usual but the locating blocks are HUGE. I suspect I'll have to re-paint everything as the paint is likely to crack and be rubbed off while I try to get the hubs inside the tyres. I'll let you know. Consolation is of course, if they don't look good enough, I'll have to do it with the wheels closed up so I won't have to worry about fixing the u/c legs!


View attachment 105319


View attachment 218337

View attachment 218338

View attachment 218339

View attachment 218340

View attachment 218341

View attachment 218342
 

Attachments

  • Wheels1.JPG
    Wheels1.JPG
    1.7 KB · Views: 0
  • Stores.JPG
    Stores.JPG
    1.8 KB · Views: 0
  • Gun bay1.JPG
    Gun bay1.JPG
    2 KB · Views: 0
  • Fuselage1.JPG
    Fuselage1.JPG
    1.7 KB · Views: 0
  • Engine1.JPG
    Engine1.JPG
    2.4 KB · Views: 0
  • Cockpit1.JPG
    Cockpit1.JPG
    2.2 KB · Views: 0
Its certainly giving you a workout Dave, Its not a shake and bake thats for sure!! The great thing is that youve done the right thing by test fitting and altering the sequences and methods of construction ,thus saving yourself any future grief. If you had just blindly followed the instructions you would be throwing it at the wall by now! Keep on fighting the good fight mate , I cant wait to see this one done . cheers tony
 
Thread owner
Tony - I should have picked summat easier but brain surgery wasn't one of the GB options!
 
Thread owner

Attachments

  • Tyres1.JPG
    Tyres1.JPG
    1.9 KB · Views: 0
  • Tyres2.JPG
    Tyres2.JPG
    1.9 KB · Views: 0
Status
Not open for further replies.
Back
Top