Theme editor

Scale Model Shop

Gern's Osprey for Photo GB

Status
Not open for further replies.

Gern

Well-known member
Joined
May 17, 2009
Messages
9,320
Reaction score
235
Points
63
1/3
Thread owner
Hi folks,

As I am making good progress on my Lanc for the Photo GB, I thought I might have time to fit in another build. I'm not sure I will be able to finish both on time, but I'll do my best.

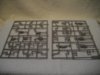
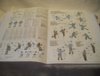
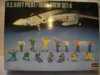
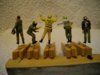
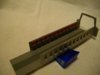
There are only two different sprues for the crew figures but there are three of each sprue included in the box for a total of 30 figures - which I think is good value. Although the casting is not up to ICM standards, I think they'll be OK when cleaned up and painted.

Gern

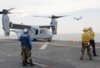
PS I won't be building a full carrier either! Just a representation of part of the deck.

View attachment 36647

View attachment 36648

View attachment 36649

View attachment 36650

View attachment 36651

View attachment 36652

View attachment 36653

View attachment 36654

View attachment 36655

View attachment 149673

View attachment 149674

View attachment 149675

View attachment 149676

View attachment 149677

View attachment 149678

View attachment 149679

View attachment 149680

View attachment 149681
 

Attachments

  • Osprey 3.jpg
    Osprey 3.jpg
    2.1 KB · Views: 0
  • Sprues 2.jpg
    Sprues 2.jpg
    2.5 KB · Views: 0
  • Sprues 1.jpg
    Sprues 1.jpg
    2.4 KB · Views: 0
  • Crew sprues.jpg
    Crew sprues.jpg
    2.1 KB · Views: 0
  • Crew instructions.jpg
    Crew instructions.jpg
    2.1 KB · Views: 0
  • Crew Decals.jpg
    Crew Decals.jpg
    1.7 KB · Views: 0
  • Crew box.jpg
    Crew box.jpg
    2.7 KB · Views: 0
  • Clear parts.jpg
    Clear parts.jpg
    1.4 KB · Views: 0
  • Box.jpg
    Box.jpg
    2.5 KB · Views: 0
Nice One Dave! Looking forward to this as I rather like the Osprey. A very smart bit of engineering!

Ian M
 
Me likey too! Will we see it surrounded by two rugby teams worth of figures?

Cheers

Steve
 
Thread owner
Maybe enough for a 5-a-side team Steve.

Half of the figures are catapult/arresting gear crew and, whatever else the Osprey may need, it ain't either of them! Besides which, I've got an F-8E Crusader which would also go nicely with these figures so I want to save some for that.

As the previous owner of my Osprey kit had removed some of the parts from the sprues - presumably for test fit - I thought I'd have a quick play about with it to see how big it's going to be. It doesn't look particularly big does it? Surprise surprise though, even in 1/48 scale it's over 20 inches across the wingspan when the rotors are added!

Anyway, I need to do the canopy masking on my Lanc so that's what I'm going to be doing for the next few hours. Steve, if you hear any swearing from your South West - it'll be me!

Gern
 
Dave just seen this mate and i like it, i have to say i am a n fan of the osprey a quality machine and no doubt.

scott
 
Thread owner
Many, many swear words later, I've still got my Lanc canopy framing to do. I'm finding in such a small scale that it's just as difficult to mask as it is to paint! I swear people walking past my house are thinking that a nutter with Tourette's lives here!

Meanwhile, I took a break from that and got started on the figures for my Osprey. Here they are all painted and Kleared ready for decals tomorrow. These five are all I'm using as I'm saving the arrestor/catapult 'action' figures in the kit for another time.

I don't know whether the pilots should have full helmets and oxygen masks, but that's the way they come out of the box and I haven't got the skills to change them. Maybe one of them had a bad curry last night so that's why they're using them! :lol

Gern

View attachment 36871

View attachment 36872

View attachment 149897

View attachment 149898
 

Attachments

  • Figures 2.jpg
    Figures 2.jpg
    2.5 KB · Views: 0
  • Figures 1.jpg
    Figures 1.jpg
    2.6 KB · Views: 0
i have this kit as well and have been terrified to start it due to the size. gonna be watching this one...
 
Nice choice Dave. Good luck and I will follow it with interest.

When I did my Dauntless, I used a piece of old roofing slate for the deck. It looked fine with the model sat on it and by the time you add the lines ect. I reckon it would fit the bill.....Worth a thought at least.

Cheers,

Ron
 
Thread owner
Thanks Ron, but I already got a piece of 6mm MDF lined up for this one (cost me a couple of quid from my local DIY place - and he cut it to size for me). It's 600mm x 450mm (24" x 18" in old money) and just about big enough. I measured the thing a little more accurately and it has a 'wingspan' of about 22" with turning rotors so it's a big beastie. I'd struggle to find a slate that size - which is a pity really 'cos it would have saved me a lot of painting!

I'll also be able to paint the other side as a plain tarmac or concrete area for my other 'planes. That will be useful as they're all at least as big as this one, so a big flat space already painted will help when I do pics. (That's assuming I get to build them of course!).

Gern

PS Meant to ask. Why an egg? Why not go for the real thing?
 
Why an egg Dave?.....I had considered a fowl of some sort but two things stopped me:-

One. The bloody thing would make too much noise and the wife would poke her nose to see what the row was!

Two. It would be just my luck the stupid bird would do an Immelmann, avoid the wirring beastie and smash some family heirloom, and the consequences of that I wouldn't wish on anyone, not even you!!!! lol

Ron
 
Gawd' struth man, I wouldn't be able to pick her up, let alone chuck her at the fan!!!!!!!!!

Ron
 
Thread owner

Attachments

  • Rotor 1.jpg
    Rotor 1.jpg
    2 KB · Views: 0
  • Figures 3.jpg
    Figures 3.jpg
    2.6 KB · Views: 0
Hi dave,sorry mate ive somehow missed this until now. Excellent choice of build, its going to be a biggie! great work on the figures too, really looking forward to seeing this progress , cheers tony
 
Thread owner
More progress.

Does anyone remember those old chinese puzzles? You know, the small metal ones where you'd got two or three interlinked pieces and the idea was to get them apart? In reverse, that was the problem I had getting my pilot figure to fit in the cockpit!

Anyway, he's in, and he's gonna STAY in! That's why the pictures of the cockpit aren't as clear as they might have been. I've not gone OTT with this. As you can see the main cabin is a bit basic - to say the least - so no point even trying to add too much detail elsewhere.

Gern

View attachment 37081

View attachment 37082

View attachment 37083

View attachment 37084

View attachment 150107

View attachment 150108

View attachment 150109

View attachment 150110
 

Attachments

  • Cockpit 3.jpg
    Cockpit 3.jpg
    1.7 KB · Views: 0
  • Cockpit 2.jpg
    Cockpit 2.jpg
    1.8 KB · Views: 0
  • Cockpit 1.jpg
    Cockpit 1.jpg
    1.5 KB · Views: 0
  • Cabin.jpg
    Cabin.jpg
    2 KB · Views: 0
Looks fine to me dave,the cabin is probably a bit spartan on the real thing anyway. The cockpit and pilot look excellent. cheers tony
 
Thread owner
Got the cockpit and cabin interior fitted.

I'm disappointed in the lack of detail in the cabin. As you can see from the pictures, there is nothing, no detail at all, anywhere in the cabin above the top line of the seats. Even the underside of the roof is totally bare. I've seen walkaround pictures which show all sorts of wiring, plumbing, boxes etc. in this area. The rear bulkhead also leaves a gap of about 6mm on each side at the bottom. Methinks this one would be better built all closed up. Then, the windows are so small you couldn't see that there's nothing there!

Still, other than the gaps on the rotor blades, I've only come across minor niggly bits of clean up on the parts so that's why the build is going so fast (for me at least!). I have tested the fit of the wing and it looks like there are some serious gaps there so I've taken the precaution of fitting a thin strip of plasticard to the edge before I join them. That will leave only a tiny gap to fill.

Gern

View attachment 37091

View attachment 37092

View attachment 150117

View attachment 150118
 

Attachments

  • Gaps.jpg
    Gaps.jpg
    1.6 KB · Views: 0
  • Inside.jpg
    Inside.jpg
    1.8 KB · Views: 0
man dave you aren't kidding. that's pretty bare inside. i'm assuming it would be hard to see even with the rear door open, but still. that's bare bones. looking good so far though.
 
Thread owner
I'm going to see what it looks like when I've finished. If it looks too bad, I may decide to close the rear doors - I think in my photo they're only partly open anyway.

Gern

PS The instructions call for about 40 grams of weight in the nose to stop her tail-sitting. There's loads of room in the side bulges and under the cabin floor for weights so there's no need to worry about trying to hide whatever you put in the nose - you can just about see past the control console through the cockpit window. I have no idea what is there on the real thing, so I'm leaving mine empty.
 
Thread owner
I've also just spotted I didn't make myself clear in my earlier post. The gap on the wing I mentioned is the one where it joins on to the fuselage. The pieces for the wing all join together with only minor bits of filling needed.

Gern
 
Status
Not open for further replies.
Back
Top