
You are using an out of date browser. It may not display this or other websites correctly.
You should upgrade or use an alternative browser.
You should upgrade or use an alternative browser.
Gern's Phantom
- Thread starter Gern
- Start date
- Status
- Not open for further replies.
G
Guest
Guest
Looking good Dave, doesn't matter which kit you buy, the Phantoms Intakes are always tricky as are most twin engine jets. Missiles look smart, a lot of work in them. Derek
G
Guest
Guest
Now that the HUD is on I can say: great job!
Francesco
Francesco
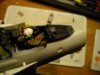
Got the cockpit finished - including the HUD -
View attachment 88514
View attachment 88515
- and now buttoned up ready for paint:
View attachment 88516
Gern
View attachment 201537
View attachment 201538
View attachment 201539
View attachment 88514
View attachment 88515
- and now buttoned up ready for paint:
View attachment 88516
Gern
View attachment 201537
View attachment 201538
View attachment 201539
Attachments
G
Guest
Guest
Just caught up with this Dave it looks great,nice tight looking mask job!
G
Guest
Guest
Like this a lot, looking very nice.
I hope so Trey! I'm using rattle can car paints and they do tend to spread paint everywhere and really do stick to plastic. I'll have some interesting things to say if they bleed under the masking!\ said:Just caught up with this Dave it looks great,nice tight looking mask job!
A while to go though before that as I want to get all the assembly finished before I paint. With such a simple paint job - white primer all over, mask underneath then light grey on top - that seems to me to be the best way to go.
Gern
G
Guest
Guest
Looking good Gern, are the Phantom's base paint is white for this particular one?\ said:I hope so Trey! I'm using rattle can car paints and they do tend to spread paint everywhere and really do stick to plastic. I'll have some interesting things to say if they bleed under the masking!A while to go though before that as I want to get all the assembly finished before I paint. With such a simple paint job - white primer all over, mask underneath then light grey on top - that seems to me to be the best way to go.
Gern
Great progress Dave , its going to be impressive when its done. Ive used aerosol primer as a finish a good few times , if the colours right why not? seems daft to me to overspray it with exactly the same colour. The tu 160 blackjack was entirely done in halfords white primer and their grey one is a great match for US neutral grey . oh and dont forget the HUD ! cheers tony
Yeah. Sure.\ said:With such a simple paint job -
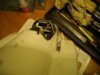
Except I forgot about the weapons pylons. I gotta fix those before I paint so I can tidy up all the joints and seams - but they've already been decalled! Normally I'd cover the decals with bits of foil or similar, then fix the foil to the surface with masking tape round the edges. I wrapped a bit of polythene around the nose of the fuel tank so that's no problem:
View attachment 88563
But on the pylons, the decals are so close to the edges and space is so restricted I can't do that.
Any idea how I can mask the decals while spraying - and then remove the masking without also removing the decals? They've already been sealed with Humbrol Matt spray varnish but I don't know if this would be strong enough to protect them from any masking adhesive.
Gern
View attachment 201586
Attachments
Maybe masking fluid dave? or some Tamiya tape but stick it to your hand first to take some of the tack off so its not too sticky. I'm sure a man of your calibre will sort it (that reminds me , I used to be a circus performer you know, Human Cannonball , loved the job but i got fired (!) after only a week , they said I wasnt the right calibre for the job !!!)ok i'll get me coat , cheers tony
Dave I would use white tacGern said:Yeah. Sure.Except I forgot about the weapons pylons. I gotta fix those before I paint so I can tidy up all the joints and seams - but they've already been decalled! Normally I'd cover the decals with bits of foil or similar, then fix the foil to the surface with masking tape round the edges. I wrapped a bit of polythene around the nose of the fuel tank so that's no problem:
View attachment 89164
But on the pylons, the decals are so close to the edges and space is so restricted I can't do that.
Any idea how I can mask the decals while spraying - and then remove the masking without also removing the decals? They've already been sealed with Humbrol Matt spray varnish but I don't know if this would be strong enough to protect them from any masking adhesive.
Gern
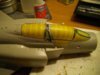
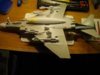
OK. That's got the building part done. Just got to touch up some small gaps on the pylons and then I'll be painting.
View attachment 88962
View attachment 88963
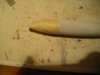
While I'm here, I have another question. I've got another kit on the go (details later) and had to clean up a seam on the canopy. It filed off OK and I used a succession of finer grits to clean the sanding marks. I finished off with some toothpaste - as I don't have any polishing compound - and a soft cloth and got it looking OK. I've heard that canopies can be improved with a coat of Johnson's Clear, so that's what I did - brush painted some on. Does anyone know why my Clear has dried with a faint but very noticeable 'orange peel' effect?
Gern
PS I was sure I'd replied about the decals masking - unless I put it on the wrong post or summat! Not sure which method to use yet, I'll maybe do some spare decals on a bit of scrap using the same paints etc and try out the suggestions.
View attachment 201985
View attachment 201986
View attachment 88962
View attachment 88963
While I'm here, I have another question. I've got another kit on the go (details later) and had to clean up a seam on the canopy. It filed off OK and I used a succession of finer grits to clean the sanding marks. I finished off with some toothpaste - as I don't have any polishing compound - and a soft cloth and got it looking OK. I've heard that canopies can be improved with a coat of Johnson's Clear, so that's what I did - brush painted some on. Does anyone know why my Clear has dried with a faint but very noticeable 'orange peel' effect?
Gern
PS I was sure I'd replied about the decals masking - unless I put it on the wrong post or summat! Not sure which method to use yet, I'll maybe do some spare decals on a bit of scrap using the same paints etc and try out the suggestions.
View attachment 201985
View attachment 201986
Attachments
G
Guest
Guest
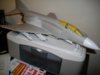
Great work Dave, I didn't realise just how big this was till I saw it on the printer. Fantastic...
Andy
Andy
G
Guest
Guest
This is looking good Dave.
- Status
- Not open for further replies.
Legal Notice
scalemodelling.co.uk is a privately operated online discussion forum. All content posted by members reflects their own views and opinions and does not necessarily represent those of the forum owners or administrators. While reasonable efforts are made to moderate content, no responsibility is accepted for user-generated material. By using this site, you agree to comply with UK law and the forum rules.