Theme editor

Scale Model Shop

Has anybody seen my suitecase

Status
Not open for further replies.

rtfoe

Active member
Joined
Apr 29, 2018
Messages
9,251
Reaction score
542
Points
113
Location
Shah Alam, Malaysia
1/3
Thread owner
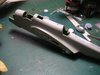
Hi All, the suitecase I'm referring to is the Handley Page Hampden. The build has already been completed but I'll be showing how I built mine from an Airfix offering I had stashed for a long time.
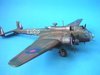
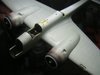
This is what it looks like completed...

View attachment 315287

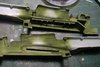
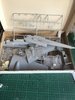
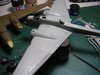
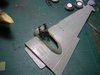
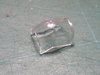
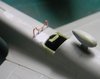
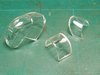
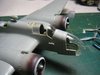
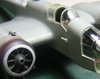
Airfix gives you a basic interior with no detail on the fuselage side walls so I added ribbing. The canopies are closed except for the rear upper gunners position which had the option to be open.

View attachment 315282

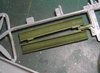
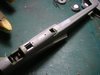
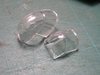
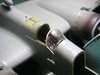
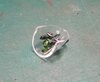
Firstly I painted the interior and gave a dark watercolour wash which was wiped off with a cotton bud leaving remnants in the corners including the bomb bay doors.

View attachment 315283View attachment 315284

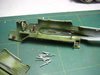
Airfix gave an instrument panel print on the instruction sheet which I cut out and stuck onto the dashboard.

View attachment 315285

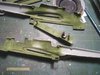
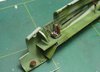
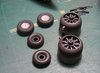
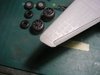
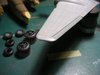
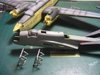
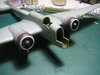
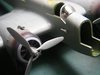
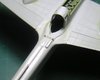
Cleaned up the guns and added seatbelts made from masking tape and bits of plasticard. The rest of the interior was given a dry brush with a lighter shade of the interior green mixed with white.

View attachment 315286

More to come later. Hope you guys are interested in the flying suitecase. :smiling4:

Cheers,
Richard
 

Attachments

  • 437251.jpg
    437251.jpg
    2.8 KB · Views: 0
  • 437252.jpg
    437252.jpg
    2.8 KB · Views: 0
  • 437253.jpg
    437253.jpg
    3.1 KB · Views: 0
  • 437254.jpg
    437254.jpg
    2.6 KB · Views: 0
  • 437255.jpg
    437255.jpg
    2.5 KB · Views: 0
  • 445914.jpg
    445914.jpg
    2.2 KB · Views: 0
Hi Richard
This is one I don't remember at all. I assume it is an old 1/72 kit. I will enjoy watching it come together.
Jim
 
Thread owner
Thanks Dave, yes there are non in 1/48...what a pity. Was one of the planes that made up the initial 1,000 bomber raid on Germany. MPM is another brand that has a 1/72 I think.

Jim, surprised you missed this which means you might have also missed the Whimpey, BF 109 and Typhoon. Good to have you along.

Cheers,
Richard
 
Nice work Richard I've got one in the stash, so I'll watch the build for tips.
 
Thanks Dave, yes there are non in 1/48...what a pity. Was one of the planes that made up the initial 1,000 bomber raid on Germany. MPM is another brand that has a 1/72 I think.

Jim, surprised you missed this which means you might have also missed the Whimpey, BF 109 and Typhoon. Good to have you along.

Cheers,
Richard
There is a 1/48 scale Hampden if you can find one.I got this off a mate who is selling off some of his stash.Ive just made a start on it. Not a straight forward build as it has vacform canopies ,white metal undercarriage and resin pieces.View attachment 315368View attachment 315369
 

Attachments

  • 4939BD05-D67B-44BB-9F58-FECADACC2442.jpeg
    4939BD05-D67B-44BB-9F58-FECADACC2442.jpeg
    3.9 KB · Views: 0
  • 583D4A5C-46DE-441A-9465-4C98F394CE36.jpeg
    583D4A5C-46DE-441A-9465-4C98F394CE36.jpeg
    3.4 KB · Views: 0
Thread owner
Hi Guys...it's a little of a squeeze in the suitecase if you guys don't mind, great to have you ...hop in. There are a few extras to the build that might interest you Ian.

With nothing else to add to the interior and the fact that the clear parts are thick, nothing much could be seen through them, I clamped the halves together and glued. The plane in the background is an Italeri Wellington ready for painting.

View attachment 315358

The undercarraige needs assembling and attached to the wing bottom nacelle before gluing the top and bottom halves of the wings together.

View attachment 315359

I puttyied gaps and sanded the fuselage and wing surfaces reducing the over emphasised revitting that Airfix is notorious for. After that I scribed the panel lines.

View attachment 315360View attachment 315361View attachment 315362

The clear parts are not exactly clear. I would be dipping these in Future hopping they get clearer. I wanted an open cockpit so I decided I would cut the canopy and slide it back. To get it to fit I had to sand the canopy cover as thin as possible.

View attachment 315363

The flaps could be positioned but the anchoring points at the wing tips was poor and needed strengthening and puttying.

View attachment 315364View attachment 315365

The engine is molded with the cowlings but wasn't a problem with careful painting. Incidentally the two tyres above are from the Whimpey.

View attachment 315366

Surfaces cleaned, wings attached waiting for further putty to the gaps. Earth has already been applied to the Whimpey in the background.

View attachment 315367

More to come later...

Cheers,
Richard
 

Attachments

  • 438002.jpg
    438002.jpg
    2.6 KB · Views: 0
  • 438003.jpg
    438003.jpg
    3 KB · Views: 0
  • 438001.jpg
    438001.jpg
    2.3 KB · Views: 0
  • 438000.jpg
    438000.jpg
    2.5 KB · Views: 0
  • 437277.jpg
    437277.jpg
    3.1 KB · Views: 0
  • 437615.jpg
    437615.jpg
    2.5 KB · Views: 0
  • 437616.jpg
    437616.jpg
    2.5 KB · Views: 0
  • 437617.jpg
    437617.jpg
    2.8 KB · Views: 0
  • 437618.jpg
    437618.jpg
    1.9 KB · Views: 0
  • 437619.jpg
    437619.jpg
    2.1 KB · Views: 0
Thread owner
There is a 1/48 scale Hampden if you can find one.I got this off a mate who is selling off some of his stash.Ive just made a start on it. Not a straight forward build as it has vacform canopies ,white metal undercarriage and resin pieces.View attachment 315368View attachment 315369

Goodness Dave, it looks like it needs as much attention as the Airfix one I did. :smiling6: But at least the canopy is thin. This will be good news for Dave Ward that there is one in 1/48. At the time of my build not sure if there was one.

Cheers,
Richard
 
Goodness Dave, it looks like it needs as much attention as the Airfix one I did. :smiling6: But at least the canopy is thin. This will be good news for Dave Ward that there is one in 1/48. At the time of my build not sure if there was one.

Cheers,
Richard
It’s made by ‘Fonderie Miniatures’ of France.Long out of production. I’ve wanted one for years and was lucky to get this one.Your Airfix Hampden is looking good.Ive built a couple over the years.
 
Hi Richard
Maybe it's just old age but I don't remember the other planes either :worried:
As always your work is neat and well planned.
Jim
 
Thread owner
Thanks Guys...I like the kit 'cos of its weird shape looking like a pregnant guppy. Jim, ok I'll post them...this was the period I concentrated on aircraft and neglected the dioramas, figs and armour.

I have seen pictures of cowling tips either painted white or was it the shine from the bare metal. I decided it was painted and did that with the help of a circular template with the right diameter placed over the cowl and airbrushed the white. The engine was masked off for this with soaked tissue. Did the same thing for my Stirling build.

View attachment 315427View attachment 315428

For the top gunner position I made gun deflector guards from copper wire and two strips of plastic and attached to two pre-drilled holes in the fuselage.

View attachment 315429

Vents and inlets were drilled out as well. I'm guessing that's the airspeed indicator assembly on the side of the fuselage.

View attachment 315430

The very noticeable gap on the front of the cockpit forward window is very apparent. Plastic shim and filler came to the rescue.

View attachment 315431

After sanding the sliding window as thin as I could it still didn't clear the fuselage so I shaved off part of the fuselage to compensate. This lets the slide canopy sit low and more to scale. Plastic strip was added for the slide rail on each side of the fuselage in line with the lip of the cockpit.

View attachment 315432

The clear parts look clearer after a bath in Future. The sanded slide canopy also got its clarity back after the bath.

View attachment 315433

Now it sits nicely and has the tiniest gap between itself and the fuselage. The front nose clear cage needed adjustments to fit. The step at the top was sanded and filled.

View attachment 315434View attachment 315435

Now you see all joints to the clear parts sitting level with no gaps or smudging. The vents and inlets are cleaner with a brush of thin cement to smoothen the edges.

View attachment 315436

More to come later...

Cheers,
Richard
 

Attachments

  • 438995.jpg
    438995.jpg
    2.7 KB · Views: 0
  • 438996.jpg
    438996.jpg
    2.3 KB · Views: 0
  • 439443.jpg
    439443.jpg
    2.2 KB · Views: 0
  • 439444.jpg
    439444.jpg
    2.7 KB · Views: 0
  • 439445.jpg
    439445.jpg
    2.7 KB · Views: 0
  • 439771.jpg
    439771.jpg
    2.7 KB · Views: 0
  • 439772.jpg
    439772.jpg
    2.2 KB · Views: 0
  • 439773.jpg
    439773.jpg
    2.6 KB · Views: 0
  • 439774.jpg
    439774.jpg
    2.7 KB · Views: 0
  • 439775.jpg
    439775.jpg
    2.8 KB · Views: 0
Thread owner
Hi Guys,
The belly gunners station didn't have any bracket to hold the twin vickers so I made one and attached it to the spine of the clear part.

View attachment 315609

A raised bulge and gun deflector plate were added just forward of the belly gun station.

View attachment 315610

Cheers,
Richard
 

Attachments

  • 440934.jpg
    440934.jpg
    2 KB · Views: 0
  • 440935.jpg
    440935.jpg
    2.2 KB · Views: 0
You've put/putting a lot of extras into this Richard. Nice to see, plenty of tips for me.
 
Sorry Richard! Late to the party again. I would sit on JR's lap but he has knobbly knees. I enjoyed the read through and it looks like another masterpiece in the making. Good luck
 
Thread owner
Hi Guys, thanks, was wanting to reply but was too busy and tired after the weekends Hobby event.

Ian, yes I was surprised by what could be added to this kit. The challenges were basically placed on myself like the sliding canopy.
John, for this particular build i was trying out a brand called E7. Works and feels like Squadron green putty so there will be shrinkage if used in thick large amounts. Better to add in layers until the required level for sanding.
Steve, one is never late in my party and besides who can fault being fashionably late. Lucky for me I'm not too ashamed of the final build of thei kit. Although old it was still a thrill to build.

Cheers,
Richard
 
Hi Richard
Wonderful work on the clear canopy parts. I notice you dip your parts. Do you polish them first with compound? Could you explain please how you use the tissue when you said ..
masked off for this with soaked tissue
Thanks
Jim
 
Status
Not open for further replies.
Back
Top