
You are using an out of date browser. It may not display this or other websites correctly.
You should upgrade or use an alternative browser.
You should upgrade or use an alternative browser.
Hasegawa 1/32 Fiesler Fi -1B Storch Gran Sasso
- Thread starter Vaughan
- Start date
- Status
- Not open for further replies.
That'll be nice! You keep hiding all these wonderful engines you do behind cowlings and panels. We never get to see them on the finished 'planes.\ said:Andy I've just tried a dry fit in the fuselage and there's not much to see apart from 3 cylinders each side but it's still worth putting the work in. So maybe one side open the other closed.
Gern
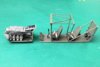
Engine mounts and firewall are now in situ oil tank still to add exhausts and some more wiring.View attachment 73164
View attachment 73165
View attachment 186187
View attachment 186188
View attachment 73165
View attachment 186187
View attachment 186188
Attachments
G
Guest
Guest
Excellent work, great details. This is growing very well.
Looking for progresses.
Francesco
Looking for progresses.
Francesco
Thanks Tony and Francesco
I've been quietly working on this one over the last week and here's where I'm up to.
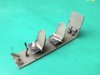
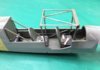
The seats are complete with the addition of some scratch built seat belts from tamiya Tape and wire. They are both attached to the floor pan as is the joystick and the foot plates, they too have toe straps made from Tamiya tape. The back wall has been added and spare magazines for the rear facing machine-gun. I've also added the finishing touches to the fuselage sidewalls.
Next up will be to attach the internal framework.
View attachment 73588
View attachment 73589
View attachment 73590
View attachment 186611
View attachment 186612
View attachment 186613
I've been quietly working on this one over the last week and here's where I'm up to.
The seats are complete with the addition of some scratch built seat belts from tamiya Tape and wire. They are both attached to the floor pan as is the joystick and the foot plates, they too have toe straps made from Tamiya tape. The back wall has been added and spare magazines for the rear facing machine-gun. I've also added the finishing touches to the fuselage sidewalls.
Next up will be to attach the internal framework.
View attachment 73588
View attachment 73589
View attachment 73590
View attachment 186611
View attachment 186612
View attachment 186613
Attachments
G
Guest
Guest
Excellent work Vaughan.
Looking very good so far.
Cheers
Looking very good so far.
Cheers
Thanks gents
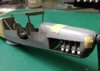
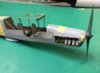
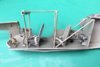
Yesterday afternoon I fitted the internal framework and then offered it up to the side wall(as a dry fit). All seems to fit ok. Then another dry fit with the two fuselage halves, engine and prop and to finish off I popped the canopy in place. That is going to be one big greenhouse.
View attachment 73633
View attachment 73634
View attachment 73629
View attachment 73630
View attachment 73631
View attachment 73632
View attachment 186652
View attachment 186653
View attachment 186654
View attachment 186655
View attachment 186656
View attachment 186657
Attachments
G
Guest
Guest
I must say is a very interesting build!
With and excellent work too!")
Cheers
With and excellent work too!
Cheers
Loving this build Vaughan. This aircraft is such an icon for me and I have fond memories of building this as a kid (in smaller scales). The build itself is up to your usual high standards and I'm really looking forward to seeing this progress. It's a lot of glass but that's what makes this aircraft - great stuff.
ATB
Paul
ATB
Paul
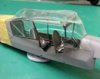
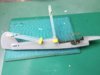
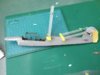
Little progress on this one over the last 2 weeks. The fuselage is now together requiring a fare bit of pressure to keep it closed. The canopy is masked up using Eduards pre-cuts, they weren't the easiest of masks to apply as they curled up once removed from the backing sheet. Prop is now sprayed and the decals applied just a little weathering to add.
View attachment 74264
View attachment 74265
View attachment 74266
View attachment 74267
View attachment 187287
View attachment 187288
View attachment 187289
View attachment 187290
View attachment 74264
View attachment 74265
View attachment 74266
View attachment 74267
View attachment 187287
View attachment 187288
View attachment 187289
View attachment 187290
Attachments

G
Guest
Guest
Vaughan, that is very impressive work!
Looks good Vaughan. It also looks like you've got to fight that large area of glass a bit ")
I've never seen those clamps before and they look pretty good, assuming you can get decent pressure with them. I tend to use those ratchet jobbies from Wicks or similar, but I'd be interested in those which you have used. Do they have a name/manufacturer ?
Cheers
Steve
I've never seen those clamps before and they look pretty good, assuming you can get decent pressure with them. I tend to use those ratchet jobbies from Wicks or similar, but I'd be interested in those which you have used. Do they have a name/manufacturer ?
Cheers
Steve
Steve they are Berna Clamps (invented by a frenchman a Dr. Philippe Berna would you believe). I bought them from Modelezone shortly before they closed down when tools and paints were 1/2 price so they only cost a fiver. This is the first time I've used them and they're quite effective. The jaws are made of a soft plastic and the rod is carbon fibre. Depending on how hard you squeeze the jaws directly relates to how hard they grip. You can get them on eBay or Amazon for a reasonable price. Here's the link for Amazon
I was going to ask about those as well. In the link you sent I see Amazon get them from Creative Models, who if I am not mistook is one of Johns suppliers for the scale model shop...
maybe if we pester the life out of him he can get them in stock as well. (and probably cheaper than Amazon too).
Having just bought one of these kits, I am paying good attention to your build. Looks like it builds well. Any problem areas to be careful about?
Ian M
maybe if we pester the life out of him he can get them in stock as well. (and probably cheaper than Amazon too).
Having just bought one of these kits, I am paying good attention to your build. Looks like it builds well. Any problem areas to be careful about?
Ian M
- Status
- Not open for further replies.
Legal Notice
scalemodelling.co.uk is a privately operated online discussion forum. All content posted by members reflects their own views and opinions and does not necessarily represent those of the forum owners or administrators. While reasonable efforts are made to moderate content, no responsibility is accepted for user-generated material. By using this site, you agree to comply with UK law and the forum rules.