Theme editor

Scale Model Shop

Hasegawa 1/32 P47D Republic Thunderbolt

Status
Not open for further replies.
Thread owner
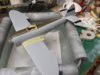
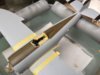
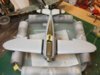
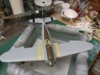
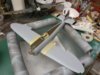
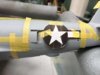
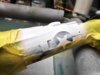
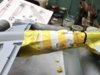
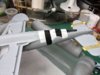
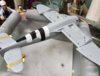
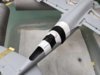
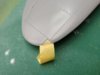
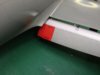
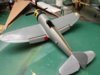
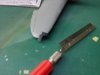
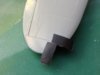
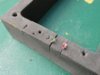
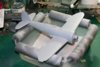
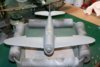
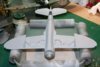
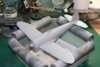
A small update, I've been waiting on the arrival of an Expo razor saw which turned up yesterday I needed it so I could cut out the navigation light blanks and then insert the clear lenses. I used Dymo tap as a guide whilst cutting with the saw. This worked very well with the minimal of tidying up afterwards. I've added a few drops of red and green in the respective lens indents. Decals to the no step areas on the flaps have been added too.

View attachment 60190

View attachment 60191

View attachment 60192

View attachment 60193

View attachment 60194

View attachment 60195

View attachment 60196

View attachment 173216

View attachment 173217

View attachment 173218

View attachment 173219

View attachment 173220

View attachment 173221

View attachment 173222
 

Attachments

  • 131402_1327.jpg
    131402_1327.jpg
    1.6 KB · Views: 0
  • 131402_1332.jpg
    131402_1332.jpg
    1.7 KB · Views: 0
  • 131402_1334.jpg
    131402_1334.jpg
    5 KB · Views: 0
  • 131402_1342.jpg
    131402_1342.jpg
    2.7 KB · Views: 0
  • 131402_1353.jpg
    131402_1353.jpg
    2 KB · Views: 0
  • 131402_1355.jpg
    131402_1355.jpg
    1.6 KB · Views: 0
  • 131402_1357.jpg
    131402_1357.jpg
    2.1 KB · Views: 0
Looking good Vaughan.The wing tip lights are a nice touch.A simple thing to do but make a difference I think.I tend to cut the shape out of the wing,Glue a bit of clear sprue in,Then sand and polish to shape.
 
\ said:
Looking good Vaughan.The wing tip lights are a nice touch.A simple thing to do but make a difference I think.I tend to cut the shape out of the wing,Glue a bit of clear sprue in,Then sand and polish to shape.
For coloured lenses rather than coloured lamps you can do that with the coloured plastic from old tooth brush handles. I've been known to do it when feeling very keen.

Cheers

Steve
 
Thread owner
Well I laid down the primer last night followed by the OD band down the spine. Started spraying on the aluminium this morning, didn't go down at all well. Don't know if it was a combination of poorly applied primer or the aluminium being awkward but it looks a total mess. It has a dusty appearance in places and is rough to the touch. So maybe a bad case of over spray to certain areas I don't know. What I do know is the lot is going to have to come off. This is a real shame as the masking on the OD worked really well. Oh well it's back to the drawing board. I'm in two minds wether to put this one on the back burner and start another build.
 
I think you should finish it Vaughan. It will just taunt you and you will lose enthusiasm for future builds. I for one would like to see you finish this as you have placed a lot of time into it already.
 
Thread owner
Thanks Joe I'm in a real bad place with this model at the moment. I did spend yesterday afternoon striping off the aluminium and primer so I'm back to square one. I will look into trying a different primer and aluminium paint. Anybody have any experience in other acrylics such as Tamiya paints, even rattle cans?
 
Hi Vaughan, Ive been following your build as I have had problems with the alum paint on a 1:72 scale Thunderbolt for a good few weeks now.. I cant get a good finish on it no matter what primer or paint i use...Closest I

got was from the "Model Colour" range of aluminium. Tried both the bottle sold purely for air brushing and the bottle unthinned for brush work. The un-thinned offered the best results when thinned 1:1 but it kept blocking the airbrush every few minutes even spraying at 20 plus PSI.

The model is sitting gathering dust, but I will get back to it and remove the paint and primer again (5th Time!)...probably go with the aluminium foil option..

Regards Danny
 
Thread owner
I'm back at the stage where the primer is down(a brand new bottle of Vallejo light grey surface primer). Some really fine sanding and polishing is going to be required, as areas of the upper wing surfaces are slightly rough( most probably down to my poor spraying skills) and will affect the aluminium when I pluck up the courage to start spraying again. I went to my LMS yesterday and bought some more Vallejo aluminium so at least there shouldn't any issues with that. So at the moment I will concentrate on sorting the primer coat.

This afternoon I've succeeded in sanding back the primer using a very worn out fine grade sanding stick, so all is very smooth and hopefully the aluminium will go down well.


View attachment 60414

View attachment 60415

View attachment 60416

View attachment 60417

View attachment 173440

View attachment 173441

View attachment 173442

View attachment 173443
 

Attachments

  • 131902_1389.jpg
    131902_1389.jpg
    5.9 KB · Views: 0
  • 131902_1383.jpg
    131902_1383.jpg
    5.9 KB · Views: 0
  • 131902_1384.jpg
    131902_1384.jpg
    5.9 KB · Views: 0
  • 131902_1388.jpg
    131902_1388.jpg
    6 KB · Views: 0
Looking great Vaughan. That cockpit was outstanding. You guys do such a great job on these, i would like to see a range of models that were just cockpits of various planes through the war ages. if they were a decent scale they would make for a great collection.

Keep up the good work

Andy
 
I think we have all been there Vaughan at some point in our modelling lives. I agree seeing it through is the only way although the enthusiasm will have taken a severe batterring! Hopefully the next coat of paint will go on OK but perhaps it is worth this time doing a test piece. Spray some scrap with the same primer so when you are ready with the aluminium spray the test piece first and wait for it to dry. If it looks OK then commit to the model but it may well save you going through this process again. Or throwing it out of the window, whichever comes first!!
 
Good to see you are going for it rather than the flight time alternative Vaughan. Good luck with the finish, I'm sure this time you will nail it.
 
Hi Vaughan, have you considered using Alclad products, these are technically not paints but lacquers, I spray lacquer a lot on the furniture i make for a living, the difference is mainly that each coat re activates the previous coats to make a single thicker coat which can then be polished to a very high sheen without the risk of tide marks etc.

None of this really applies to model making but I've found these Alclad lacquers to be great. Their website, Alclad2.com gives you all the finishes and a good run down on how to use them. Stick with it, it will be great in the end. m
 
Thread owner
Thanks for all the info and support Guys,

Michael I had thought about using Alclad paints but don't have a spray booth and an extraction system as I gather the fumes and overspray are not good. Their site is very interesting and the results are fantastic, so maybe something for the future.

For the time being I will have another go with the Vallejo aluminium the primer is very smooth so I should get a good finish. The next thing to take into account is do I spray the the OD to the fuselage spine and the black bands to the tail fin, horizontal stabilisers and then mask prior to putting the aluminium down. Too much to think about at the moment. Oh and I almost forgot the invasion stripes too.
 
Dont forget to give the areas for the alluminium a quick rubdown after the OD and before the Allu goes down.

I had similar problems with a Speed silver Mossy, I think I spent more time rubbing down than painting!!!

Keep at it.

Ian M
 
I too have a well known preference for Alclad :)

I don't know how tough the Vallejo primer is but the Halfords plastic primer I use sticks like Sh#t to a blanket and can be polished to a very smooth surface before spraying the aluminium. For any natural metal finish we all know that preparation is everything.

Stick at it,it has been a terrific build and I'm sure you will crack it :)

Cheers

Steve
 
Thread owner
I'm back, not had any time to work on the Jug in the last week. Shed loads of masking was required I won't bore you with the photos only to say there was a lot of tape used. OD on the spine has gone down fine as has the black bands. The walkways were next. Now the fun begins as I have to re-mask accurately over the spayed areas. I've still yet to work out the best way of masking the invasion stripes with the possibility of using a combination of decals.

View attachment 61047

View attachment 61048

View attachment 61049

View attachment 61050

View attachment 61051

View attachment 61052

View attachment 174073

View attachment 174074

View attachment 174075

View attachment 174076

View attachment 174077

View attachment 174078
 

Attachments

  • 130103_1406.jpg
    130103_1406.jpg
    2.8 KB · Views: 0
  • 130103_1407.jpg
    130103_1407.jpg
    5.9 KB · Views: 0
  • 130103_1410.jpg
    130103_1410.jpg
    3 KB · Views: 0
  • 130103_1411.jpg
    130103_1411.jpg
    3.2 KB · Views: 0
  • 130103_1405.jpg
    130103_1405.jpg
    3 KB · Views: 0
  • 130103_1404.jpg
    130103_1404.jpg
    3 KB · Views: 0
Thread owner
Some more progress this morning I have re-masked the painted areas and made a start on the invasion stripes. I photocopied the decals and used them as a template so that I can line up the invasion stripes as accurately as possible. It was really tricky but it seems to have worked. Yet again it has required a fare bit of the old Tamiya tape but I have invested in a 40mm roll which makes life easier. The results aren't too bad but will require a little tidying up. Now will have to wait for the paint to go off enough to then re-mask the whole area in readiness for the aluminium to go down. In the mean time I will make a start on the canopy.

View attachment 61202

View attachment 61203

View attachment 61204

View attachment 61205

View attachment 61206

View attachment 61207

View attachment 174228

View attachment 174229

View attachment 174230

View attachment 174231

View attachment 174232

View attachment 174233
 

Attachments

  • 130603_1417.jpg
    130603_1417.jpg
    5.9 KB · Views: 0
  • 130603_1419.jpg
    130603_1419.jpg
    2.7 KB · Views: 0
  • 130603_1420.jpg
    130603_1420.jpg
    3 KB · Views: 0
  • 130603_1422.jpg
    130603_1422.jpg
    3 KB · Views: 0
  • 130603_1425.jpg
    130603_1425.jpg
    2.9 KB · Views: 0
  • 130603_1426.jpg
    130603_1426.jpg
    5.7 KB · Views: 0
Status
Not open for further replies.
Back
Top