Theme editor

Scale Model Shop

Hasegawa Fw190D-9 in 1/32. - stona

Status
Not open for further replies.

stona

New member
Joined
Jul 22, 2008
Messages
9,889
Reaction score
9
Points
0
1/3
Thread owner
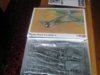
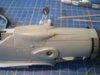
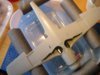
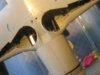
This is my intended victim. Not decided how it will be finished. If you've seen my current Me262 build you'll understand that I'm not exactly over-keen on stripes at the moment! Bag opening later.

Cheers

Steve

View attachment 22615

View attachment 135141
 

Attachments

  • GB Victim..jpg
    GB Victim..jpg
    2.4 KB · Views: 0
I know which one it is lol, i can see why you're not keen. If memory serves me right, these D-9's used to be the decoys for the Me 262 on take off so was Red with white stripes underneath.

If i'm right do i get a lucky bag lol? John
 
nice choice steve, are the stripes on the decal sheet or have you got to mask them? cheers tony
 
Thread owner
You are correct John,though I think their role was more airfield defence than decoy. The stripes (a bit like allied invasion stripes) were to stop over enthusiastic flak gunners shooting them down. The me 262s were very vulnerable on take off and landing as they were low and slow. Unlike modern jet engines they couldn't make rapid power demands which meant they accelerated rather slowly. Everyone remembers that they went 100mph quicker than the fastest allied fighters but not how long they took to get there.

It would/will be a masking job if I do one of the air field defence aircraft. Decals aren't included and I doubt that they'd work very well as you'd be trying to cover a red base colour.I'm sure it would show through. Secondly,on the few photos where the stripes are visible they seem far from perfectly or evenly applied. They were supposed to be 10cm wide,though I've no idea where this received wisdom came from,and that's only about 3mm in this scale.

Cheers

Steve
 
WOO WOO! I've got something right lol. But to be honest i was reading up on these 190's way before the GB. The German pilots were a little like the Japanese Kamikaze pilots as they put there life on the line to get the job done, Thanks for the info Steve.

Have fun, John
 
Nice to see a couple of 1/32 in the GB, this will be great I am sure Steve.
 
Sorry Stona, didn't see this before the comment on the absence of a 1/32 scale.

Papagei staffel was my first choice too, however my plastic pusher, ordered the wrong kit, so I went for the A-3.

Eaglecals do decal sheets for the papagei machines in 1/48 and 1/32.

Correct the strips where a bit slap dash, but read some place they where painted with a 10cm brush.

Looking forwards to seing your build. I still have the D-9 on order so might do it later.
 
Thread owner
\ said:
Decals aren't included Cheers

Steve
Oh yes they are,I was looking at the wrong sheet. I always remove decal sheets from a kit and seal them in a freezer bag for protection. My filing system obviously leaves a bit to be desired. I still can't imagine why you'd not paint them in this scale anyway.

Ian, I'm trying to get hold of the Eagle Cals sheet (Doras of the Galland circus) as the kit decals are based on some of Jerry Crandall's old profiles which he has since revised for this sheet. Hannants have it but you can't order at the moment as they are in a bit of a transition. If I can't get them in time I may do another Dora,we'll see.

Cheers

Steve

,
 
Thread owner
Bang!! We're off. Unexpected few hours today so sprues out for quick photo call and time to stick a few bits together. First impressions are good. I don't know the history of this kit but it certainly looks okay,nice crisp molding,recessed panel lines and not much flash etc. Let's see if I can make a decent Dora out of it.

Cheers

Steve

View attachment 22829

View attachment 22830

View attachment 135355

View attachment 135356
 

Attachments

  • Sprue2..jpg
    Sprue2..jpg
    2.8 KB · Views: 0
  • Sprue1..jpg
    Sprue1..jpg
    2.8 KB · Views: 0
Thread owner
A bit of progress. A very nice kit this and pretty simple to build. Only problem so far was some nasty sink marks on the back of a couple of propeller blades (that's the front of the airscrew,the face faceing the back of the aircraft,if you know what I mean). See before and after. Straight forward office. The gubbins which will be visible through the wheel wells is a bit of a fiddle,some of the pipework doesn't exactly fall into place, but no real problem. I think this will go together quite quickly as I'm doing it out of the box and most of what's left is big chunks.

Cheers

Steve

View attachment 22836

View attachment 22837

View attachment 135362

View attachment 135363
 

Attachments

  • IMG_2070..jpg
    IMG_2070..jpg
    3 KB · Views: 0
  • sink 1..jpg
    sink 1..jpg
    2.8 KB · Views: 0
Have to say this group build is bringing out some nice models and this is one of them.
 
Thread owner
Here we go,had a good bash this afternoon when I should have been doing CAD stuff but,hey,it's the joy of being self employed and having no self discipline.The "gubbins" is in the fuselage having had a nice dirty oil wash. The office is also installed though the hours I spent on the side consoles and instrument panel are all but invisible. I'm familiar with the Fw190 and knew this would happen! It looks cool but you'll have to take my word for it. More tomorrow telephone permitting. I would recommend this kit to anyone. It is nicely detailed but seems a very nice kit to assemble. Everything fits and,importantly, would be difficult to misalign due to positive fitment. You can see what I mean on the underside of the cockpit tub.If you get those two tabs in you can't go wrong.

Cheers

Steve

View attachment 22849

View attachment 22850

View attachment 22851

View attachment 135375

View attachment 135376

View attachment 135377
 

Attachments

  • pit 1..jpg
    pit 1..jpg
    3.1 KB · Views: 0
  • gubbins 2..jpg
    gubbins 2..jpg
    3 KB · Views: 0
  • gubbins 1..jpg
    gubbins 1..jpg
    3.2 KB · Views: 0
Steve this looks like a very nice kit the detail looks nice too.

scott
 
Thread owner
Got a bit more done. Look at the lovely fit on the top cowling,it just fell into place! I'm also fitting the wells to the lower wing. You've got to get this right or you'll be in a world of s**t when you try to fit the wings to the fuselage. I'm planning to attach the lower wing this evening.That's when I'll find out how well I've done all the sub assemblies!

Steve

View attachment 22879

View attachment 22880

View attachment 22881

View attachment 135405

View attachment 135406

View attachment 135407
 

Attachments

  • well_dihedral..jpg
    well_dihedral..jpg
    2.8 KB · Views: 0
  • top cowl 2..jpg
    top cowl 2..jpg
    3 KB · Views: 0
  • top cowl 1..jpg
    top cowl 1..jpg
    2.6 KB · Views: 0
Thread owner
It's a very nice kit. I didn't know anything about it when I bought it so I'm well chuffed!

I've attached the lower wing and it fits very well,which is a relief. In the second piccy you can just about make out a little filler on the leading edge infront of the starboard well. It's just roughly done as I'll want the upper wings on before doing too much remedial work. That is the only putty on the kit (apart from a couple of sink marks) which speaks volumes.

Steve

I have noticed one boo-boo. The flaps are set open but they are dropped 90 degrees. I don't think the Fw190 could give more than 60 degrees of flap. For take off they used 12 degrees. Nothing that can't easily be fixed,but something to look out for when building this kit.

View attachment 22882

View attachment 22883

View attachment 135408

View attachment 135409
 

Attachments

  • lower wing on..jpg
    lower wing on..jpg
    2.9 KB · Views: 0
  • stbd leading edg&#10.jpg
    stbd leading edg&#10.jpg
    2.6 KB · Views: 0
All that detail seen up through the wheel well from the back of the engine firewall is missing on the Eduard kits. It just has what appears to be a plate across it. really nice to see that sort of detail even if you have to tip it over to look at it, knowing it is there is a good feeling.

Tell you something though Steve, I am going to knick the idea of the plastic box and pipe insulation, looks a great way of holding the kit at little risk to paintwork etc.
 
\ said:
All that detail seen up through the wheel well from the back of the engine firewall is missing on the Eduard kits. It just has what appears to be a plate across it. really nice to see that sort of detail even if you have to tip it over to look at it, knowing it is there is a good feeling. Tell you something though Steve, I am going to knick the idea of the plastic box and pipe insulation, looks a great way of holding the kit at little risk to paintwork etc.
the exposed pipework visible in the wheel well was only on the 190d inline engine variants graham so the eduard and any radial engined 190 kit shouldnt have them , so dont worry , yours is right after all . cheers tony
 
Thread owner
\ said:
the exposed pipework visible in the wheel well was only on the 190d inline engine variants
Exactly so. The exhausts from the lower cylinders on the radials came out the bottom.

The box/pipe insulation works really well (once you've got the wings on!). It definitely prevents hangar damage and other unintentional chipping.

Steve
 
Whoops, I didn't realise it had a different engine.... Sadly I only build kits, I have so much to learn about the real thing..........
 
Status
Not open for further replies.
Back
Top