
I promised a while back that I'd give a 'step-by-step' guide to how I paint figures (specifically pilots). And so, a little belatedly, I'm posting the 'How to...'.
This tutorial will not be quick as I'm doing several other things concurrently and I'm slotting this in as and when I can. Anyway, on to subject at hand...
Rather than just show how I paint 1 figure I thought it would be more useful to see the technique across a range of figures. I've therefore gone and prepared 8 figures from various sources and hope that this will be of interest.
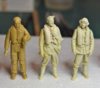
So here's the line-up...
View attachment 118884
From left to right: Douglas Bader by 'Fine Molds'; 2 BoB pilots by 'Ultracast'; 1 Pilot, 1 Waaf by 'Wings', 2 Luftwaffe ground crew by Verlinden, 1 BoB scrambling pilot by Aerobonus. All figures are resin apart from the Bader figure which is injection plastic.
(The technique I use is the same whether your figure is plastic, resin or metal)
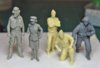
A couple of shots showing detail...
View attachment 118885
View attachment 118886
Personally, I think it's always worth while investing in a quality figure as it's harder to paint detail that isn't there. That said, we'll see what detail can be brought out of the Bader figure which is of course injection plastic and the details are softer as a result.
Preparation
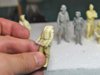
I prepare all my figures in the same way. I always assemble the figures by glueing AND pinning limbs to torsos. I pin them with pieces of paper clip cut to suitable lengths. Most of the time I assemble the figure fully but occasionally I may leave a limb pinned but unglued for ease of painting. generally though it's a neater job if you can assemble fully. Once the assembly is finished I fill any gaps with filler (note only the scrambling pilot has had filler applied). I use a variety of fillers - milliput, humbrol down to Mr Surfacer depending on the gap.
Pinned limbs...
View attachment 118887
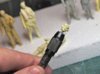
The head again is always pinned and is left loose for ease of painting. This has 3 advantages - 1. The join is strong later on, 2. You can position the head just where you want it (looking left, right, down, up), and 3. you can clamp the head by the pin in a pin vice for ease of painting.
View attachment 118888
That's it for the moment. I'm sorry if this is a bit slow but this will take time to complete.
Thanks for your patience.
Paul
View attachment 231906
View attachment 231907
View attachment 231908
View attachment 231909
View attachment 231910
This tutorial will not be quick as I'm doing several other things concurrently and I'm slotting this in as and when I can. Anyway, on to subject at hand...
Rather than just show how I paint 1 figure I thought it would be more useful to see the technique across a range of figures. I've therefore gone and prepared 8 figures from various sources and hope that this will be of interest.
So here's the line-up...
View attachment 118884
From left to right: Douglas Bader by 'Fine Molds'; 2 BoB pilots by 'Ultracast'; 1 Pilot, 1 Waaf by 'Wings', 2 Luftwaffe ground crew by Verlinden, 1 BoB scrambling pilot by Aerobonus. All figures are resin apart from the Bader figure which is injection plastic.
(The technique I use is the same whether your figure is plastic, resin or metal)
A couple of shots showing detail...
View attachment 118885
View attachment 118886
Personally, I think it's always worth while investing in a quality figure as it's harder to paint detail that isn't there. That said, we'll see what detail can be brought out of the Bader figure which is of course injection plastic and the details are softer as a result.
Preparation
I prepare all my figures in the same way. I always assemble the figures by glueing AND pinning limbs to torsos. I pin them with pieces of paper clip cut to suitable lengths. Most of the time I assemble the figure fully but occasionally I may leave a limb pinned but unglued for ease of painting. generally though it's a neater job if you can assemble fully. Once the assembly is finished I fill any gaps with filler (note only the scrambling pilot has had filler applied). I use a variety of fillers - milliput, humbrol down to Mr Surfacer depending on the gap.
Pinned limbs...
View attachment 118887
The head again is always pinned and is left loose for ease of painting. This has 3 advantages - 1. The join is strong later on, 2. You can position the head just where you want it (looking left, right, down, up), and 3. you can clamp the head by the pin in a pin vice for ease of painting.
View attachment 118888
That's it for the moment. I'm sorry if this is a bit slow but this will take time to complete.
Thanks for your patience.
Paul
View attachment 231906
View attachment 231907
View attachment 231908
View attachment 231909
View attachment 231910
")

