
You are using an out of date browser. It may not display this or other websites correctly.
You should upgrade or use an alternative browser.
You should upgrade or use an alternative browser.
Ian M's Famo
- Thread starter Ian M
- Start date
- Status
- Not open for further replies.
Thanks Monica, Terry, David and Steve for your encouraging words.
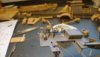
Carpet monster? haven't got one, laminat flooring so I can hear where they bounce. Only lost one tiny bit, and I think thats on the desk....
Here is today's thrilling installment
View attachment 264184
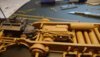
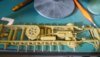
Made a start on tarting up the Chassis...
View attachment 264183
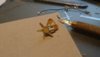
Made up the six bladed cooling fan... that was fun...
View attachment 264181
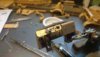
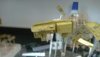
Ah! the instrument panel...This would have been a lot smarter an idea, if I had not already fitted the kit one. A few snips with the sprue cutters and I could build this little bugger instead.
View attachment 264182
I even made back cases for the dials and wired them. there are a couple of extra bits that have been mounted after the photo, but a few things to do yet so next time.
Talking of time all that you see in these four pictures is the result of FIVE hour work minus the time it took to make two cups of coffee.. Jep only two..... I have a big cup lol.
Carpet monster? haven't got one, laminat flooring so I can hear where they bounce. Only lost one tiny bit, and I think thats on the desk....
Here is today's thrilling installment
View attachment 264184
Made a start on tarting up the Chassis...
View attachment 264183
Made up the six bladed cooling fan... that was fun...
View attachment 264181
Ah! the instrument panel...This would have been a lot smarter an idea, if I had not already fitted the kit one. A few snips with the sprue cutters and I could build this little bugger instead.
View attachment 264182
I even made back cases for the dials and wired them. there are a couple of extra bits that have been mounted after the photo, but a few things to do yet so next time.
Talking of time all that you see in these four pictures is the result of FIVE hour work minus the time it took to make two cups of coffee.. Jep only two..... I have a big cup lol.
Attachments

Well I'm still here, just been busy! LOL
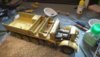
Well i got most of the sub-assemblies primed the other day so today I painted them with some very expensive paint! ( more on that later...)
First time trying Model Air. Its rather good. Smells not to bad and covers well..... I might use more of them. But I wonder how the economy will be. A Model color, my normal choice lasts for ages, at least five or six good size builds... The model air, Used half a bottle so far and a long way to go yet....
View attachment 264449
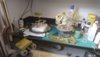
A general overview of the chaos that is my paint table...
View attachment 264450
Me thinks that this is very much a kit that needs painting as much as possible before assembling, twas bit of a bugger to spray all the nooks and cranies with out swamping the detail...
A couple of the fire wall after this its hairy stick and detail painting...View attachment 264451
View attachment 264452
Now you are all wondering why this paint was so expensive....
Well I found a hobby shop in the same end of the country I am. So rather than just order on line and pay the postage, I jumped in the car and drove the 60 or so kilometre to the shop...That ended up costing me £60. quite restrained actually. What really pushed the price up was the speeding fine I got from the ATC hidden in the hedgerows on the way out. Have not got the giro yet but its gong to be around £150. so £210 to buy one bottle of paint! Grrrrrrrr.
Well i got most of the sub-assemblies primed the other day so today I painted them with some very expensive paint!
( more on that later...)First time trying Model Air. Its rather good. Smells not to bad and covers well..... I might use more of them. But I wonder how the economy will be. A Model color, my normal choice lasts for ages, at least five or six good size builds... The model air, Used half a bottle so far and a long way to go yet....
View attachment 264449
A general overview of the chaos that is my paint table...
View attachment 264450
Me thinks that this is very much a kit that needs painting as much as possible before assembling, twas bit of a bugger to spray all the nooks and cranies with out swamping the detail...
A couple of the fire wall after this its hairy stick and detail painting...View attachment 264451
View attachment 264452
Now you are all wondering why this paint was so expensive....
Well I found a hobby shop in the same end of the country I am. So rather than just order on line and pay the postage, I jumped in the car and drove the 60 or so kilometre to the shop...That ended up costing me £60. quite restrained actually. What really pushed the price up was the speeding fine I got from the ATC hidden in the hedgerows on the way out. Have not got the giro yet but its gong to be around £150. so £210 to buy one bottle of paint! Grrrrrrrr.
Attachments

G
Guest
Guest
Loads of details there Ian, waiting to see how it looks painted.
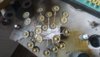
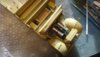
Are you aware of how many wheels there where on one of these things!?!?!
View attachment 264476
About that many! and these are just those for the tracks...
Thanks Bob. The main colour is on, just need to figure out which way to go now.
View attachment 264476
About that many! and these are just those for the tracks...
Thanks Bob. The main colour is on, just need to figure out which way to go now.
Attachments
Most excellent work so far Ian. Great detail and the etch will really make a difference. With regards to the grab handles I tend to replace those as a matter of course anyway. The wire is invariably stronger than the plastic counterpart it replaces and removes the need for tedious plastic part clean up.
Looking forward to a great looking model.
Cheers
Paul
Looking forward to a great looking model.
Cheers
Paul
Cheers Paul. Agree about the grab handles, I tend to swap them out for brass most of the time. On this one though I will give the tie downs that surround the whole of the grew/cargo area a miss. They are microscopic! I can barely see them WITH a magnifier!! lol.
Anyways... So all the main components are painted an appropriate colour; Model Air Dark Sand, it looks OK to me.
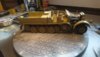
So wheels on and Big bits stuck on. The motor room was fun getting everything to fall into place. At the moment all the wires/cables from the dashboard are just poked down out of the way...Here is how she is looking at the moment. Still loads to do yet!
View attachment 264478
View attachment 264479
View attachment 264477
View attachment 264480
Need a break now before I go on to tackle the pram hood...
Anyways... So all the main components are painted an appropriate colour; Model Air Dark Sand, it looks OK to me.
So wheels on and Big bits stuck on. The motor room was fun getting everything to fall into place. At the moment all the wires/cables from the dashboard are just poked down out of the way...Here is how she is looking at the moment. Still loads to do yet!
View attachment 264478
View attachment 264479
View attachment 264477
View attachment 264480
Need a break now before I go on to tackle the pram hood...
Attachments
G
Guest
Guest
some damn fine work here Ian, proper skill with the PE and wiring!
G
Guest
Guest
Cheers Paul. Agree about the grab handles, I tend to swap them out for brass most of the time. On this one though I will give the tie downs that surround the whole of the grew/cargo area a miss. They are microscopic! I can barely see them WITH a magnifier!! lol.
Anyways... So all the main components are painted an appropriate colour; Model Air Dark Sand, it looks OK to me.
So wheels on and Big bits stuck on. The motor room was fun getting everything to fall into place. At the moment all the wires/cables from the dashboard are just poked down out of the way...Here is how she is looking at the moment. Still loads to do yet!
View attachment 264478
View attachment 264479
View attachment 264477
View attachment 264480
Need a break now before I go on to tackle the pram hood...
Those tie downs are a pain in the arse Ian and yes you are microscopic.
") .........Jim
.........Jim ")
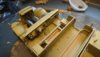
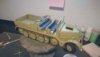
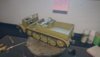
Still plugging away at this one. Mostly an hour here and there...Have a couple of domestic projects that the missus thinks are more important. :/
Here is where I am at the moment.
View attachment 265046
View attachment 265047
I cant figure out how or where but some thing is out. The motor compartment hood is almost two millimetre to short. I can only assume that the drivers compartment has been placed to far back. the engine compartment is in the correct place....
Contemplating, dismantling it and trying again!!! Ouch.
HELP: Does anyone have some DAK armored division decals x2 and the DAK emblems x4 that they are not going to use?
Attachments
- Status
- Not open for further replies.
Legal Notice
scalemodelling.co.uk is a privately operated online discussion forum. All content posted by members reflects their own views and opinions and does not necessarily represent those of the forum owners or administrators. While reasonable efforts are made to moderate content, no responsibility is accepted for user-generated material. By using this site, you agree to comply with UK law and the forum rules.
Currently on our website
Threads
37,405
Messages
707,857
Members
2,652
Latest member
Waffenträger Auf E-100