
You are using an out of date browser. It may not display this or other websites correctly.
You should upgrade or use an alternative browser.
You should upgrade or use an alternative browser.
Ian M's Famo
- Thread starter Ian M
- Start date
- Status
- Not open for further replies.
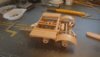
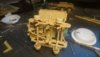
Well after about an hour I finally got the tie-rods sorted. In fairness this would have gone a lot quicker if they had been done as the axles went on and not after! Still I know for the rear boogie which are the next up.
View attachment 265474
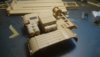
Front boogie done, still a few tools and such to go on but that will be after painting.View attachment 265475
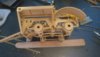
The tie rods. Instead of the wire and screws of the kit, the replacements are resin, wire, tube and PE. The instructions call for the ball joint holders to be rounded out so the ball joints can work.... well I dont think I will be playing with it so they ended as a nice tight push fit. Tight enough to stay put but just lose enough be able to pose the wheels.
View attachment 265476
Here you can see them a bit better. The PE set also included Mudguards but to be honest these look fine to me. Just need to remove the surplus from the supports and they are fine.
Right then better get on with the rear set...
View attachment 265474
Front boogie done, still a few tools and such to go on but that will be after painting.View attachment 265475
The tie rods. Instead of the wire and screws of the kit, the replacements are resin, wire, tube and PE. The instructions call for the ball joint holders to be rounded out so the ball joints can work.... well I dont think I will be playing with it so they ended as a nice tight push fit. Tight enough to stay put but just lose enough be able to pose the wheels.
View attachment 265476
Here you can see them a bit better. The PE set also included Mudguards but to be honest these look fine to me. Just need to remove the surplus from the supports and they are fine.
Right then better get on with the rear set...
Attachments
G
Guest
Guest
That trailer looks complex, so many parts, lots of detail in this one, I like!
That trailer looks complex, so many parts, lots of detail in this one, I like!
There is so much going on in those last two pictures. It certainly is well detailed
I agree with you both. In fact I could be tempted to say that this is one of the more complex builds I have done, so far, and just for good measure I'm doing the PE as well; though I admit I am leaving a lot off as the Plastic is pretty good. I am being, whats the word..... Selective. If it's not a great improvement or is not going to be seen, leave it off.
")
The reason that I purchased the FOUR sets of PE is purely down to the fact that Aber, in a great marketing move put the key components a couple in each set.
The drivers canopy 'pram hood' was in one set, the one for the trailer drivers compartment in an other..... that sort of thing gets my goat a bit
 .
.I agree with you both. In fact I could be tempted to say that this is one of the more complex builds I have done, so far, and just for good measure I'm doing the PE as well; though I admit I am leaving a lot off as the Plastic is pretty good. I am being, whats the word..... Selective. If it's not a great improvement or is not going to be seen, leave it off.
The reason that I purchased the FOUR sets of PE is purely down to the fact that Aber, in a great marketing move put the key components a couple in each set.
The drivers canopy 'pram hood' was in one set, the one for the trailer drivers compartment in an other..... that sort of thing gets my goat a bit
The scum bags, someone knew what they were doing !
The reason that I purchased the FOUR sets of PE is purely down to the fact that Aber, in a great marketing move put the key components a couple in each set.
The drivers canopy 'pram hood' was in one set, the one for the trailer drivers compartment in an other..... that sort of thing gets my goat a bit
Looking good Ian But that's business for you.
G
Guest
Guest
That's looking great Ian.
Well it has been precipitating profusely today so I hid myself away for and hour or two to stick some plastic together....
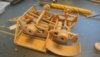
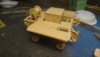
Rear boogie set all done bar a dozen or so bits... As an indicator, each axle consists of two half's each hub consists of five. Those pesky linkage rods are five parts each (should be 7...) thats 44 parts just for the two axles. (88 for all four. I have built complete kits with less parts than that !!!)
What ever. Need to do the rear driver compartment then its on to the flatbed....View attachment 265515View attachment 265516View attachment 265517View attachment 265518
Should be a blast to paint :/
Rear boogie set all done bar a dozen or so bits...
As an indicator, each axle consists of two half's each hub consists of five. Those pesky linkage rods are five parts each (should be 7...) thats 44 parts just for the two axles. (88 for all four. I have built complete kits with less parts than that !!!)What ever. Need to do the rear driver compartment then its on to the flatbed....View attachment 265515View attachment 265516View attachment 265517View attachment 265518
Should be a blast to paint :/
Attachments
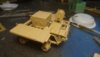
Still slogging away at it. It's freezing out side so I hid away in the den for a while.
View attachment 265680
View attachment 265681
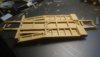
I got 95% of the trailer bed done. It is the least complicated part of the build.
View attachment 265682
Added a few larger bits and bobs to the rear boogie set.
And just to get an idea of the total object:
View attachment 265683
So far so good but there are still a load of parts in the box! I guess at some point soon I will get to prime/Paint it....
View attachment 265680
View attachment 265681
I got 95% of the trailer bed done. It is the least complicated part of the build.
View attachment 265682
Added a few larger bits and bobs to the rear boogie set.
And just to get an idea of the total object:
View attachment 265683
So far so good but there are still a load of parts in the box! I guess at some point soon I will get to prime/Paint it....
Attachments
G
Guest
Guest
Still slogging away at it. It's freezing out side so I hid away in the den for a while.
View attachment 265680
View attachment 265681
I got 95% of the trailer bed done. It is the least complicated part of the build.
View attachment 265682
Added a few larger bits and bobs to the rear boogie set.
And just to get an idea of the total object:
View attachment 265683
So far so good but there are still a load of parts in the box! I guess at some point soon I will get to prime/Paint it....
Coming along very nicely sir.
G
Guest
Guest
Have you not finished that little job yet? 
Amazing looking kit Ian, you are doing a cracking job on it.
Amazing looking kit Ian, you are doing a cracking job on it.
G
Guest
Guest
Wow, this really is magnificent. What an exciting kit this is Ian
1/3
Amazing work so far Ian now I am glad that I can't afford one to many bits for me.
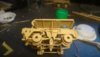
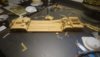
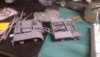
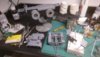
Phew! Got some primer on most of the trailer parts. It was not until I took the pictures I realised that I have forgotten the side parts for the rear driver cabin! Bugger!
Anyway, I was thinking that this is going to be German Grey then hairspray then the fender markings then the Desert yellow.... sound like a good idea?
View attachment 266174
Darn thing took three if not four Airbrush cups to spray and its still a bit patchy.
View attachment 266175View attachment 266176
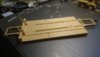
The 'Wooden' ramps and blocks are going to get painted as Oak first then a bit of hairspray befor the final paints. ditto the metal ones. Only in metal first, not oak
As I have already painted the Famo Yellow, I guess I will have to try a different approach to the weathering on that. Sponge? brush chipping? Hmmm.
Anyway, I was thinking that this is going to be German Grey then hairspray then the fender markings then the Desert yellow.... sound like a good idea?
View attachment 266174
Darn thing took three if not four Airbrush cups to spray and its still a bit patchy.
View attachment 266175View attachment 266176
The 'Wooden' ramps and blocks are going to get painted as Oak first then a bit of hairspray befor the final paints. ditto the metal ones. Only in metal first, not oak
As I have already painted the Famo Yellow, I guess I will have to try a different approach to the weathering on that. Sponge? brush chipping? Hmmm.
Attachments

- Status
- Not open for further replies.
Legal Notice
scalemodelling.co.uk is a privately operated online discussion forum. All content posted by members reflects their own views and opinions and does not necessarily represent those of the forum owners or administrators. While reasonable efforts are made to moderate content, no responsibility is accepted for user-generated material. By using this site, you agree to comply with UK law and the forum rules.
Currently on our website
Threads
37,405
Messages
707,857
Members
2,652
Latest member
Waffenträger Auf E-100