
You are using an out of date browser. It may not display this or other websites correctly.
You should upgrade or use an alternative browser.
You should upgrade or use an alternative browser.
Ian M's Sea Vixen FAW2
- Thread starter Ian M
- Start date
- Status
- Not open for further replies.
Cheers Colin, Yes the price is falling on them- I might get another one if I pull this one off and do the FAW! conversion on it. We'll have to see about that.
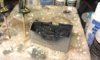
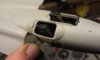
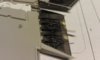
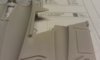
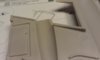
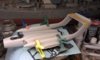
Right then, spent a couple of hours painting the cock pit up and the seats. So they are soon ready to be put to use.
View attachment 51660 View attachment 51661 View attachment 51662
Next up the Air-break.
View attachment 51663
I realised that after almost a week of building and I have not even touched the actual kit yet other than to check the fit.
Ian M
View attachment 54245
View attachment 54246
View attachment 54247
View attachment 54248
View attachment 167271
View attachment 167272
View attachment 167273
View attachment 167274
Attachments

G
Guest
Guest
Very sharp looking office Ian. I know what you mean about not touching the actual kit for what seems a long time into the build ,it comes with the turf when dealing with the added goodies! Things do seem to really take off quickly when it all gets to the kit parts merging with the a/m bits though!
I've been squeezing in the odd hour here and there and due to a pair of knees that did not want to do anything involving bending took a sick day. :-(
Up date time.
View attachment 51786
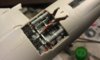
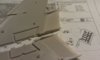
The airbreak box loads of nice detail hidden here.
View attachment 51797 View attachment 51796 View attachment 51795
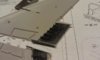
Got the office, the air break and the wheel wells fitted.
View attachment 51787 View attachment 51788 View attachment 51789 View attachment 51790 View attachment 51791 View attachment 51792 View attachment 51793 View attachment 51794
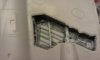
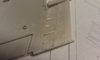
The ribs moulded into the flap boxes in the wing all have to go, so its time for a new blade in the trusty Swann and Morten. The PE part where to put it bluntly a pain in the rear!!! The result was a bit messy but should look a lot better with a bit of paint and gunk.
View attachment 51798
So.. booms, wings, tail wing, all sitting clamped and drying.
I have yet to fill the main body with the intakes, exhaust and some lead to keep the nose wheel on the deck.
More later.
Ian M
View attachment 54358
View attachment 54359
View attachment 54360
View attachment 54361
View attachment 54362
View attachment 54363
View attachment 54364
View attachment 54365
View attachment 54366
View attachment 54367
View attachment 54368
View attachment 54369
View attachment 54370
View attachment 167384
View attachment 167385
View attachment 167386
View attachment 167387
View attachment 167388
View attachment 167389
View attachment 167390
View attachment 167391
View attachment 167392
View attachment 167393
View attachment 167394
View attachment 167395
View attachment 167396
Up date time.
View attachment 51786
The airbreak box loads of nice detail hidden here.
View attachment 51797 View attachment 51796 View attachment 51795
Got the office, the air break and the wheel wells fitted.
View attachment 51787 View attachment 51788 View attachment 51789 View attachment 51790 View attachment 51791 View attachment 51792 View attachment 51793 View attachment 51794
The ribs moulded into the flap boxes in the wing all have to go, so its time for a new blade in the trusty Swann and Morten. The PE part where to put it bluntly a pain in the rear!!! The result was a bit messy but should look a lot better with a bit of paint and gunk.
View attachment 51798
So.. booms, wings, tail wing, all sitting clamped and drying.
I have yet to fill the main body with the intakes, exhaust and some lead to keep the nose wheel on the deck.
More later.
Ian M
View attachment 54358
View attachment 54359
View attachment 54360
View attachment 54361
View attachment 54362
View attachment 54363
View attachment 54364
View attachment 54365
View attachment 54366
View attachment 54367
View attachment 54368
View attachment 54369
View attachment 54370
View attachment 167384
View attachment 167385
View attachment 167386
View attachment 167387
View attachment 167388
View attachment 167389
View attachment 167390
View attachment 167391
View attachment 167392
View attachment 167393
View attachment 167394
View attachment 167395
View attachment 167396
Attachments
-
 SV17.jpg2.7 KB · Views: 0
 -
 SV16.jpg2 KB · Views: 0
 -
 SV15.jpg2.4 KB · Views: 0
 -
 SV14.jpg1.6 KB · Views: 0
 -
 SV13.jpg1.8 KB · Views: 0
 -
 SV12.jpg1.8 KB · Views: 0
 -
 SV11.jpg1.4 KB · Views: 0
 -
 SV10.jpg1.4 KB · Views: 0
 -
 SV09.jpg1.6 KB · Views: 0
 -
 SV08.jpg1.6 KB · Views: 0
 -
 SV07.jpg1.3 KB · Views: 0
 -
 SV06.jpg1.5 KB · Views: 0
 -
 SV05.jpg2.1 KB · Views: 0
G
Guest
Guest
This is looking awesome ian.
G
Guest
Guest
lovely detail in this Ian,and the build is looking great
mobear
mobear
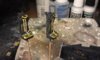
Well I'm still plugging away, between fighting the spam war. I have been busy with the drop tanks and the rocket packs. Having seam issues with them I can tell you.
I might make the red tops missiles as well and see how they look but I think I will go with four rocket pods, I'll see how the other bits turn out.
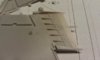
Spent a whole hour trying to get the top and bottom halves of the fuselage to join and line up. There were these large lumps of resin in the way and this aircraft has one of those shapes that makes it a total pain in the a"#¤¤ to clamp. Today was sanding and then fitting the twin booms. Now it looks like a Vixen!!! And now its wait for the glue to cure time.
View attachment 51889
Ian M
View attachment 54457
View attachment 167483
I might make the red tops missiles as well and see how they look but I think I will go with four rocket pods, I'll see how the other bits turn out.
Spent a whole hour trying to get the top and bottom halves of the fuselage to join and line up. There were these large lumps of resin in the way and this aircraft has one of those shapes that makes it a total pain in the a"#¤¤ to clamp. Today was sanding and then fitting the twin booms. Now it looks like a Vixen!!! And now its wait for the glue to cure time.
View attachment 51889
Ian M
View attachment 54457
View attachment 167483
Attachments
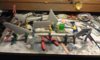
I am losing the plot! Ever time I look at the pile of bits on the desk I think "Primer time!!" then I look at the instructions again and find I have an ocean of parts that need to go on before I can prime.
This kite is literally littered with probes, antennae, vents, arieals, pilot tubes, they are all over the place.
Oh well maybe tomorrow then.
Ian M
This kite is literally littered with probes, antennae, vents, arieals, pilot tubes, they are all over the place.
Oh well maybe tomorrow then.
Ian M
") Keep the faith !
Keep the faith !
G
Guest
Guest
Looks a stunning model Ian, brings back memories of our EE Lightnings. Temptation is to rush it to get it finished, but I know your work, so have every confidence you will take the time needed to produce your usual 5 Star work. Cheers Derek
Cheers for the encouraging words chaps.
Part of the problem is not so much lack of motivation, I really chill out at my desk.
I can feel in my bones that the cold weather is on the way, my joints are all trying to out do each other to tell me.
Very busy at work, so when I get home that comfy armchair is so inviting.....
So its a case of get to the bench before I fall asleep. Trying to remove the tiny parts from the sprues and clean them up it a challenge when you have two eyes that are quite intent on looking each their own direction, trying to find a dark corner to sleep in!
Still I got most of the tiny bits sorted and some more of the larger parts are mounted ready for primer....
Right now the only thing on my mind is the Lasagne that is ready to come out the oven...
Ian M
G
Guest
Guest
Really looking good Ian. Starting to take shape nicely. I read a kit review and it made reference to how fun joining those fuse halves could be,geuss the added resin bits did'nt help either. Whats this cold weather thing you speak of ? ")
Thanks Trey. I have arthritis in my knees, elbows, shoulders, and a bit in my wrists and ankles. Now my fingers are joining in. Happy days.
Last night I discovered that those twin booms had moved while clamped to let the glue set.... Bugger
Spent almost an hour cutting then free at the by this time 100% cured join....
Not pretty but a,bucket of filler should sort it out...
Ian m.
Last night I discovered that those twin booms had moved while clamped to let the glue set.... Bugger
Spent almost an hour cutting then free at the by this time 100% cured join....
Not pretty but a,bucket of filler should sort it out...
Ian m.
G
Guest
Guest
Very nice & detailed model Ian. I like the wiring takes a lot of patience research to get the routes.
See you are using Tamiya glue. Have you tried Mr Cement it is quicker. It is rare for me to use clamps. Now using finger thumb & tacking ends & sides. Goes off (not obviously completely cured) enough to hold even springing bits. Hold each for about 45 secs then release. Springy bits longer. Then travel around the piece with further tacking holding firm with fingers at each point. Found with clamps they tend to hold at the point of contact but slightly open open the joint between clamps. My fingers thing gives a tight joint all round.
May be of course that your arthritis may not welcome this approach Ian. Sympathise I suffer form Psoriasis (skin thing) but which the condition some times can produce Psoriatic arthritis. For some reason it seems to have got better as the years roll on.
Laurie
G
Guest
Guest
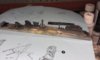
Ian, Some photos I took in the mid-late 1960's may be of some use. Taken at RNAS Lossiemouth and Leuchars. Derek
View attachment 52036View attachment 52037View attachment 52038
p.s. scanned from prints
View attachment 54596
View attachment 54597
View attachment 54598
View attachment 167622
View attachment 167623
View attachment 167624
View attachment 52036View attachment 52037View attachment 52038
p.s. scanned from prints
View attachment 54596
View attachment 54597
View attachment 54598
View attachment 167622
View attachment 167623
View attachment 167624
Thanks for the photos Derek, the first one has given me a good help with the rocket pods.
I might just try that Mr. Cement some day soon. Running low on the extra thin.
The reason for the clamps is two fold. The first being that I often use Revell contactor the one with the needle like spout. Sets up slow but gives a nice strong join. The second was because I was fighting a bend.
I had managed to put the booms on drunk. Not me the booms! So had to cut them off along the wing and force them in toward the fuselage!!! Talk about swear. I was not a happy man when I saw what had happened.
The Tamiya stuff normally dries very well with a little finger pressure and I dont normally clamp.
Just to really stir things up, I even use Humbrol liquid poly when I have no Tamiya thin.......
This evening I can report that the booms are now where they are meant to be and the rather horrific gap is now filled with milliput.
I have also started to prime the dangly bits, and hopefully Splash some primer on the fuselage tomorrow... Well I have a day off so why not!
Ian M
G
Guest
Guest
Ian, I use two Liquid cements. 'Plastic Weld' is excellent and dries almost instantly. 'Mr Cement' is also excellent but takes a few seconds to dry which can also be handy in certain circumstances. Cheers Derek\ said:Thanks for the photos Derek, the first one has given me a good help with the rocket pods.I might just try that Mr. Cement some day soon. Running low on the extra thin.
Ian M
- Status
- Not open for further replies.
Legal Notice
scalemodelling.co.uk is a privately operated online discussion forum. All content posted by members reflects their own views and opinions and does not necessarily represent those of the forum owners or administrators. While reasonable efforts are made to moderate content, no responsibility is accepted for user-generated material. By using this site, you agree to comply with UK law and the forum rules.