Theme editor

Scale Model Shop

IBG 1/72 Supermarine Spitfire PR Type A/B/E

Geoffers

SMF Supporters
Joined
Jan 26, 2017
Messages
2,225
Reaction score
759
Points
113
Age
61
1/3
Thread owner
Hello Chaps,

Having finished my Battle of Britain GB entry I decided to have a go at this recently released beauty 🙂

filedata/fetch?filedataid=255111
wAAACH5BAEKAAAALAAAAAABAAEAAAICRAEAOw==
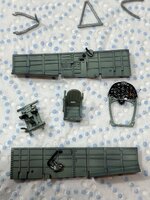
It covers the early versions of photo reconnaissance Spitfires and is very detailed. Hence a very stuffed box of plastic.

filedata/fetch?filedataid=255112
wAAACH5BAEKAAAALAAAAAABAAEAAAICRAEAOw==
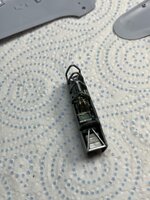
​​​​​It reminds me of Eduard kits in that it has quite a few unused parts so plenty for the spares box.
It includes a few pe parts and some resin wheels so some nice extras 😊

The instructions are very comprehensive, similar to Kotare from what I’ve seen of those.
IMG_4845.jpg IMG_4846.jpg

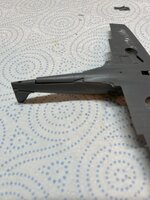
I’ve started by removing all the cockpit parts and getting them ready for painting. I have started to build up some of the cockpit parts to create sub assemblies.

IMG_4847.jpg
As you can see there are some tiny parts, I will do well not to lose any 😳

I’ll add another update soon, thanks for looking 👍

Geoff.
 
Looks VERY comprehensive geoff ! The amount of detail for a 1/72 is staggering , good luck trying to glue on the tiny brake lever on the control column !!( step 2 )
Ive got a 1/72 IBG kit in the stash - the PZL 23 Karas , and the interior is also very detailed like this one , so I’ll be following closely to see how it goes together. Cheers tony
 
Wow, this looks rather comprehensive Geoff, to use Tony's phrase again. I had never heard of IBG before, I see they are a Polish company.
 
Nice one fella.I wouldnt mind doing a PR early one in the Pinky colour.I used to have Pavla resin conversion for the Airfix kit but sadly lost in the mists of time.
Richard
 
Certainly looks to be a very detailed kit. I hope the fit is good. There is always the danger that in order to create fine detail the parts count is high and many parts are tiny and this can lead to fit issues. Trumpeter kits are often like this. I look forward to seeing how this goes. Can't have too many Spitfires :)
 
Thread owner
Glad to have you following along Tony. You’re right the amount of detail is crazy 😳 almost to the point of being too much really.
 
Thread owner
Hi Joe, I hadn’t heard of them until recently either. I think they originally did military vehicles but have started now with aircraft too.
 
Thread owner
That’s a shame Richard ☹️. I’m going to finish this one in the very early “Camotint”green.
 
Thread owner
Glad to have you along Nick. Yes it’s amazing the level of detail some manufacturers are achieving in 1/72 these days 👍
 
That does look amazingly detailed. I wonder what their larger scale kits are like ?
 
Thread owner
At the moment I think they only do 1/72 scale aircraft. They do 1/35 scale military vehicles which also look very detailed.
 
Thread owner
Bit of an update 😊

It’s taken a while to paint the various cockpit components. I’ve also added the multitude of tiny stencil/placard transfers. Most of them won’t be seen but I wanted to add them for completeness and to show what you get with the kit. If I was to build another one I probably wouldn’t bother with them.

IMG_4878.jpg
I spent some time ths evening slowly constructing the cockpit.
It went together well in the end but definitely needed a bit of patience to get it looking ok.

IMG_4890.jpg IMG_4888.jpg
IMG_4889.jpg
The two fuselage side were then joined and the cockpit tub pushed up into place from the underside.

IMG_4892.jpg

IMG_4893.jpg
I think that’s the most complicated part of the build done 🤞

Thanks for looking 👍

Geoff.
 

Attachments

  • IMG_4873.jpg
    IMG_4873.jpg
    333.1 KB · Views: 0
  • IMG_4891.jpg
    IMG_4891.jpg
    340.8 KB · Views: 0
Thread owner
Goodness me that is a lot of parts for 1/72. Looking good Geoff

Thanks Joe 👍

Yes a lot of parts which unfortunately won’t be seen. Doesn’t really seem any point in them really other than the fact you know they are there 🤔

Geoff.
 
Thread owner
I’ve been plugging away at this over the last couple of days.

On the original aircraft the guns were all removed to save weight. As IBG have moulded the wing to be able to be used in the various other marks of Spitfire they intend to release they have moulded it with the shell ejector chutes in place. These had to be filled, I tried using suitable sized plastic rod on one side but this wasn’t too neat so on the other side I blanked off the chutes from the inside of the wing and filled the holes with filler.
Due to the amount of detail on the wings I didn’t really want to start sanding as it would be very difficult to reinstate the lost detail. I decided to use Perfect Plastic Putty to prevent this.

Once this was done it was time to start putting it all together.

Unfortunately the fit so far has been a bit iffy and a bit disappointing really 😔

First up the lower wing didn’t fit well.

IMG_4902.jpg This was caused by the bottom part of the cockpit tub being too low.

IMG_4903.jpg I did wonder if I’d put it in wrong or at an odd angle but all the upper arches seem to fit snuggly into the upper part of the fuselage so I don’t think that’s the case.

So it was out with the sanding sticks/ grinder to thin out the bottom of the tub sufficiently to allow the wings to fit correctly.

Once this was done I added the fuel tank and engine cowlings. Again there were some fit issues.

IMG_4900.jpg This seemed to be as a result of it not fitting over the instrument panel. This was trimmed back and a better fit was achieved.

IMG_4904.jpg The front of the wing roots come as separate pieces so these were next to be applied.

So far I’ve got most of the fuselage together but will have some gaps to fill.

IMG_4906.jpg IMG_4905.jpg

So that’s the progress so far, a bit more to do.

Thanks for looking 👍

Geoff.
 

Attachments

  • IMG_4902.jpg
    IMG_4902.jpg
    211.9 KB · Views: 0
Thread owner
Bit more done this morning.

IMG_4907.jpg IMG_4908.jpg
Just the oil cooler/radiator to add then fill in the gun barrels on the wings.
After that it will be time for some gap filling/clean up before it’s time for paint.

Thanks for looking 👍

Geoff.
 
Back
Top