Theme editor

Scale Model Shop

(IBG) PZL 42 - Polish Light Bomber - 1:72

pjgtech

SMF Supporters
Joined
Dec 28, 2023
Messages
1,556
Reaction score
1,360
Points
113
Age
61
Location
Kent, UK
1/3
Thread owner
My first build of 2025 and its my first plane since I was about 12, so a long, long, long time ago. 😎
An IBG Polish Light Bomber - PZL 42 in 1:72 scale.

Personally I have never heard of this manufacturer? But the sprues look very clean and well detailed. (Pics further down...)

This kit was from a small auction haul that I bought a couple of months ago, where I got five kits for £15 (incl fees), etc, so £3 each, a bargain!
This kit also has a small photo etch sprue, so my first kit with PE, so we'll see how that goes....

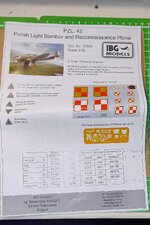
The instructions do have English, but they seem to be a bit "vague" to say the least, not as easy to follow as Airfix, Revell or Tamiya IMHO. You do have to look very closely at the instructions / diagrams to try to work out which bit goes where, but we'll figure it out as we go along.
I now also have a small plane "jig" or stand, so will get a chance to try that out and see if it works and if its useful and see if it actually helps with the build.

Back in the day, I used to have my model planes hanging from the bedroom ceiling on bits of cotton, in an attempt to have my own "dogfights". 😂🛩

Looking forward to building this one, I am treating these "cheap" auction haul kits as my learning projects for Planes, as I have a couple of nicer models to build a bit later on, eg: a nice Mossie and Junkers JU88, and I definitely want to build a nice Lancaster and Flying Fortress at some stage.
So if I make a few mistakes, (highly likely) on these cheap ones, I will not be too bothered and hopefully learn from my mistakes for the later projects.

Here's the box art and sprues.....
Click image for larger version  Name:	PZL PolishBomb 3jan25 origkit (11).jpg Views:	0 Size:	345.1 KB ID:	1245067
Click image for larger version  Name:	PZL PolishBomb 3jan25 origkit (3).jpg Views:	0 Size:	422.7 KB ID:	1245068
Click image for larger version  Name:	PZL PolishBomb 3jan25 origkit (11).jpg Views:	0 Size:	345.1 KB ID:	1245067
 

Attachments

  • PZL PolishBomb 3jan25 origkit (6).jpg
    PZL PolishBomb 3jan25 origkit (6).jpg
    339.3 KB · Views: 0
Last edited:
Thread owner
Made a small start....
just starting to put together the little cockpit interior details.
My first attempt with the photo etched parts too, blimey they are tiny!
But I have so far managed to not lose them or have them fly across the room...... yet (touches wood!) Lol....
Looking a nice little kit though to be fair....
Pic:

polbomb3jan25PEparts (1).jpg
 
IBG do have nice kits. I've built a couple but not one of their planes. Looks as if you have sorted the PE. Canopy looks as if it will be quite fiddly to paint.
 
Thread owner
Used a thick CA on the PE, it does not go off really fast, so gives a little bit of wiggle room, Hopefully it will stay stuck ok?
 
Thread owner
Despite buying a dedicated PE bending tool (not yet arrived), I found a nice small pair of flat surface and flat edged pliers, (sort of jewellers type) in the garage, and they are ideal for bending small PE parts, so good result there. 👍
 
Thread owner
Little update.
Wings glued and most stuff primed...

Painted interior cockpit area....still needs another coat at this stage...
PZL polish lite bomb 5jan25 (2).jpg
Cockpit glass masked and first coat on. I'm only painting the thick parts/struts, as my painting skills are not up to the very thin parts!
Also put the decals on the cockpit display/controls...
PZL polish lite bomb 5jan25 (4).jpg
My new plane stand is already proving useful...... 8-)

PZL polish lite bomb 5jan25 (3).jpg

Started the main body / fuselage assembly, one side in, and the internal cockpit fitment, but blow me its fiddly!
PZL polish lite bomb 5jan25 (5).jpg
Now added few other parts to the internal cockpit area.
I can see that getting them to line up with the other half of the main body/fuselage will be fun!

PZL polish lite bomb 5jan25 (6).jpg
Wheels, undercarriage done, no instructions for how to do that and the kit has wheel struts / supports that don't appear to fit anywhere?
There is no room for them in the wheel housing, only room for the wheels and thats it, so.......? Spare parts for another kit I suppose.... Lol

PZL polish lite bomb 5jan25 (7).jpg
 
You're making good progress. The PE kooks like it's adding detail. I've only used PE.once and that too was on a 1/72 scale aircraft. It was fiddly and added nothing.

I love how you've primed in black too. On my latest build as part of the memorial GB, I've primed black for the first time. I'm a brush painter like you so looking forward to see how easy it is to get the lighter colours down.
 
Thread owner
I tend to use black primer as IMO it shows up any imperfections well. Obviously brush painting I tend to do lots of thin coats and build it up, at least three coats, usually four.
 
Thread owner
Have glued the other side of the main body/fuselage on now, it was a tight fit, but got there in the end.
I had to bend one wing back slightly to snap the fuselage into place, was a tense moment as I did not want to break the wing!
But, the front section is not quite meeting flush, there is un underside bit that sort of curves up to meet the two halves of the front body, but there's a small gap, too big to fill and so the propeller cowling is not going to fit? It will bend a little bit, so I might have to persuade it a tad, like I did with the fuselage....
 
Last edited:
Thread owner
Todays update...
With judicious use of mini clamps, I managed to close up the gap at the front just enough, and with a bit of filling and sanding, that I should now be able to get the propeller cowling on. Some pics....
PZL Polish Lite Bomb 6jan25  (1).jpg

PZL Polish Lite Bomb 6jan25  (2).jpg

PZL Polish Lite Bomb 6jan25  (6).jpg

PZL Polish Lite Bomb 6jan25  (5).jpg

PZL Polish Lite Bomb 6jan25  (4).jpg

PZL Polish Lite Bomb 6jan25  (7).jpg

PZL Polish Lite Bomb 6jan25  (3).jpg
I'm really liking the black colour, even though its only primer, so I'm seriously considering applying some kind of matt black as a final colour?
Different but quite cool.... we'll see.
 
Great progress peter , top work with the fiddly PE . Ive got one of the IBG kits in the stash , the PZL p23 - like this one but with a single tail . Like yours it looks a lovely kit , although it was a bit more than £3 !! You got a proper bargain there . Looking forward to the paint job , cheers tony
 
Thread owner
Construction almost complete now.
Undercarriage added.
Rear tail fins added.
Couple more (tiny) PE parts added, especially like the tiny front gun sight, not even sure if it shows up in the photos.
Done first bit of sanding the filled joints, but needs smoothing down a bit more, may even need more filler, before final coat of primer and then painting.
Pics.....
PZL Polish lite bomb 8jan25  (1).jpg
PZL Polish lite bomb 8jan25  (2).jpg
PZL Polish lite bomb 8jan25  (4).jpg
PZL Polish lite bomb 8jan25  (5).jpg
PZL Polish lite bomb 8jan25  (3).jpg
PZL Polish lite bomb 8jan25  (6).jpg
 
Thread owner
All built, primed and ready for paint..... But, as above, really like the look of the black, really tempted to maybe do some sort of matt black finish.

pzl 42 pol lite bomb 9jan25  (5).jpg
pzl 42 pol lite bomb 9jan25  (2).jpg
pzl 42 pol lite bomb 9jan25  (3).jpg
pzl 42 pol lite bomb 9jan25  (1).jpg

But no, think I'll stick with the kits suggested colours, so first coat on....
But as I'm brush painting it will be several thin coats, probably three or four.....

pzl 42 pol lite bomb 9jan25  (8).jpg
pzl 42 pol lite bomb 9jan25  (6).jpg
pzl 42 pol lite bomb 9jan25  (7).jpg
 
Peter,

That's an interesting subject not something you see everyday. I have heard of IBG I have built a few of their 35scale vehicles. Your doing a great job on this one.
 
Thread owner
Put three coats on the underside yesterday and it looks ok, not bad at all.
So today I am painting the top side, will probably be another three coats, each separated by a few hours.
Paint blurb says can be repainted after one hour, but I tend to leave it for at least 2 to 3 hours between coats, seems to work ok for me.
Onwards..... 8-)
 
Thread owner
Yep, actually I think it was four coats on the underside not three, as the first two coats tend to be a bit patchy, the third looks ok, and the 4th gives a good final coat, so will be four coats on the topside too. 8-)
 
Back
Top